ANIIMOGUIDE
ANIIMOGUIDE
000
ANIIMOGUIDE.COM

Gameplay · 8 min

Aniimo Photo Mode: Group Photos, Poses and Gaze

Photo mode is one key away and the group shot is four clicks deeper. AniimoSync walks the whole panel on camera: the Aniimo menu that summons your team, the move and rotate handles, the emote and pose pickers, the three gaze tabs, and the one checkbox at the top of the screen that decides how the picture actually looks.

AniimoSync YouTube channel avatar

Written by

AniimoSync

The walkthrough, the group photos, the footage and every screenshot on this page by AniimoSync

Subscribe
By AniimoSync
Video credit: AniimoSync on YouTube · embedded with attribution. Watch on YouTube

Press F7 to open photo mode, tick Enable Ultra Graphics at the top of the screen, then open the Aniimo Emotes tab and click the round Aniimo button to summon your team into the shot. Every Aniimo you summon gets its own position, rotation, pose and eye direction, and the shutter is Space.

That is the whole mode in one paragraph, and the reason most players never find it is that the group photo lives two clicks inside a tab whose icon is a cat. Nothing on the first screen says summon your Aniimo here.

The walkthrough below is AniimoSync’s, recorded in the Russet Highlands on 18 September 2026. Every button name, key prompt, tab label and pose name here was read off his screen and checked against the rest of the site. Where the two disagree, we say so.

How do you open photo mode in Aniimo?

Press F7. The camera button sits in the bottom left action bar in the open world, between the chat bubble on Enter and the emote wheel on O, and the prompt printed under it is F7.

Stand where you want the picture taken before you press it: photo mode unpins the camera but leaves your Pathfinder where they were. AniimoSync walks to the edge of a ridge first, so the mountains behind him are a choice rather than luck.

The Aniimo open world action bar showing the chat button on Enter, the camera button on F7 and the emote button on O
0:21, the button that starts everything. Bottom left of the normal HUD: chat on Enter, camera on F7, emotes on O. Cropped at native size from the recording, so this is the exact pixel size it is on screen.

Our Sparkelf event guide already tells you to press F7 for the statue photo task, and the two agree: same key, same camera, and the daily that wants a picture featuring any Aniimo is cleared from inside this mode.

Every photo mode control, and the key it sits on

Photo mode prints its own key map in the bottom left corner and its own buttons down the right rail, so nothing has to be memorised. The recording is PC and shows keyboard prompts only, so those are the only prompts we list.

What you want to doWhere it isPrompt on screen
Open photo modeCamera button, bottom left action barF7
Pan the cameraBottom left key mapW A S D
Tilt the cameraBottom left key mapE and Q
Spin the cameraBottom left key mapMouse
Take the photoWhite shutter circle, right railSpace
Freeze the worldTime Stop, right railG
Put the camera backReset, right railV
Track a subjectTrack, right railTab
Creative cameraCreative, right railR
Pose your PathfinderCharacter Emote, bottom barHand icon
Summon and pose AniimoAniimo Emotes, bottom barCat icon
Aim everyone’s eyesEye Direction, bottom barEyes icon
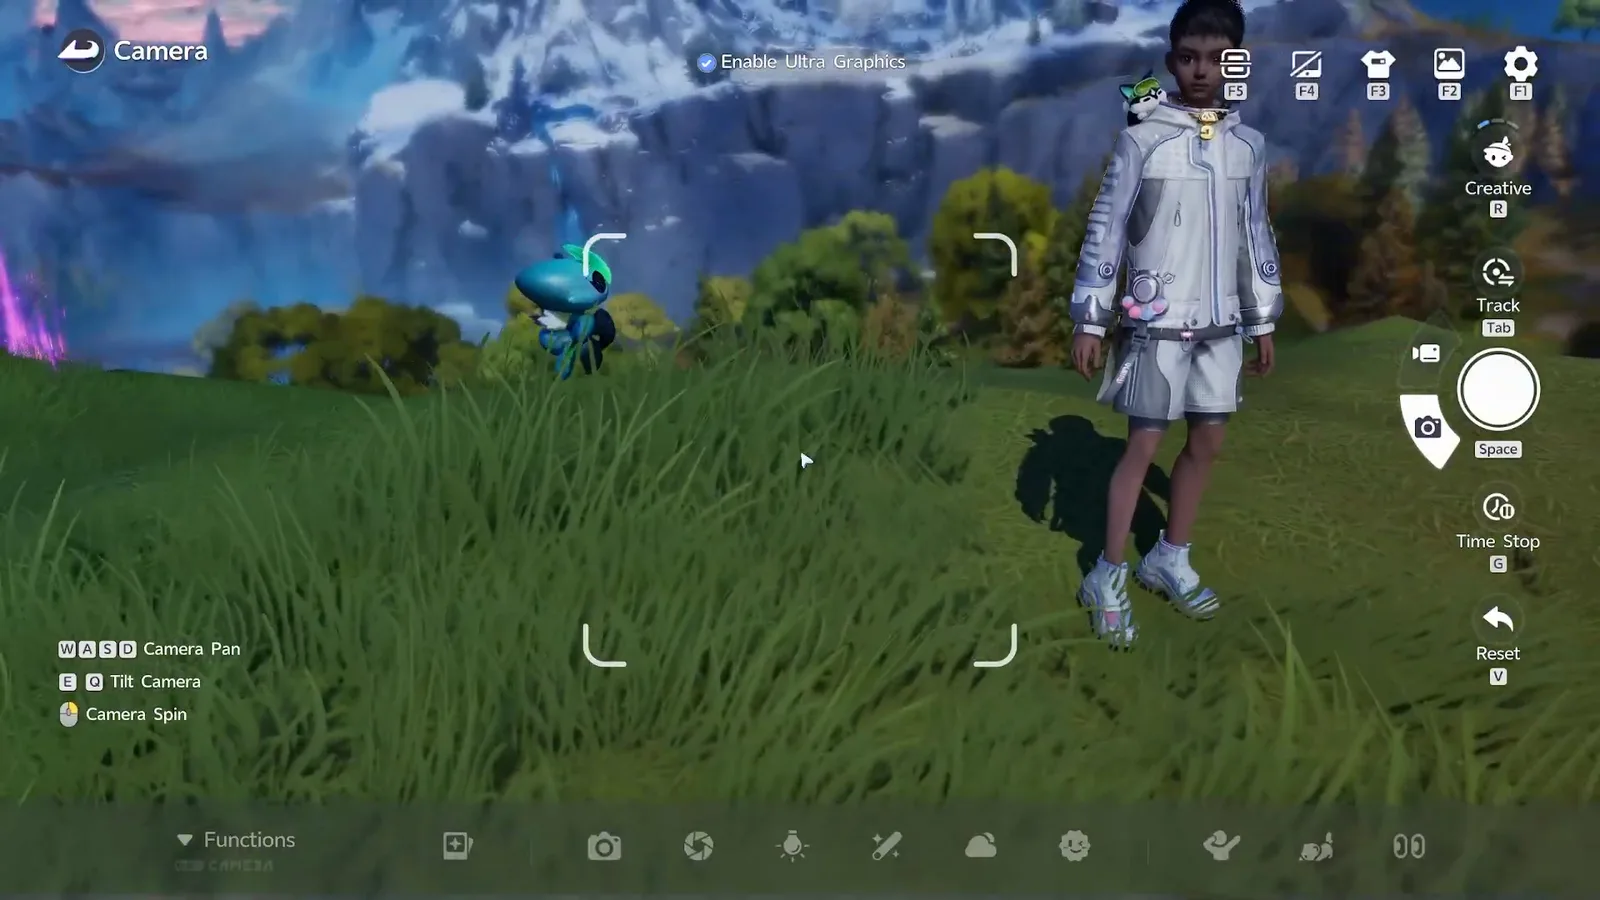
The Aniimo photo mode interface on first opening, with the Camera title, the Enable Ultra Graphics checkbox, the F1 to F5 icon row, the Creative, Track, shutter, Time Stop and Reset rail, and the WASD camera key map
0:31, the whole panel on first open. Title Camera top left, the Ultra checkbox alone at the top, F1 to F5 shortcuts top right, the camera rail down the right side, the key map bottom left, and the tabbed Functions bar along the bottom. Everything else in this guide lives in that bottom bar.
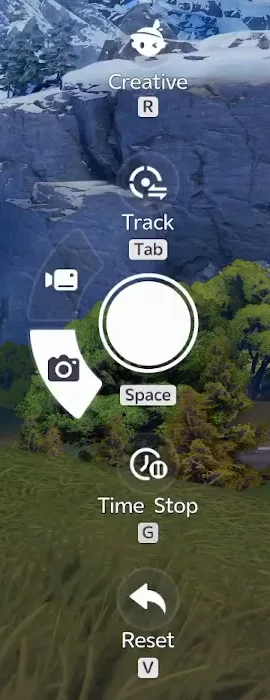
The Aniimo photo mode right hand rail: Creative on R, Track on Tab, the white shutter button on Space, Time Stop on G and Reset on V
The right rail, cropped at native size. From the top: Creative (R), Track (Tab), the shutter on Space with a photo and video toggle beside it, Time Stop (G) and Reset (V). Reset is the one to remember later.
The Aniimo photo mode Functions bar with filter and weather icons, and the Character Emote, Aniimo Emotes and Eye Direction buttons grouped at the right end
The bottom bar, cropped at native size. The tab name sits on the far left and changes as you click. The three buttons after the divider on the right are the ones this guide is about: hand for Character Emote, cat for Aniimo Emotes, eyes for Eye Direction. Here the eyes are underlined, so the label reads Eye Direction.

What does the Ultra Graphics photo toggle do?

Enable Ultra Graphics is a checkbox at the top centre of the photo mode screen that renders the shot at a higher quality than the game you were just playing. It is ticked in AniimoSync’s footage from the first frame and he calls it the detail that is easiest to miss.

It is a photo mode option rather than a graphics preset, which is why it is absent from the settings menu and why our system requirements page lists no Ultra tier: the published minimum is a GTX 1060 and the recommended card an RTX 3070, neither measured with this box ticked. Expect it to cost frames while the panel is open and nothing once you leave. The video never shows the same shot unticked, so we cannot offer a before and after.
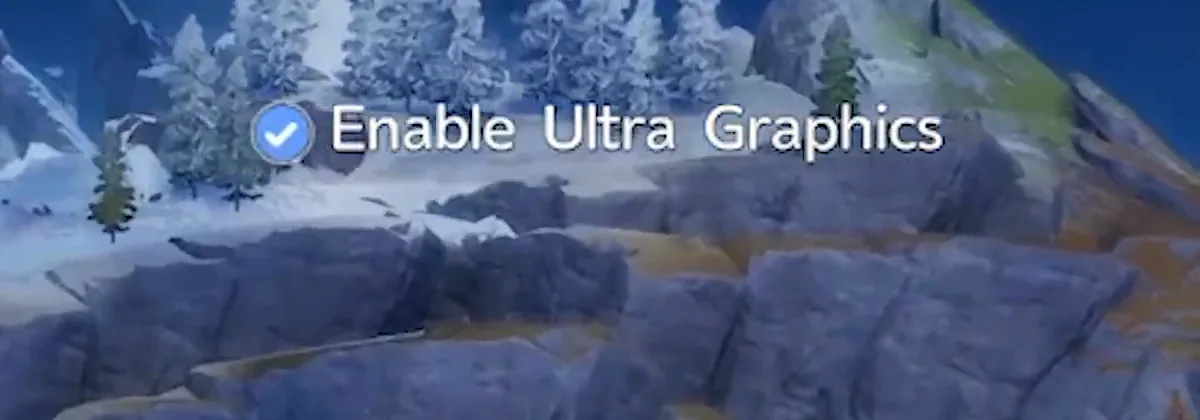
The Enable Ultra Graphics checkbox ticked at the top of the Aniimo photo mode screen, above a snowy mountain backdrop
0:07. One checkbox, top centre, no menu path and no submenu: Enable Ultra Graphics. AniimoSync’s words for what it buys you are the crispiest photos possible.

How do you take a group photo with your Aniimo?

Open the Aniimo Emotes tab with the cat icon at the right end of the bottom bar, then click the round Aniimo face underneath the camera button inside that panel. Your team appears as a column of portraits on the right, and every portrait you click summons that Aniimo into the shot.

This is the step the whole video exists for. The cat icon alone opens an emote strip for whoever is already out. The small dark circle with an Aniimo face on it, under the camera button, is what turns that strip into a roster.
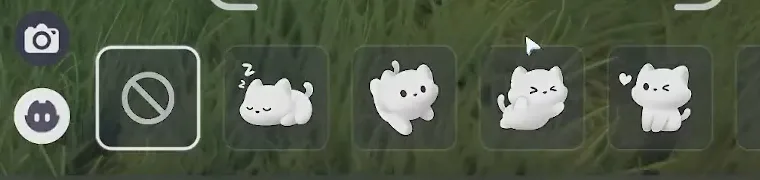
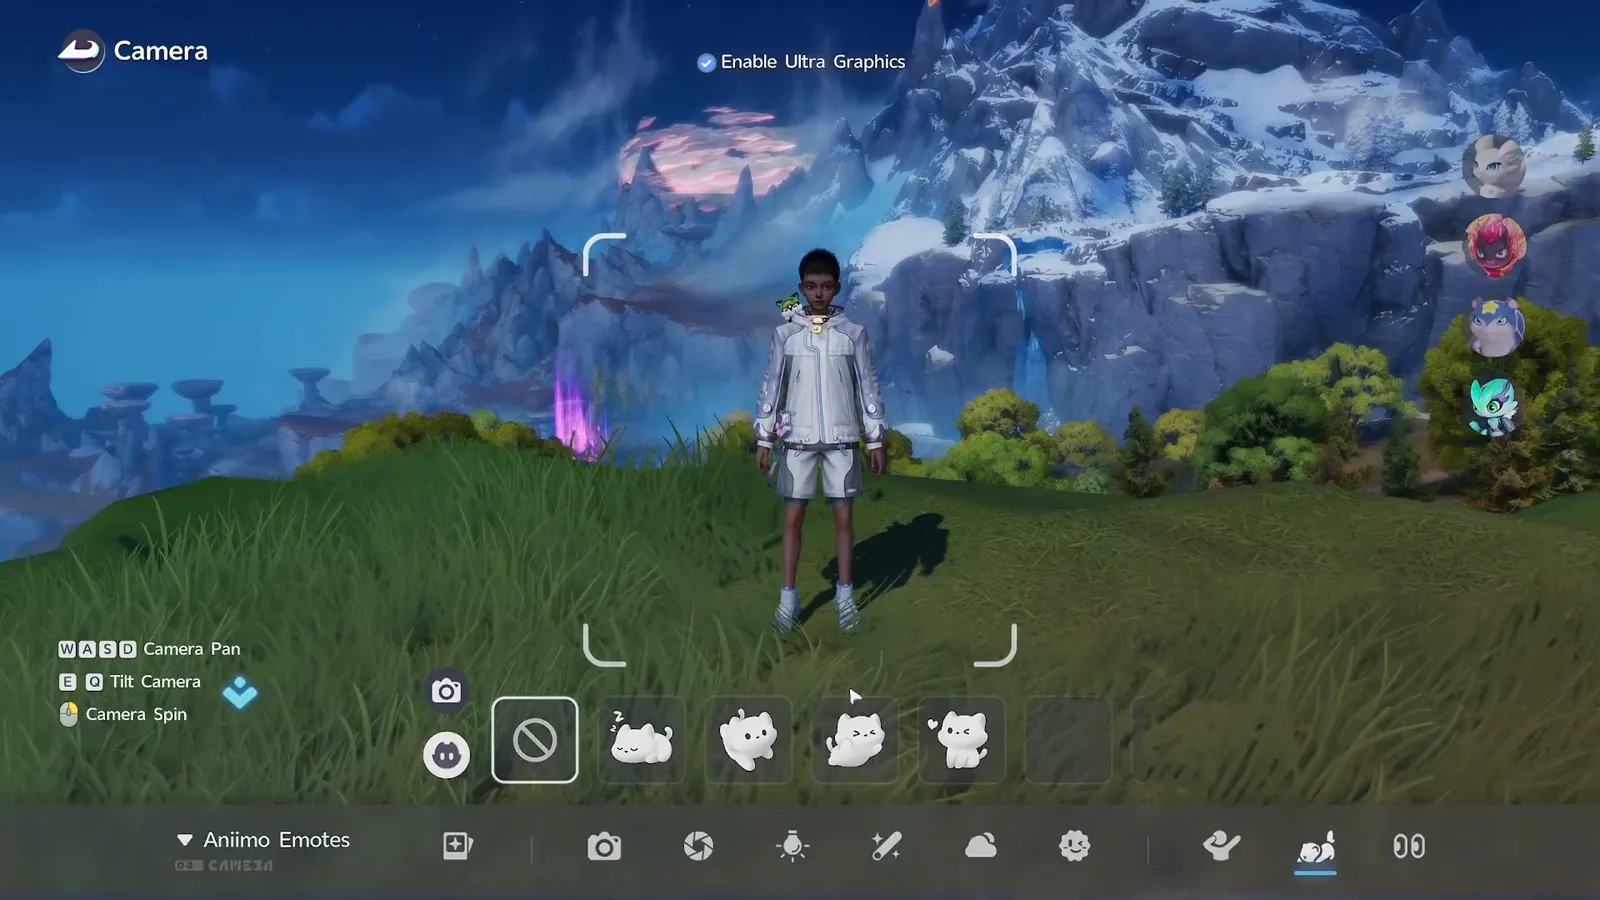
The Aniimo Emotes panel in photo mode with a camera button above a round Aniimo face button, beside the first emote tiles
0:43, cropped at native size. Two stacked buttons on the left of the emote strip: camera on top, Aniimo underneath. The lower one is the summon menu. The first tile in the strip, a circle with a line through it, clears the current pose.
The Aniimo summon list in photo mode: four Aniimo portraits stacked down the right edge beside the Pathfinder standing alone in grass
0:47. The column on the right is your active team, one portrait each, and nobody has been summoned yet. Clicking a face sends that Aniimo out. AniimoSync’s four are Lunara, Sparki in its Sea of Flowers Form, Celestis and Wisptis in its Forest Form.

The number you can have in frame is the number in that column, and in this build the column is your party: four. Nothing in photo mode reaches past it, so pick your team before you press F7 and use the Aniidex to decide who goes in.

Moving and rotating each Aniimo

The Aniimo you last clicked carries two handles: a four arrow cross for position, and a slider with a curved arrow at each end for rotation. Drag the cross to walk them around the scene, drag the slider to spin them on the spot.

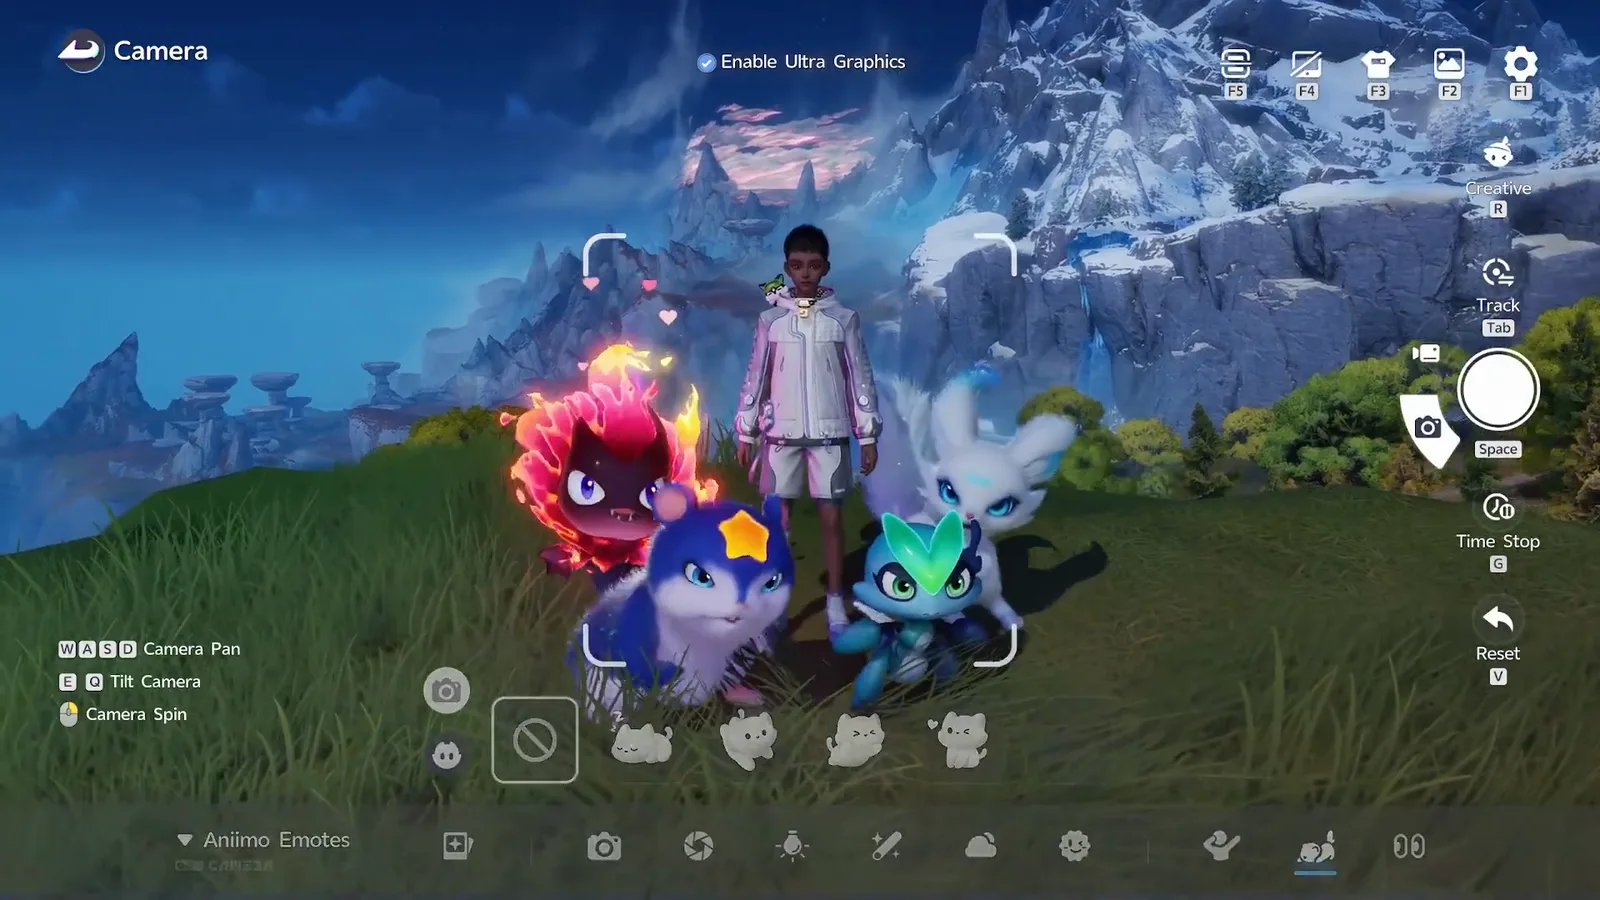
AniimoSync’s staging advice is the obvious one and it is right: put the short ones at the front. Celestis goes to the front row, the taller silhouettes fill in behind, and each of them gets turned a few degrees so nobody is presenting a shoulder to the lens.
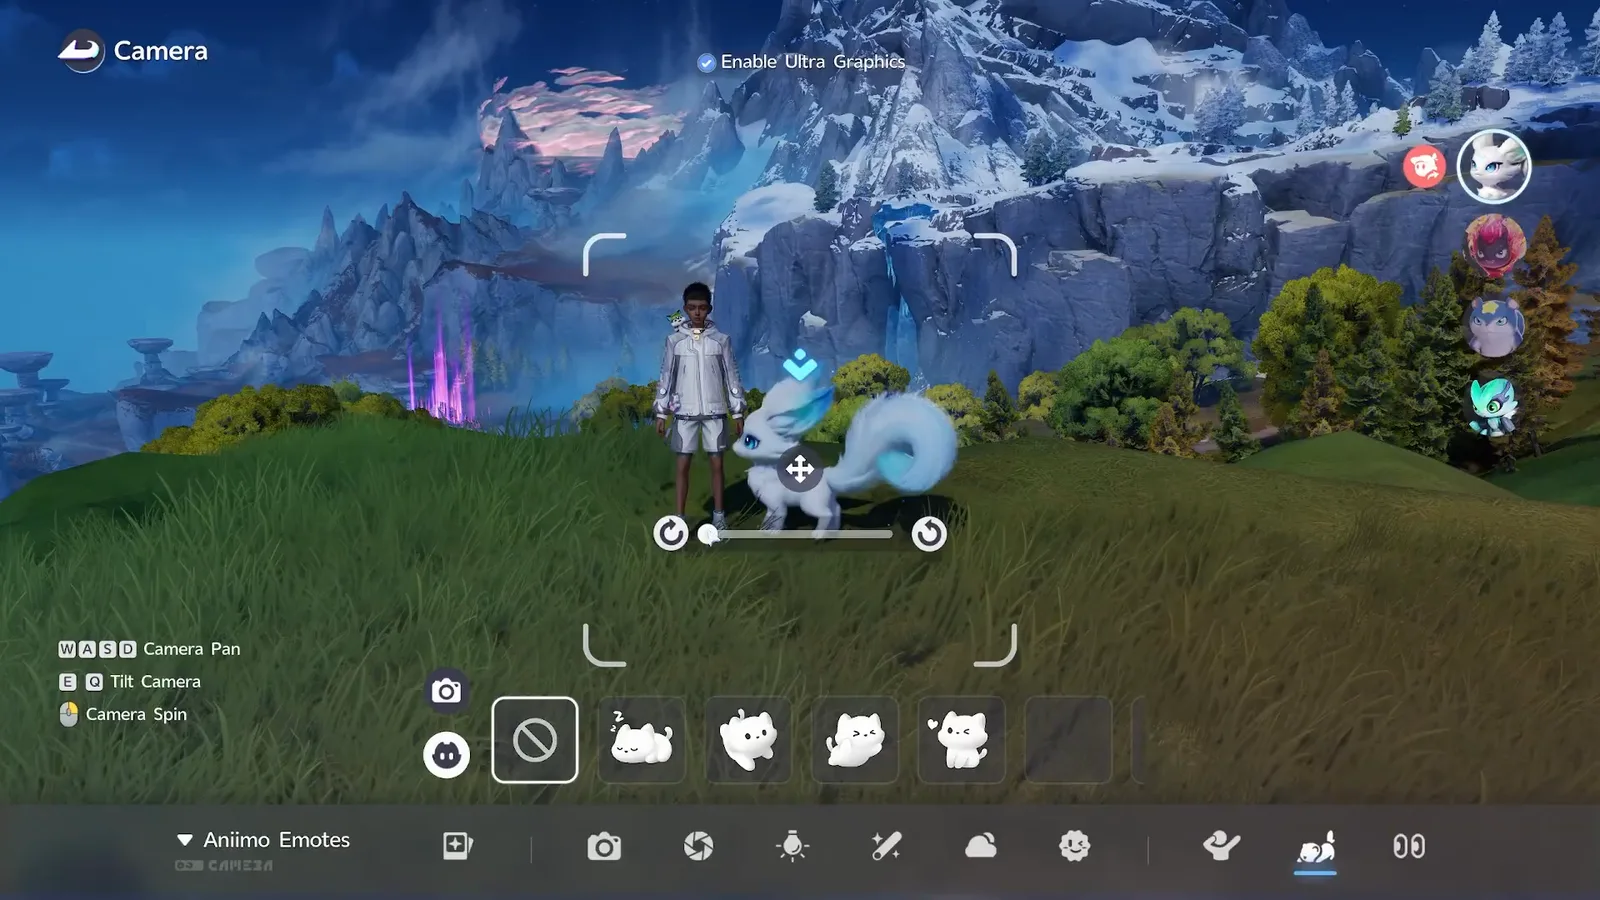
Lunara summoned in Aniimo photo mode beside the Pathfinder, with the four arrow move handle above it and the rotation slider below
1:00, the first Aniimo out. Lunara has the move cross on its back and the rotation slider under its feet, and the summon column on the right now shows which portrait is selected. Every Aniimo you add gets the same pair of handles.
Four Aniimo arranged around the Pathfinder in Aniimo photo mode: Sparki, Celestis, Wisptis and Lunara in tall grass with snowy peaks behind
1:31, arranged and ready. Short at the front, tall at the back, everyone turned inward. The group is framed inside the four corner guides, which is the crop the saved picture will use.

The group photo, step by step

  1. Walk to the spot first. Photo mode moves the camera, not your Pathfinder.
  2. Press F7. The title top left changes to Camera.
  3. Tick Enable Ultra Graphics, top centre.
  4. Click the cat icon at the right end of the bottom bar.
  5. Click the round Aniimo button under the camera button. The team column appears on the right.
  6. Click each portrait to summon that Aniimo.
  7. Drag the move cross and the rotation slider until the group sits well inside the corner guides.
  8. Pose them from the emote strip, one at a time.
  9. Set Eye Direction so nobody is looking off camera.
  10. Press Space, then Save Photo.
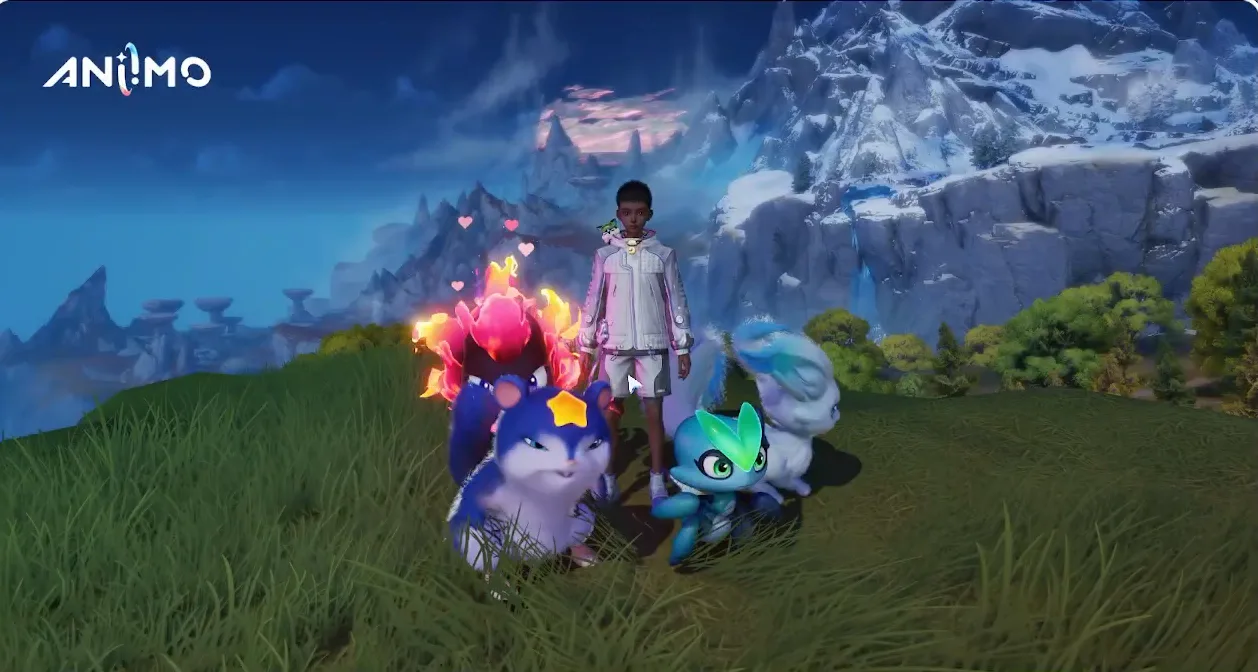
An Aniimo group photo: the Pathfinder standing in grass with Sparki, Celestis, Wisptis and Lunara, with snowy mountains and a pink cloud behind
The first saved picture, 1:34, with the interface out of the way. This is the group summoned and arranged but not yet posed, and it is also the shot AniimoSync points at to explain why the next two sections exist: Lunara is looking away.

How do you pose Aniimo in photo mode?

Go back into Aniimo Emotes, click the Aniimo you want in the column on the right, then click an emote in the strip along the bottom. Each Aniimo is posed separately, so you repeat it once per creature.

The strip starts with a circle and a line through it, meaning no pose, and the tiles after it are the emotes that Aniimo owns. Hovering one prints its name: the heart emote AniimoSync gives Lunara is called Like. Posing does not lock an Aniimo in place, so you can still nudge it afterwards.
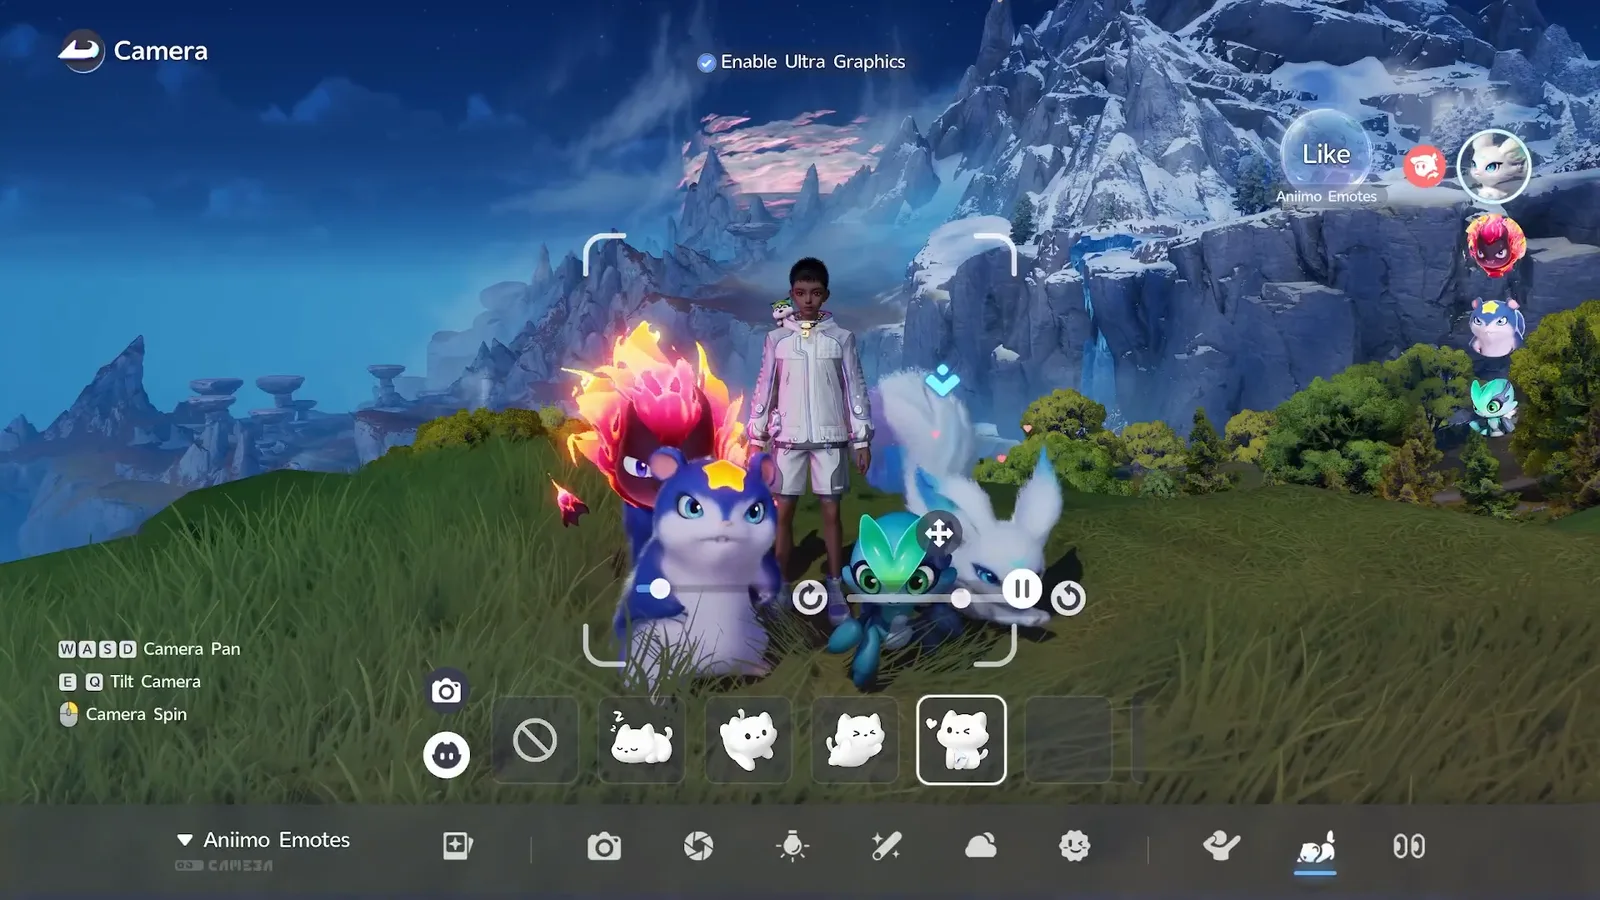
The Like emote selected for Lunara in Aniimo photo mode, with the emote strip along the bottom and the Aniimo portrait column on the right
1:58. Lunara is selected in the column on the right, the heart tile is highlighted in the strip, and the tooltip above the column reads Like · Aniimo Emotes. Hearts are already floating out of the group.

Work down the column, give each of the four something, then press Space again. The difference between the two saved pictures is the whole argument for bothering.
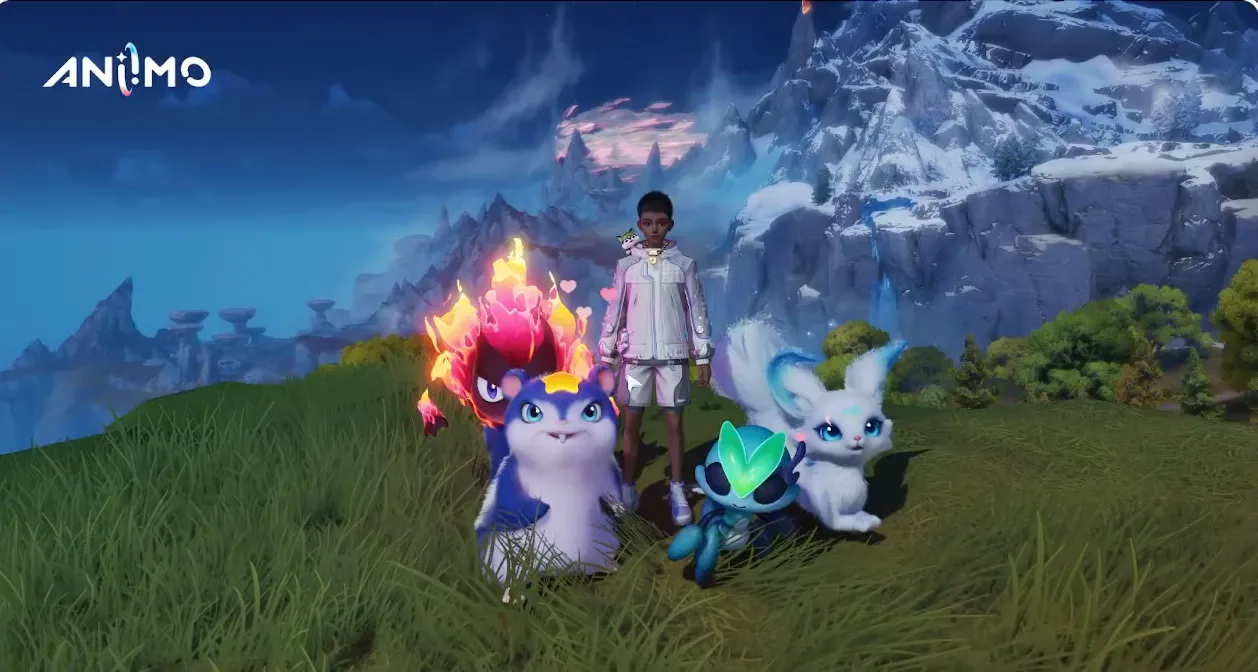
A posed Aniimo group photo: Sparki, Celestis, Wisptis and Lunara emoting around the Pathfinder in grass, hearts rising over the group
The posed version, 2:19. Same spot, same four Aniimo, same camera: only the emotes changed. Read it against the picture above and the point lands. These two figures are a pair.

Posing your Pathfinder: Static and Dynamic

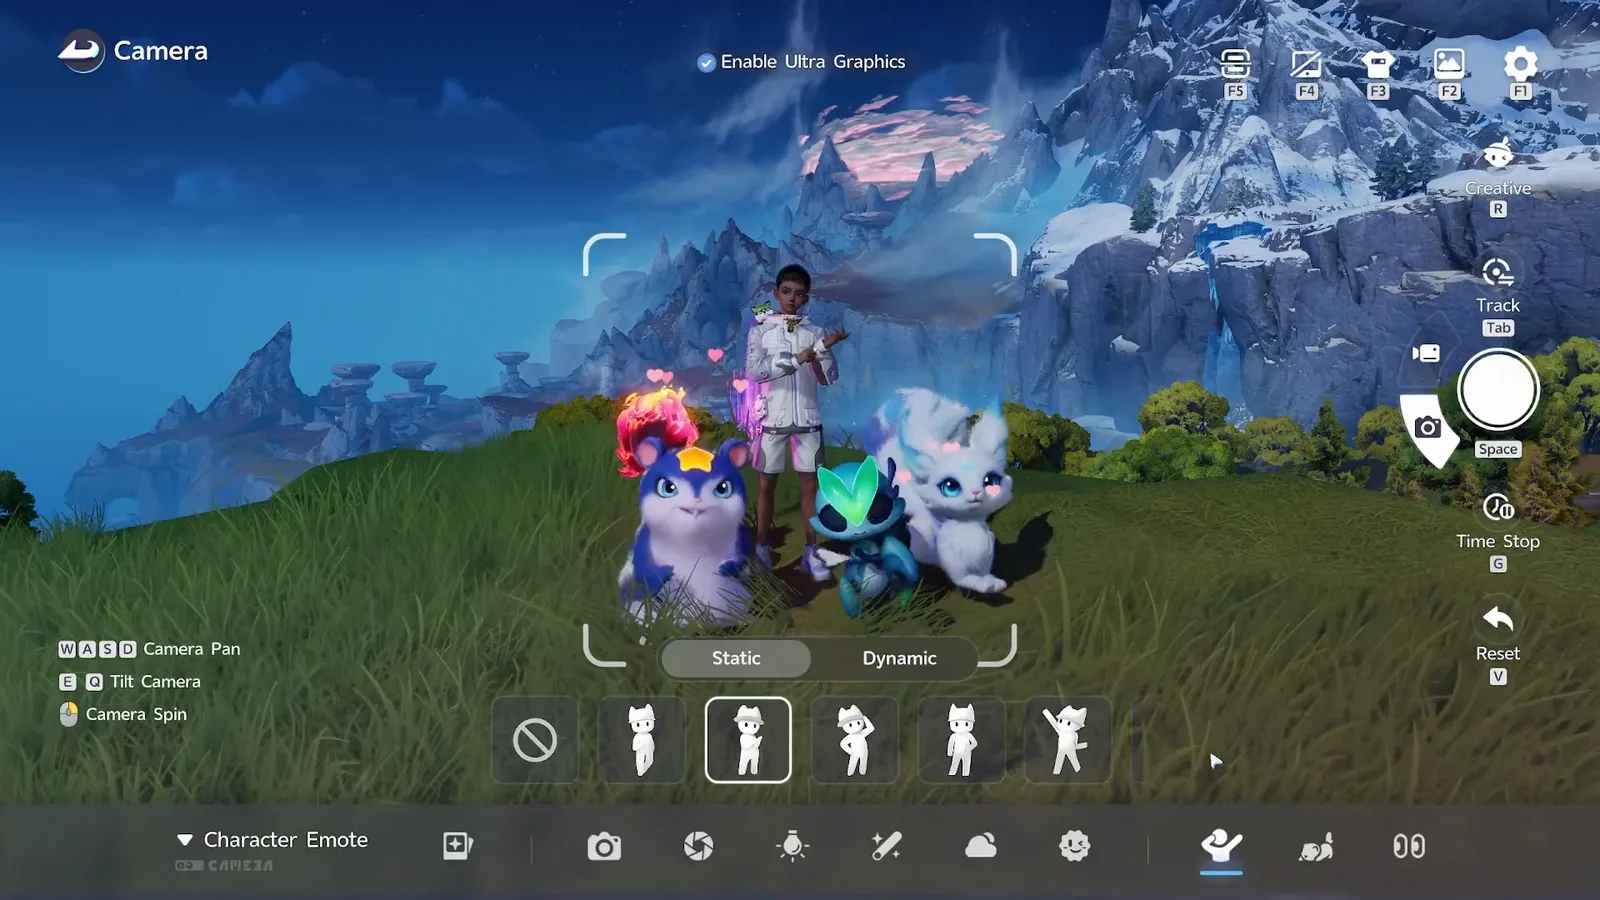
The hand icon at the right end of the bottom bar opens Character Emote, and that panel has two tabs: Static and Dynamic. Pick a pose, then click the hand icon again to close the panel before you shoot.

The tabs are what they sound like. A Static pose holds one frame, so the picture is the same whenever you press the shutter. A Dynamic pose runs an animation, livelier but the exact frame is down to your timing. Hovering a tile names it: the one AniimoSync settles on is Tenacious.
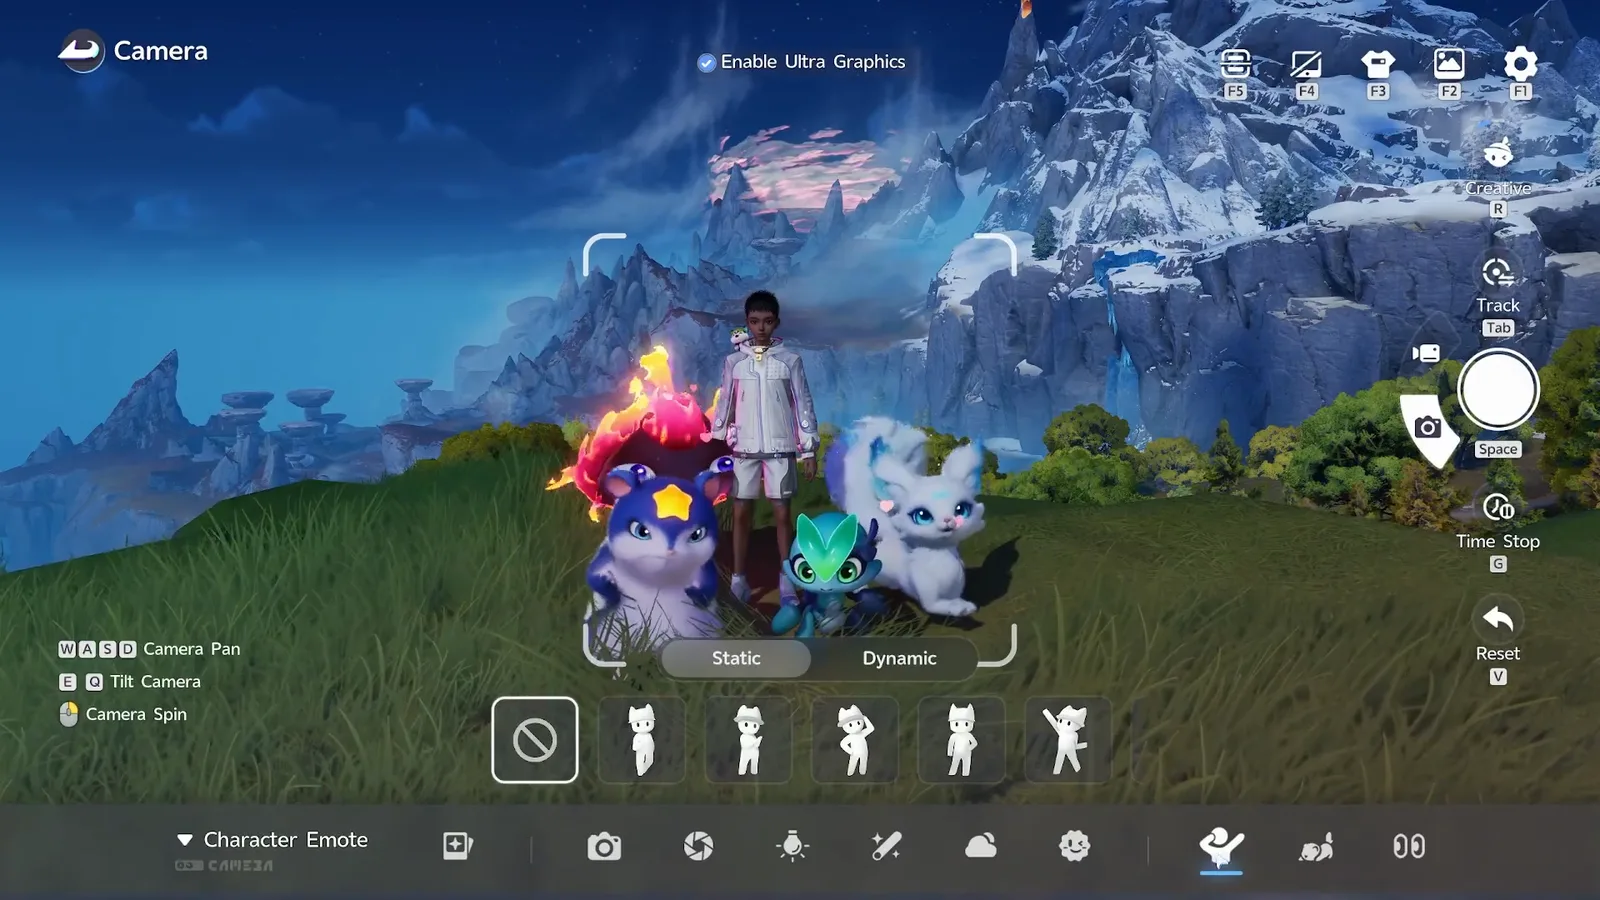
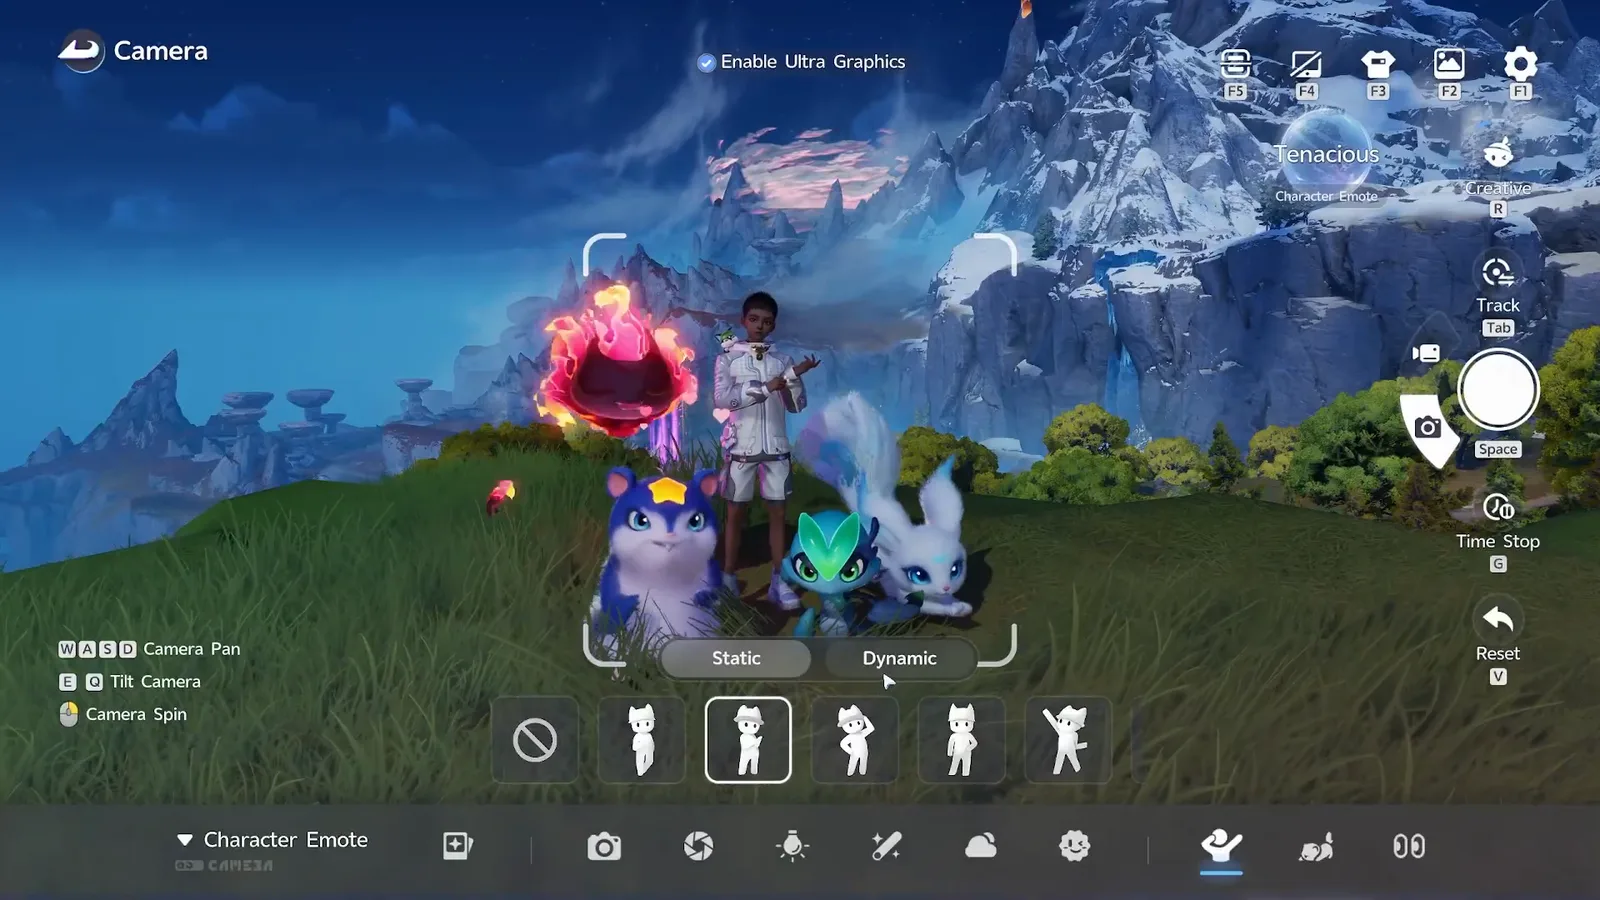
The Character Emote panel in Aniimo photo mode with the Static and Dynamic tabs above a row of Pathfinder pose tiles
2:27. The tab name bottom left now reads Character Emote, with Static and Dynamic above the pose tiles and the same circle and line meaning no pose. The Aniimo keep whatever emote you already gave them.
The Tenacious pose name shown in the Aniimo photo mode tooltip while the Pathfinder stands posed with four Aniimo in front of a mountain range
2:31. The tooltip top right reads Tenacious · Character Emote while the cursor sits on the Dynamic tab. Pose names only appear on hover, so this is the one place the game tells you what you are picking.
The Pathfinder in a static pose with a hand on one hip, standing behind Celestis, Wisptis and Lunara in Aniimo photo mode
2:38, the pose applied. Whatever your Pathfinder is wearing comes with them: the mode uses your equipped appearance items exactly as they are, so a shot is only as good as the outfit you walked in with.

How do you make Aniimo look at the camera?

Click the eyes icon at the right end of the bottom bar. Eye Direction has three tabs, Character Gaze, Aniimo Gaze and NPC Gaze, and each offers Natural, At Camera and Adjust. At Camera makes that subject follow the lens wherever you move it.

Natural is the default, and the default is why the first group photo has Lunara staring off to one side: every creature keeps its own idle look direction until you say otherwise.
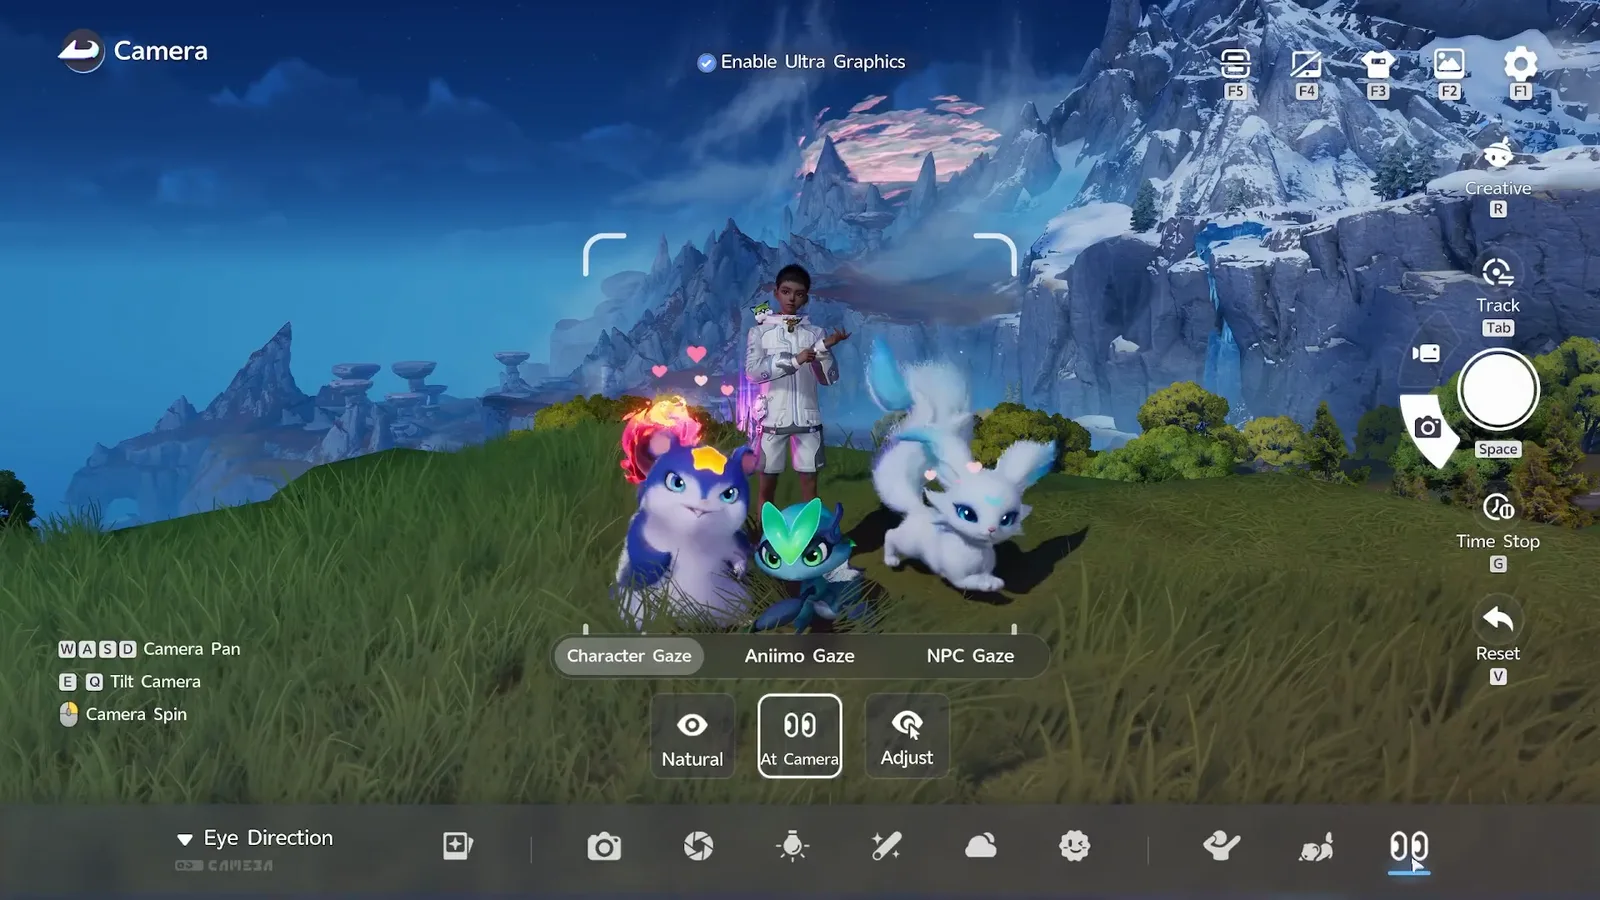
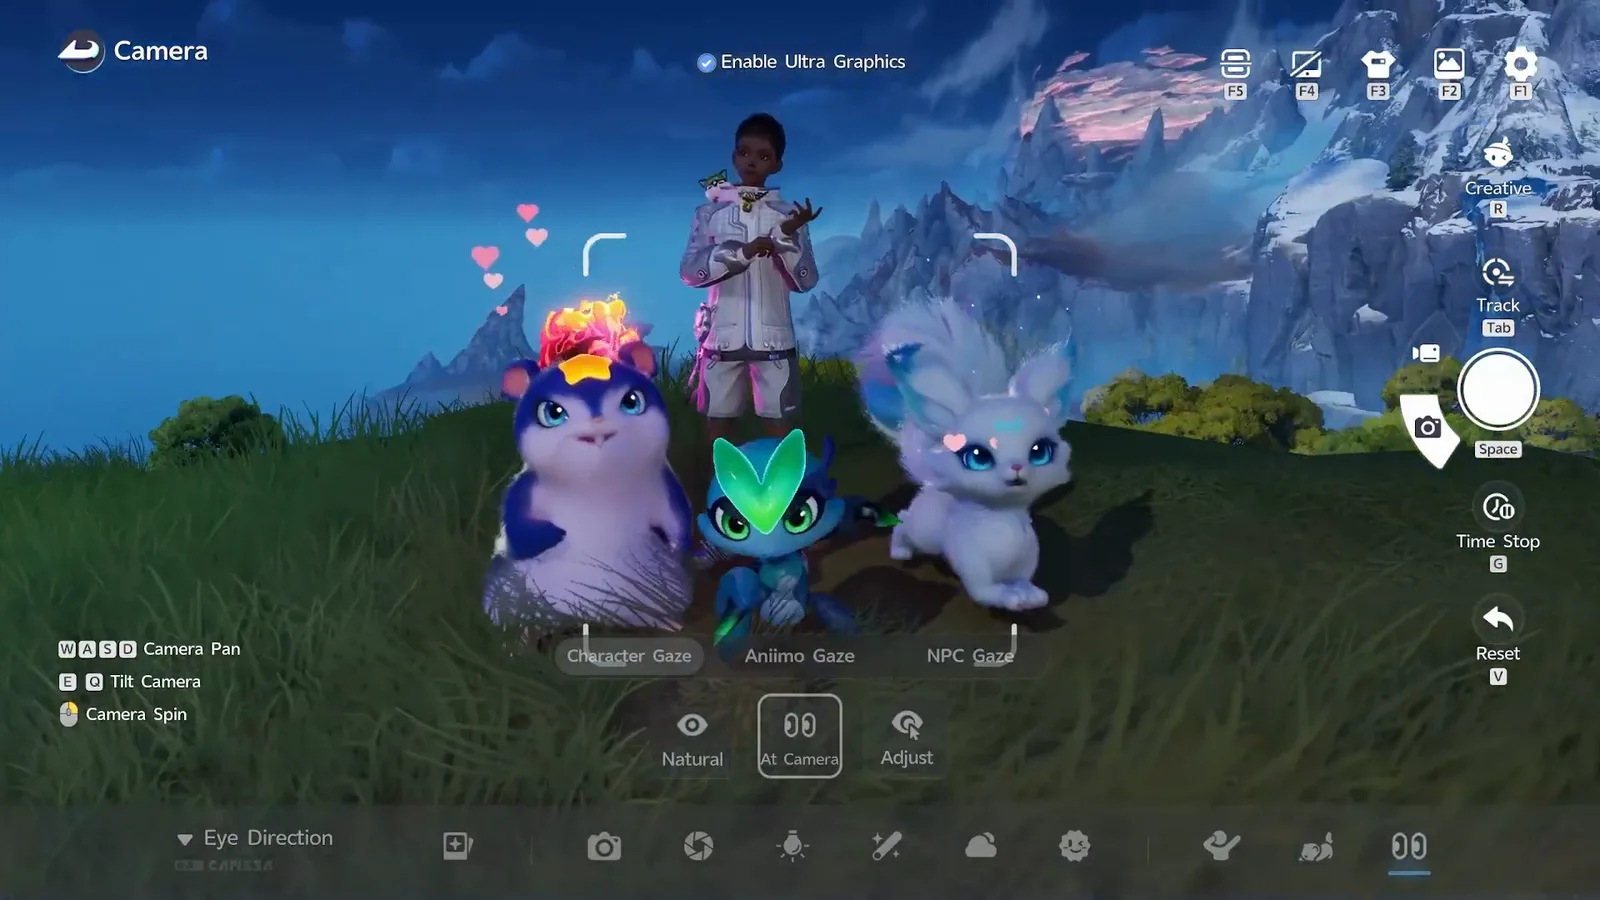
The Eye Direction panel in Aniimo photo mode showing the Character Gaze, Aniimo Gaze and NPC Gaze tabs with Natural, At Camera and Adjust below
2:43, gaze on Natural. Three tabs, three modes under each, and the group still looking wherever it feels like. Compare this with the next figure: the two are a before and after pair.
Celestis, Wisptis and Lunara all looking straight into the lens in Aniimo photo mode with At Camera selected under Character Gaze
2:52, the same group with At Camera selected. Every pair of eyes has swung to the lens and will stay on it as the camera moves. This is the single click that makes a group photo look intentional.

The tabs split the work by who is being aimed. Aniimo Gaze gives one eye toggle per summoned creature, plus an Apply to All checkbox that does the lot at once. Character Gaze does the same for your Pathfinder, and NPC Gaze for anyone else in the scene.
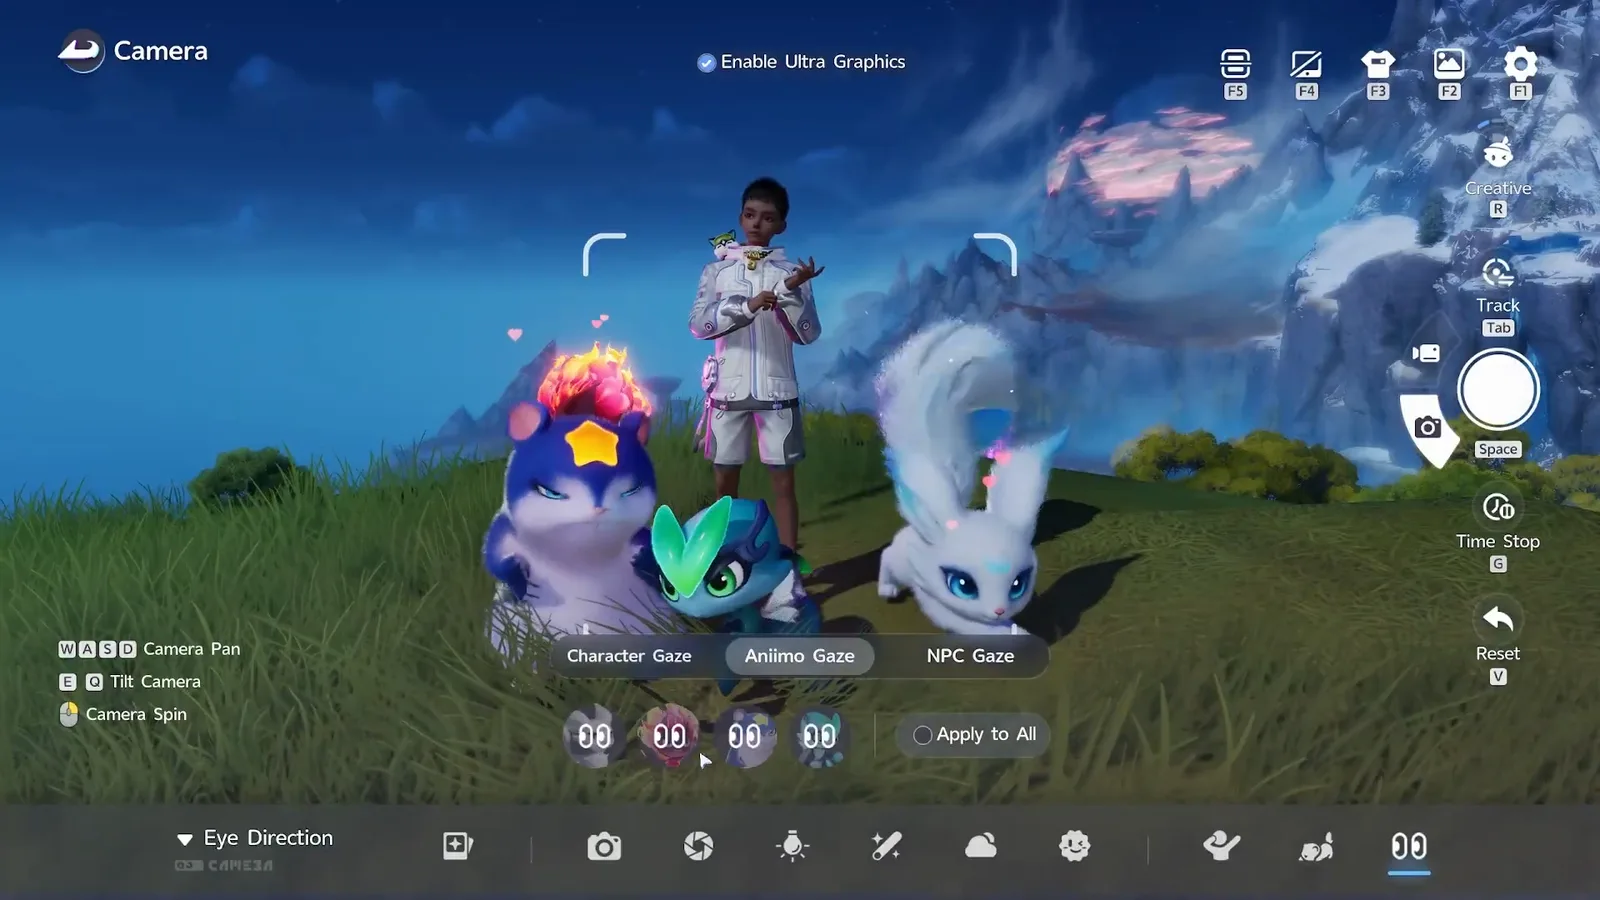
The Aniimo Gaze tab in Aniimo photo mode with one eye toggle per summoned Aniimo and an Apply to All checkbox beside them
2:56. Aniimo Gaze selected: four small eye buttons, one per summoned Aniimo, and Apply to All on the right. Click a single face to fix just that one, or tick the box and be done.

Adjust is the fussy one: it drops a floating eyeball marker into the scene, and wherever the marker goes is where your subject looks. AniimoSync uses it on the Pathfinder and notes it works identically on the Aniimo.
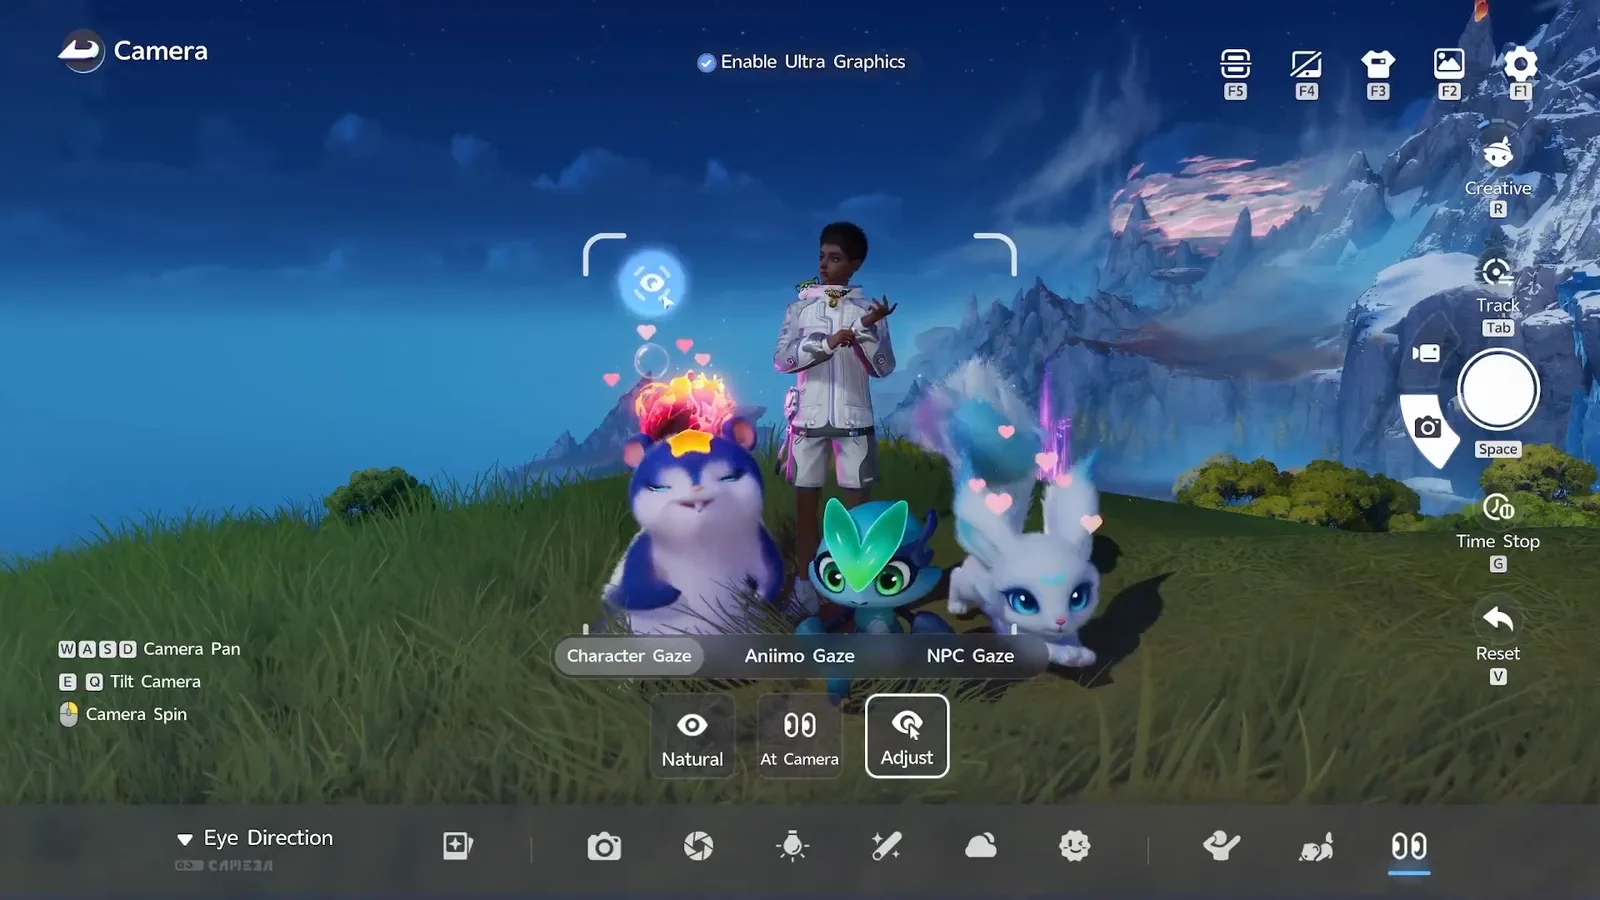
The Adjust gaze mode in Aniimo photo mode with a floating eyeball marker above the group, aiming the Pathfinder’s eyes
3:10, Adjust under Character Gaze. The glowing eyeball marker floating over the group is the target: drag it and the Pathfinder’s eyes follow. Aniimo Gaze has the same control.

The warning: do not press Escape

Nothing you have just set up survives leaving photo mode. AniimoSync’s words at 3:13: if you hit Escape or exit, you are going to have to redo this whole setup.

This is the only part of the mode with no on-screen text behind it: the game prints no warning and asks for no confirmation, so we pass it on as his caution rather than as something the client says. Two consequences. Take the shot before you go hunting a better angle. And when the camera ends up somewhere silly, use Reset on V rather than backing out, because Reset moves the camera without touching the Aniimo you just arranged.

Where are Aniimo photos saved, and how do you share them?

Press Space and the picture appears on a framed card with the ANIIMO logo, the region name and a date and time along the bottom. Under the card sit share buttons for X, Instagram and Facebook, an album button, a chat button, and a Save Photo button that writes the file out.

The card in the video reads Russet Highlands and 09/18/2026 13:54:25, both stamped by the game. The X top right closes the card and drops you back into photo mode with the group still in place.
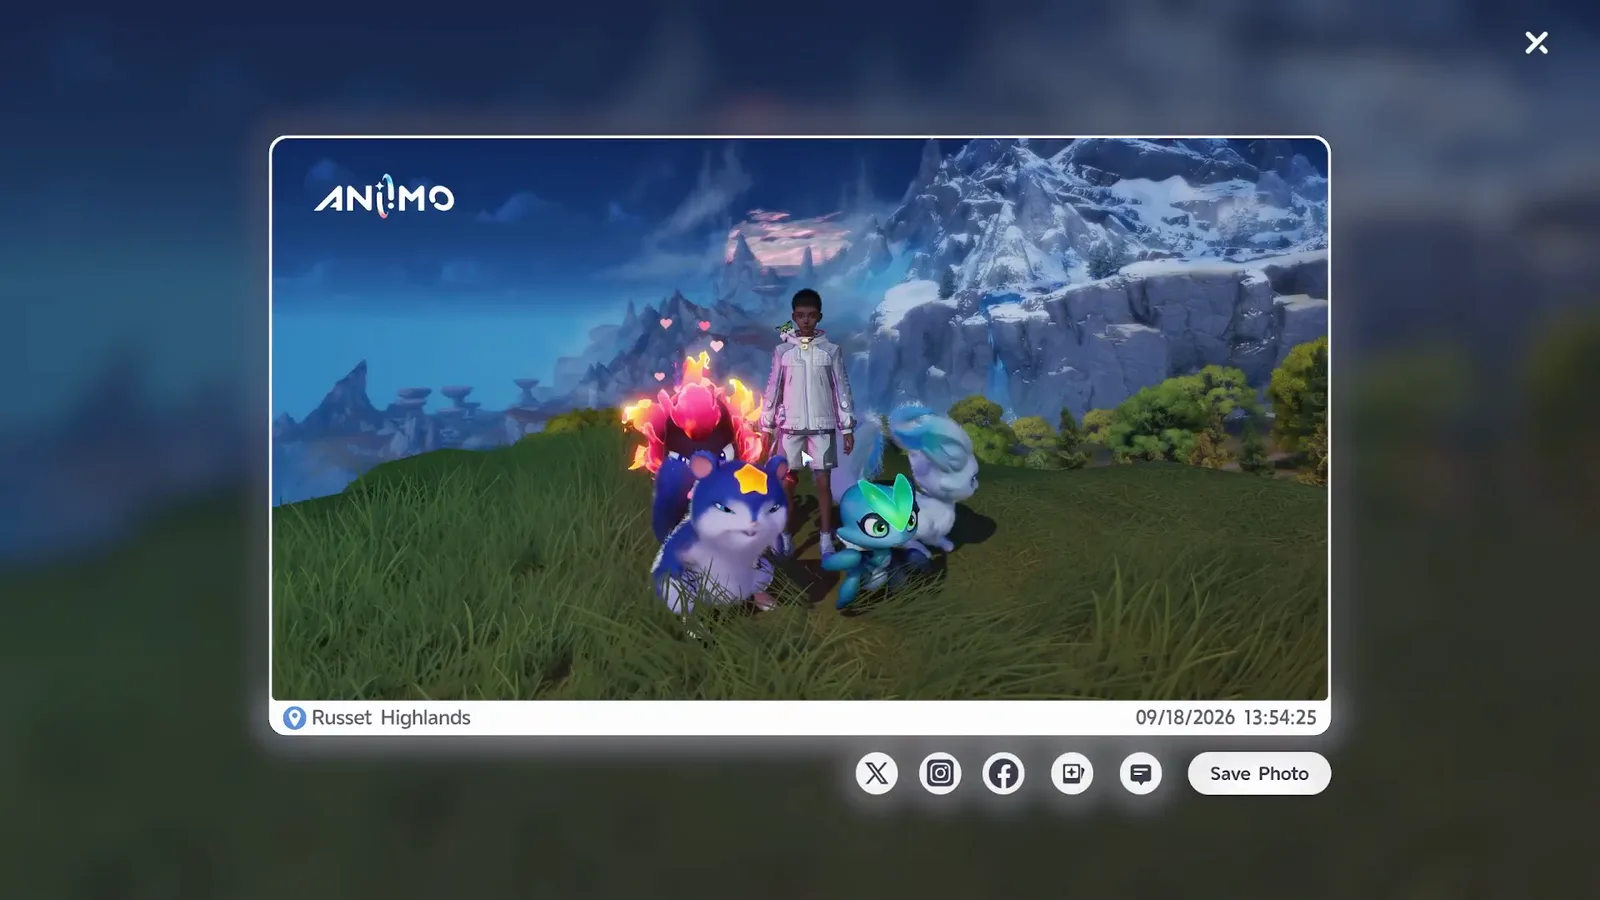
The Aniimo save photo screen: the group photo on a framed card reading Russet Highlands with a timestamp, share icons for X, Instagram and Facebook, and a Save Photo button
1:34, the save screen. Region and timestamp along the bottom of the card, five share buttons and Save Photo underneath, and a close X top right. AniimoSync’s ask at the end of the video is that you post yours in his Discord.

Where to shoot, and the Photo Challenges on the map

AniimoSync’s advice is to pick the backdrop before the pose: he sets up on a ridge in the Russet Highlands so the snow line and the floating rock formations fill the frame. A preference rather than a rule, but a sound one, because the mode gives you no way to change the scenery once you are in it.

If you would rather the game chose for you, our interactive map carries 13 Photo Challenge markers, filed under Puzzles. One caveat, and it is the game’s: those pins arrive with the layer name Photo Challenge but the marker name Help the Aniimo, two labels that have not been reconciled. Use the Photo Challenge filter, not the marker text.

Two other photo tasks are worth knowing while you are in here: the Sparkelf event wants a daily photo at the Horizon Square statue, and the Daily Activity board pays out for a photo featuring any Aniimo, which the group shot above clears outright. Our 10 things to do first guide puts both in the order you should do them.

The last word is his, and it is the right one: it looks like a lot of buttons and it is four. Summon, arrange, pose, aim. Then Space.
How do you open photo mode in Aniimo?

Press F7. The camera button sits in the bottom left action bar in the open world, between the chat button on Enter and the emote button on O, and F7 is the prompt printed under it. The screen title changes to Camera, the world HUD is replaced by the photo panel, and your Pathfinder stays exactly where they were standing, so walk to the spot you want before you press it.

How do you take a group photo with your Aniimo in Aniimo?

Open photo mode with F7, click the cat icon at the right end of the bottom bar to open the Aniimo Emotes tab, then click the round Aniimo face button underneath the camera button inside that panel. Your active team appears as a column of portraits down the right edge, and clicking a portrait summons that Aniimo into the shot. Repeat for each one, then arrange them with the move and rotate handles and press Space.

How many Aniimo can you summon in photo mode?

As many as are in your active team. The summon column in photo mode is your party roster and nothing in the panel reaches past it, so in AniimoSync’s recording that is four portraits and four Aniimo in the picture. If you want a different cast in the shot, change your team before you press F7.

How do you pose Aniimo in photo mode in Aniimo?

In the Aniimo Emotes tab, click the Aniimo you want in the portrait column on the right, then click an emote tile in the strip along the bottom. Each Aniimo is posed on its own, so you work down the column one at a time. The first tile, a circle with a line through it, clears the pose. Hovering a tile prints its name: the heart emote is called Like.

How do you make Aniimo look at the camera in Aniimo?

Click the eyes icon at the right end of the bottom bar to open Eye Direction, choose the Aniimo Gaze tab, and select At Camera. That subject then follows the lens wherever you move it. Aniimo Gaze gives you one eye toggle per summoned Aniimo plus an Apply to All checkbox that sets every one of them at once. Character Gaze does the same for your Pathfinder and NPC Gaze for anyone else in the scene.

What is the difference between Dynamic and Static poses in Aniimo?

They are the two tabs inside the Character Emote panel that poses your Pathfinder. A Static pose holds one frame, so the picture is the same whenever you press the shutter. A Dynamic pose plays an animation, so it looks livelier but the exact frame you capture depends on your timing. Hovering a tile names the pose: Tenacious is the one AniimoSync picks on camera.

What does the Ultra Graphics photo toggle do in Aniimo?

Enable Ultra Graphics is a checkbox at the top centre of the photo mode screen that renders the shot at a higher quality than normal play. It is a photo mode option rather than a graphics preset, which is why it does not appear in the settings menu or in the published system requirements, and it only applies while the photo panel is open. AniimoSync calls it the detail that is easiest to miss.

Where are Aniimo photos saved?

Pressing Space puts the picture on a framed card stamped with the ANIIMO logo, the region you are standing in and the date and time. Under the card are share buttons for X, Instagram and Facebook, an album button, a chat button and a Save Photo button, and Save Photo is what writes the file out. The X at the top right closes the card and returns you to photo mode with the group still in place.

View all