Gameplay · 12 min
Aniimo Aniipods: How to Farm Pods, Ultras and Sparkling Cubes
Capture devices are the one resource a creature collector never has enough of, and Aniimo hides most of them behind two menus rather than behind the world. Kairos opened every one of them on camera in launch week: the discounted shelf at the outpost vendor, the Aniipod Shop in Astra, the Homeland machine that prints pods while you are away, and the Glimmer purchase that turns 1,500 free currency into one Sparkling Cube a week.

Written by
Kairos
Every shop screen, price and in-game screenshot on this page by Kairos
The cheapest repeatable Aniipods in Aniimo are the discounted rows at the outpost vendor, 2,000 Credits for an Aniipod and 4,000 for an Aniipod Pro against 3,500 and 7,000 at base price, and the free ones the Aniipod Maker in your Homeland produces, one every 15 minutes on camera. For the premium tier, the only route that costs nothing is the Glimmer shop: 15 Glimmer buys 10 Sparkling Crystals, 100 buys a week is 1,000 crystals, and 1,000 crystals exchange for one Sparkling Cube.
The creator’s title calls this an unlimited supply. It is not: almost every cheap row in this guide carries a weekly or daily counter, and the interesting part of the video is where those counters sit. This page is the procedural version, one section per source, with the shop screens and the numbers on them.
Everything below was read off Kairos’ screen, recorded on 19 September 2026, three days after launch, with one shot from his launch day account. Prices and stock are cross-checked against the game’s data files. Where the recording is a single account on a single day, this page says so.
Every Aniipod source at a glance
Two menus hold almost all of it. Open the main menu, choose Shop, then the Corner Shop tab along the bottom, then Exchange down the left side. That screen lists six vendors, and three of them sell capture devices.
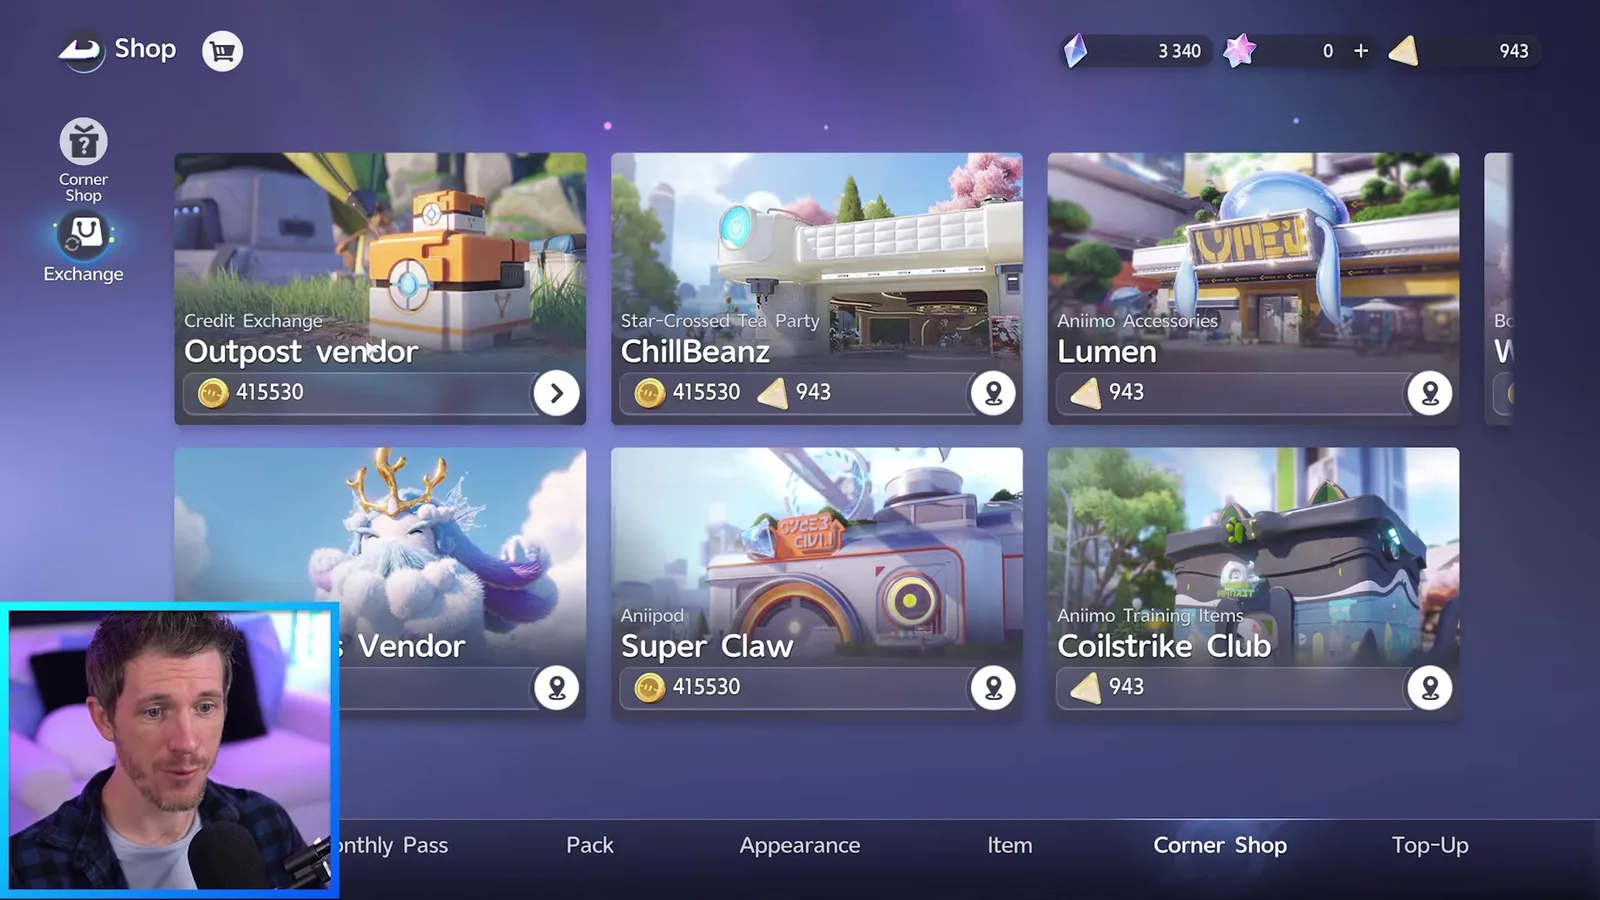
| What you want | Where | Cost | Limit and reset |
|---|---|---|---|
| Aniipod | Outpost vendor, Credits | 2,000 Credits discounted, 3,500 at base | Weekly cap of 100 on the discounted row, none at base |
| Aniipod Pro | Outpost vendor, Credits | 4,000 Credits discounted, 7,000 at base | Weekly cap of 100 on the discounted row, none at base |
| Aniipod Mega | Outpost vendor, Credits | 6,000 Credits discounted, 10,500 at base | Weekly, and it was already sold out on camera |
| Aniipod Hyper | Super Claw, Astra | 7,200 Credits, discounted | Weekly, sold out on camera |
| Aniipod Track | Super Claw, Astra | 7,200 Credits, discounted | Weekly, sold out on camera |
| Aniipod Track | Mysterious Vendor, Astra | 5,000 Credits | Daily limit 40, and only when it rotates in |
| Tumbler | Super Claw, Astra | 100,000 Credits, half the outpost vendor’s 200,000 | Weekly, sold out on camera |
| Aniipod and Aniipod Pro | Lying in the world | Free | One pickup each, they do not come back |
| Aniipod | Homeland Aniipod Maker | Free, one worker | About one pod every 15 minutes, all day |
| Aniipod Ultra | Outpost vendor, Item Exchange | 20 Aniipod Ultra Vouchers | No counter printed on the row |
| Aniipod Ultra | Shop, Item tab, Glimmer | 200 Glimmer | Weekly limit 10 |
| Aniipod Ultra | Mysterious Vendor, Astra | 400,000 Credits | Daily limit 1, seen on launch day only |
| Sparkling Cube | Outpost vendor, Item Exchange | 1,000 Sparkling Crystals | No counter printed on the row |
| Sparkling Crystal | Shop, Item tab, Glimmer | 15 Glimmer per 10 crystals | Weekly limit 100 buys, so 1,000 crystals |
| Sparkling Cube | Stamp Shop, Season tab | 500 Windborn Stamps | Locked until 2,500 stamps are spent in the shop |
| Aniipod Ultra and Sparkling Cube | Shop, Item tab, Lumin Crystal | 200 and 1,500 Lumin Crystals | Real money, covered in our cash shop guide |
The Aniipod hub carries the whole device ladder with capture multipliers and the catch maths behind them. This page is the other half: where the pods come from and what each one costs.
The outpost vendor’s discount shelf
Shop, Corner Shop, Exchange, Outpost vendor, Credits. This is the only vendor on the list you can open without teleporting, so it works from anywhere in Idyll. The shelf holds two of every basic device: one at a cut price with a Discount ribbon and a weekly counter, one at full price with no counter at all.
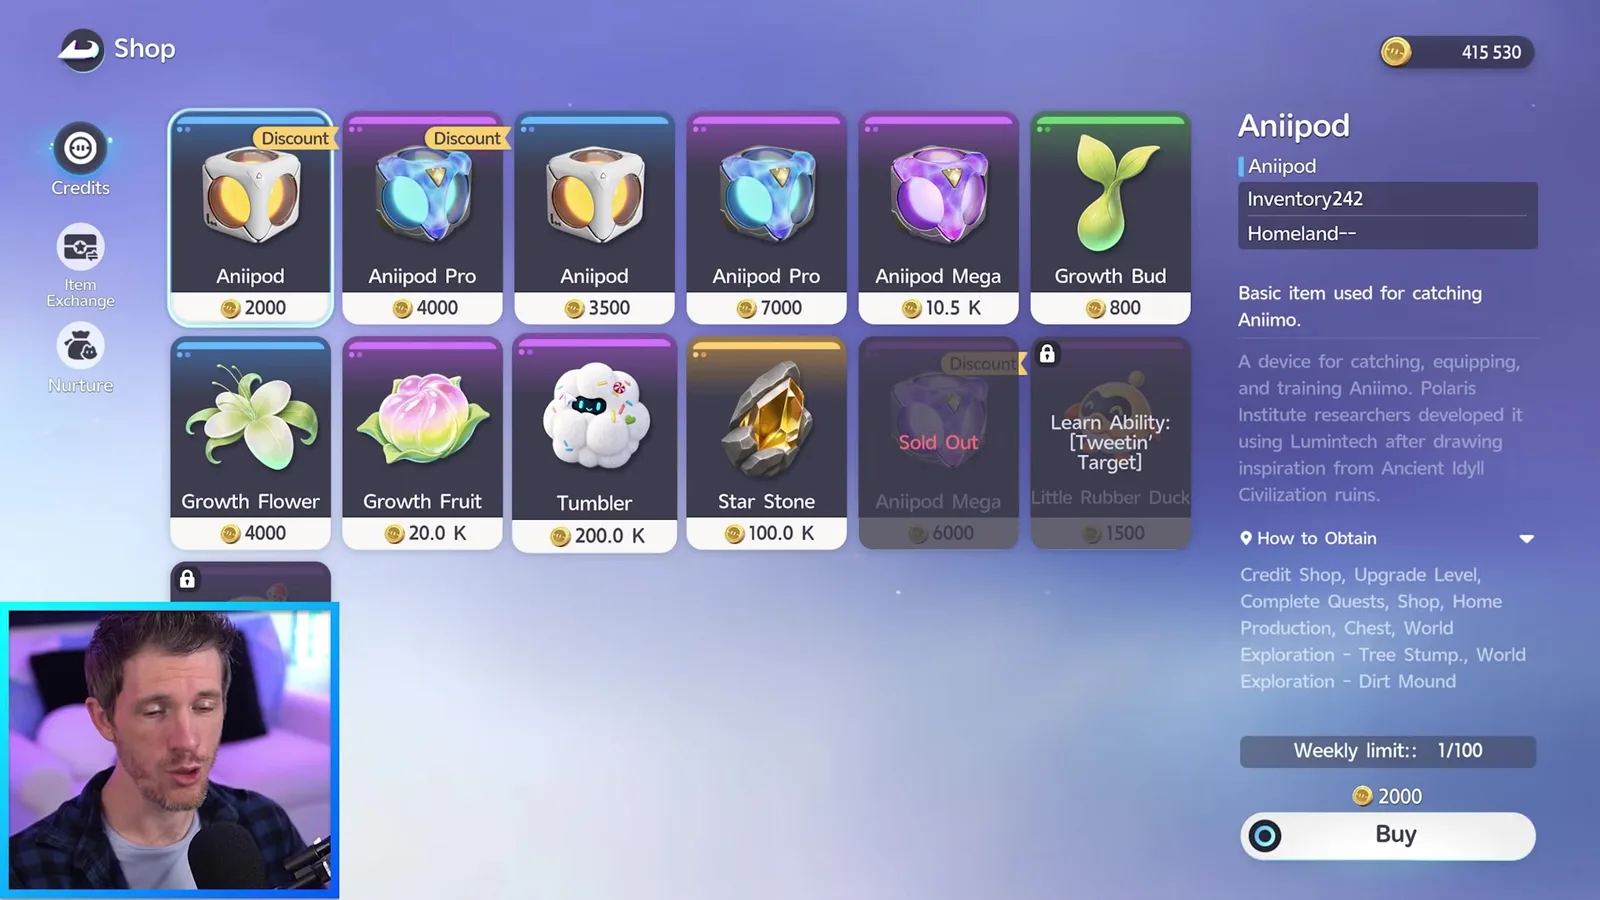
The buy panel is where the catch is. Select the discounted Aniipod and it prints Weekly limit:: 1/100, the same counter style the rest of the game uses for remaining out of cap. Select the 3,500 Credit Aniipod beside it and there is no limit line at all, only a quantity stepper. So the cheap shelf is a hundred pods a week, and the expensive shelf is a Credit sink with no ceiling.
- Aniipod, 2,000 Credits instead of 3,500. A saving of 1,500 a pod, 150,000 Credits a week if you clear the shelf.
- Aniipod Pro, 4,000 instead of 7,000. The 1.5x device, and the one worth clearing first.
- Aniipod Mega, 6,000 instead of 10,500. The 2x device, and the row that sells out fastest.
- Tumbler, 200,000 Credits. Full price here. Buy it at Super Claw instead, below.
Kairos’ advice on camera is worth repeating: buy the discounted rows because they do not restock quickly, but do not empty your Credit balance into them, because Credits are also the currency for held items, Growth materials and the Mysterious Vendor.
Super Claw: Hyper, Track and half-price Tumblers
Same route, Shop then Corner Shop then Exchange, but pick Super Claw and press the location pin. The teleport lands you facing away from the shop front, so turn around. Super Claw is the dedicated Aniipod Shop in Astra, on Chill Street, a short walk from Horizon Square.
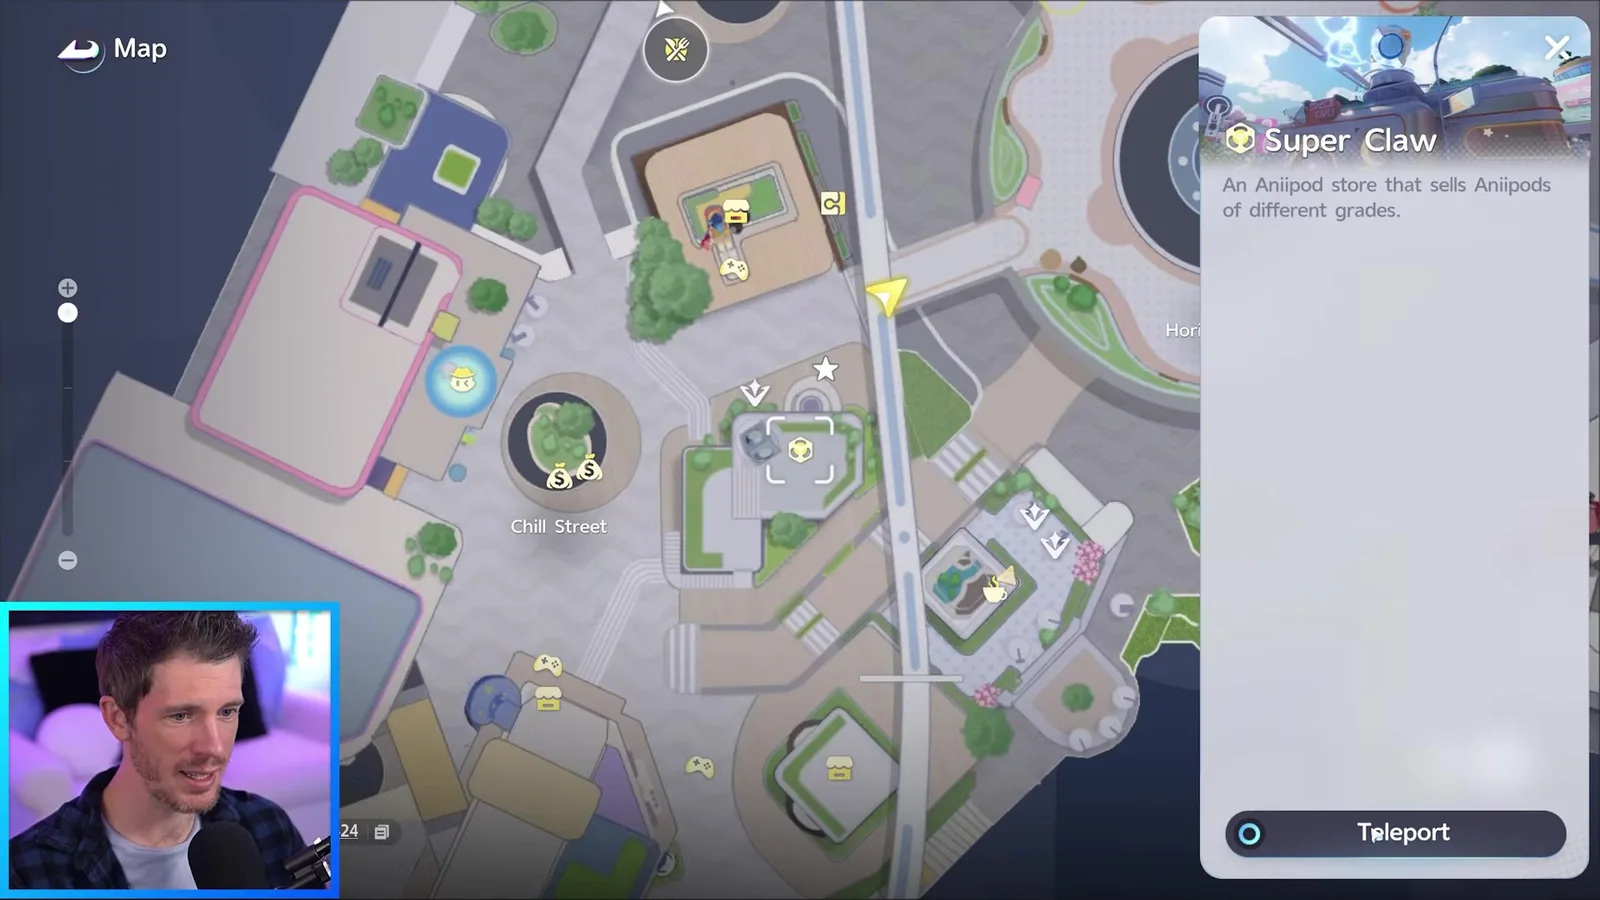
Super Claw sells the three basic devices at exactly the outpost vendor’s full price, which is why it is not worth a trip for them. Its second row is the reason to come.
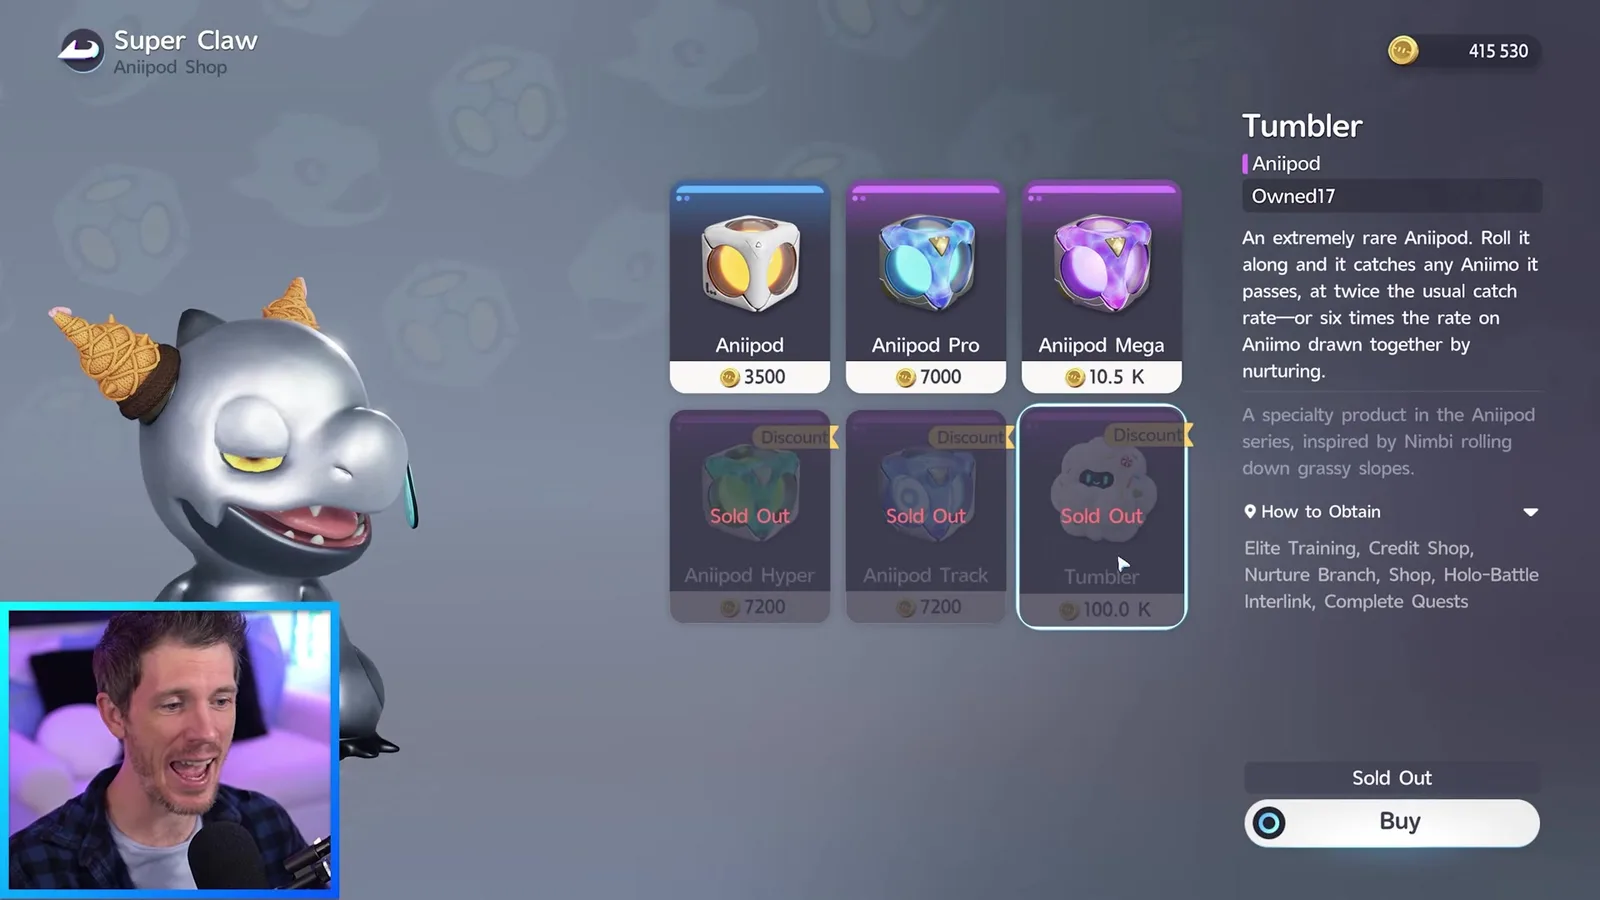
- Aniipod Hyper, 7,200 Credits. A 2x pod that throws faster and further. Otherwise it comes from the Companion Handbook, which pays ten at level 1.
- Aniipod Track, 7,200 Credits. A 2x pod that locks on and chases the target after the throw. The handbook pays ten at level 9 and ten more at level 32.
- Tumbler, 100,000 Credits. Half what the outpost vendor charges for the same item. If it is in stock and you have the Credits, this is the single biggest saving in either shop.
One note on the Tumbler, because the shop card and our own page disagree. The card in this recording still prints the closed beta line, twice the usual catch rate and six times on Aniimo drawn together by nurturing. The launch item table reads 1.5x, and 3x on an Aniimo that gathers through Nurture, which is what the Tumbler page uses. Take the pod page’s numbers, and read the Nurture guide for what that clause is actually for.
The pods lying in the world
Aniipods sit on the ground all over Idyll, and they come out of chests, breakable pots and digging spots as well. They are a one-time pickup: nothing in the recording or in the map data suggests they respawn.
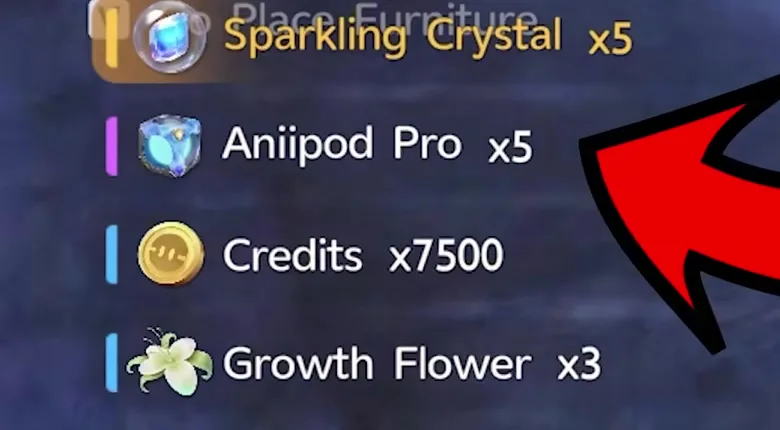
The recording sends you to a third-party map for the pickup locations. We have our own, and the numbers behind it are worth stating plainly. The survey our interactive map is built on holds 599 Aniipod pickups across Idyll: 427 plain Aniipods and 172 Aniipod Pros. Nothing rarer than a Pro is ever lying on the ground, anywhere.
To follow a route, open the map, collapse everything and turn on the Aniipod layer under Treasures. Chest, Ground pickup and Digging spot live in the same category and are worth running in the same pass. The regions with the most pods are:
| Region | Aniipod pickups | of which Aniipod Pro |
|---|---|---|
| Beast Fang Ridge | 83 | 15 |
| Blitzwood | 66 | 17 |
| Russet Highlands | 53 | 19 |
| Zephyrus Landbridge | 53 | 13 |
| Driftwise Meadow | 40 | 24 |
Driftwise Meadow is the odd one out and the one to note: 24 of its 40 pods are Pros, the best ratio on the map. One caveat we publish on the map itself applies here too. Those marker positions were surveyed during the Global Closed Beta and reused with permission, so a pin can sit where the launch build no longer puts it.
The Homeland Aniipod Maker
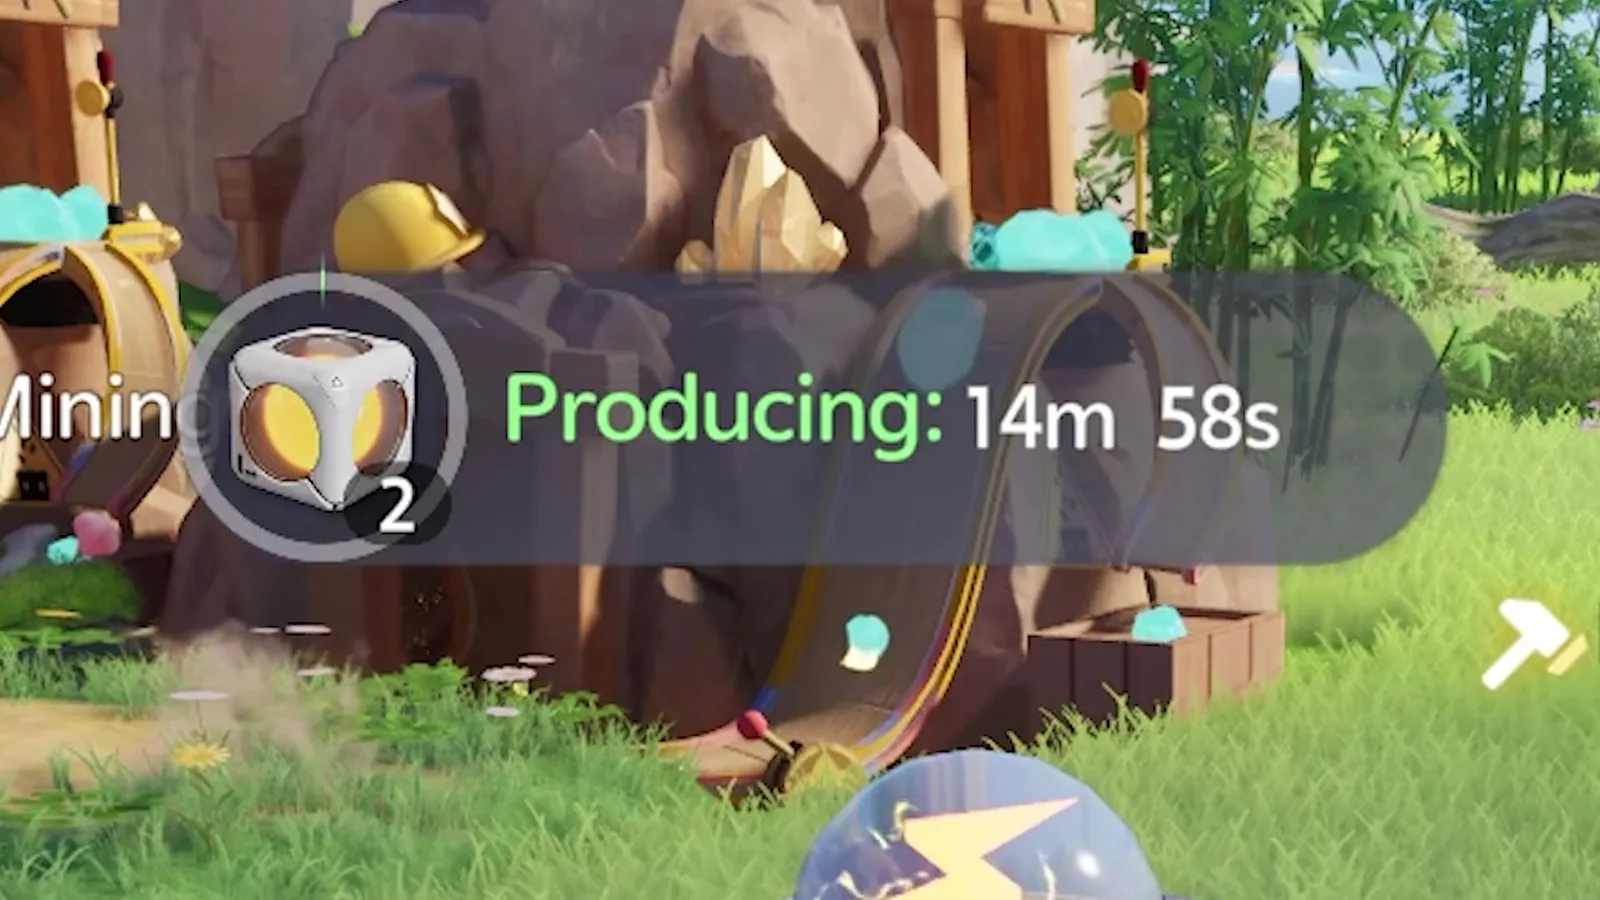
Place an Aniipod Maker in your Homeland, put an Electric Aniimo on it, and it prints pods without you. The machine in the recording is Aniipod Maker (Level 1) and its cycle timer reads just under fifteen minutes.
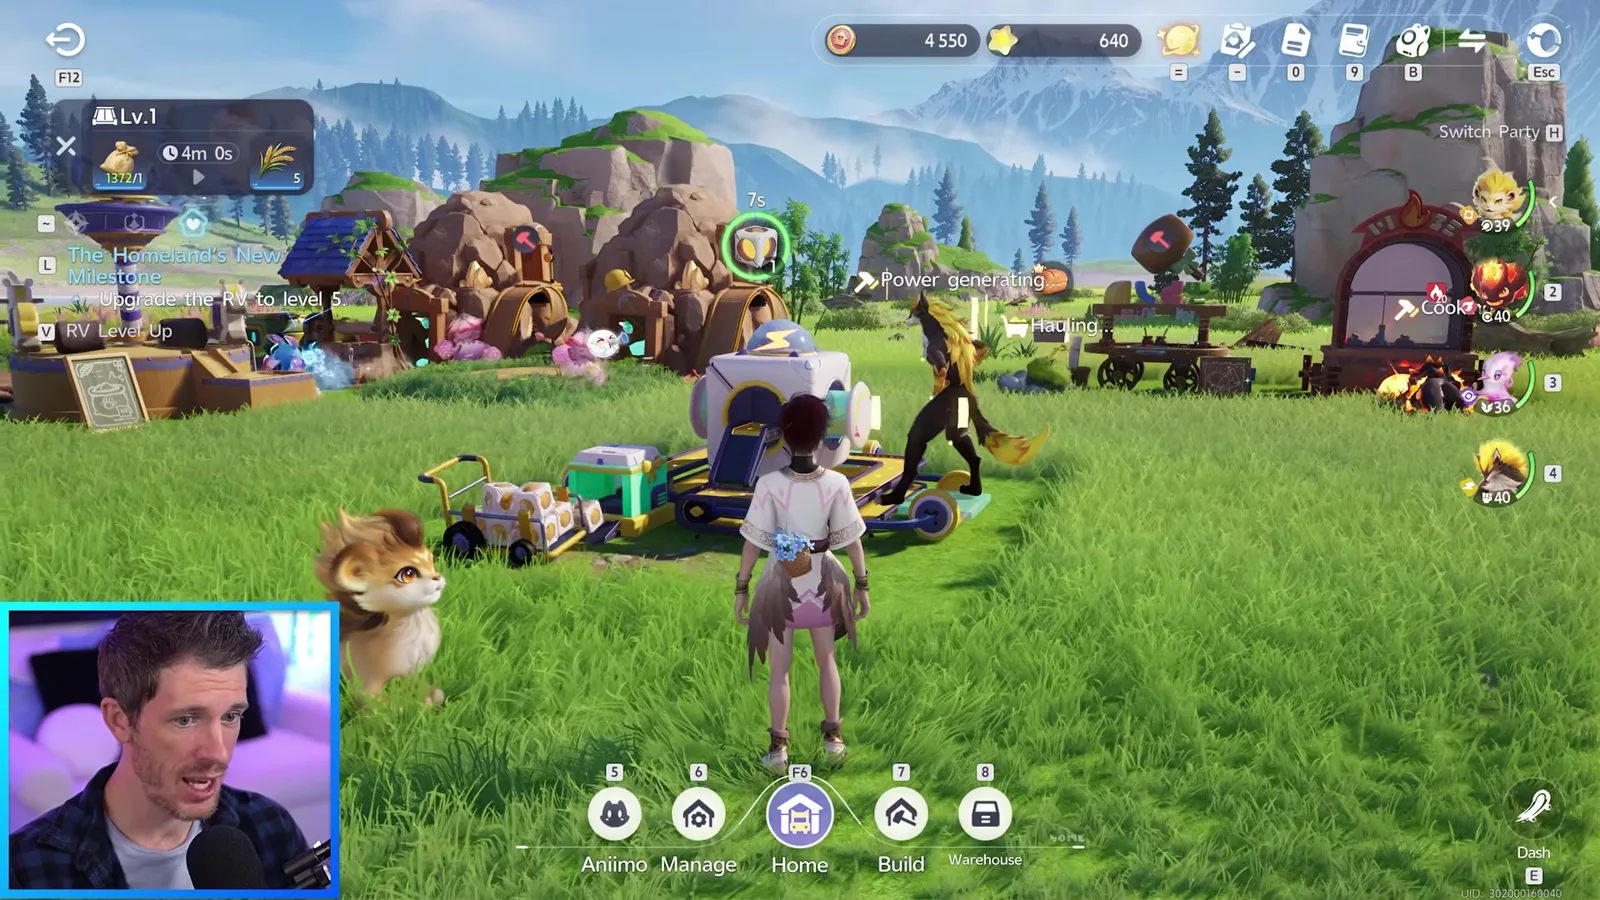
Two things the video is honest about being unsure of, so we are too. It says the Homeland unlocks at level 20 or 25 without settling which, and it says the machine gets faster with better makers later on. The game’s data files do carry Aniipod Maker Level 2 and Level 3 as separate pieces of furniture, but they ship with no recipe attached, so nothing published says what upgrading one costs.
The crafting side is real but small. The data files list a Semi-finished Aniipod made from Azure Grass ×5 and Craft Test Material ×5, then finished with Primegy ×20, with the same two-step shape for the Pro and the Mega. The Aniipod hub carries those rows, and the video never opens the crafting screen, so treat it as background rather than a farm.
Assisting, and the AFK question
Walk up to the Aniipod Maker and there is a Process option on the wheel. Using it yourself cuts the remaining time and pushes the next pod out faster. That is the whole trick behind the video’s AFK chapter: the machine runs on its own, and standing there helping makes it run harder.
Kairos wonders on camera whether you can leave the client running overnight and wake up to a full stack, and then says he has not tested it. Neither have we, and the Homeland’s production caps are not printed on the machine, so we are not going to claim a number. What is certain is that the Maker keeps producing while you are elsewhere in the world, because the 2 on the icon above is the queue it built while he was away.
Aniipod Ultra: four routes that cost no money
The Aniipod Ultra is a guaranteed catch, and the Aniimo arrives at Elite Potential or better. The one costed route is the Item Exchange: 20 Aniipod Ultra Vouchers buys one, at the same outpost vendor.
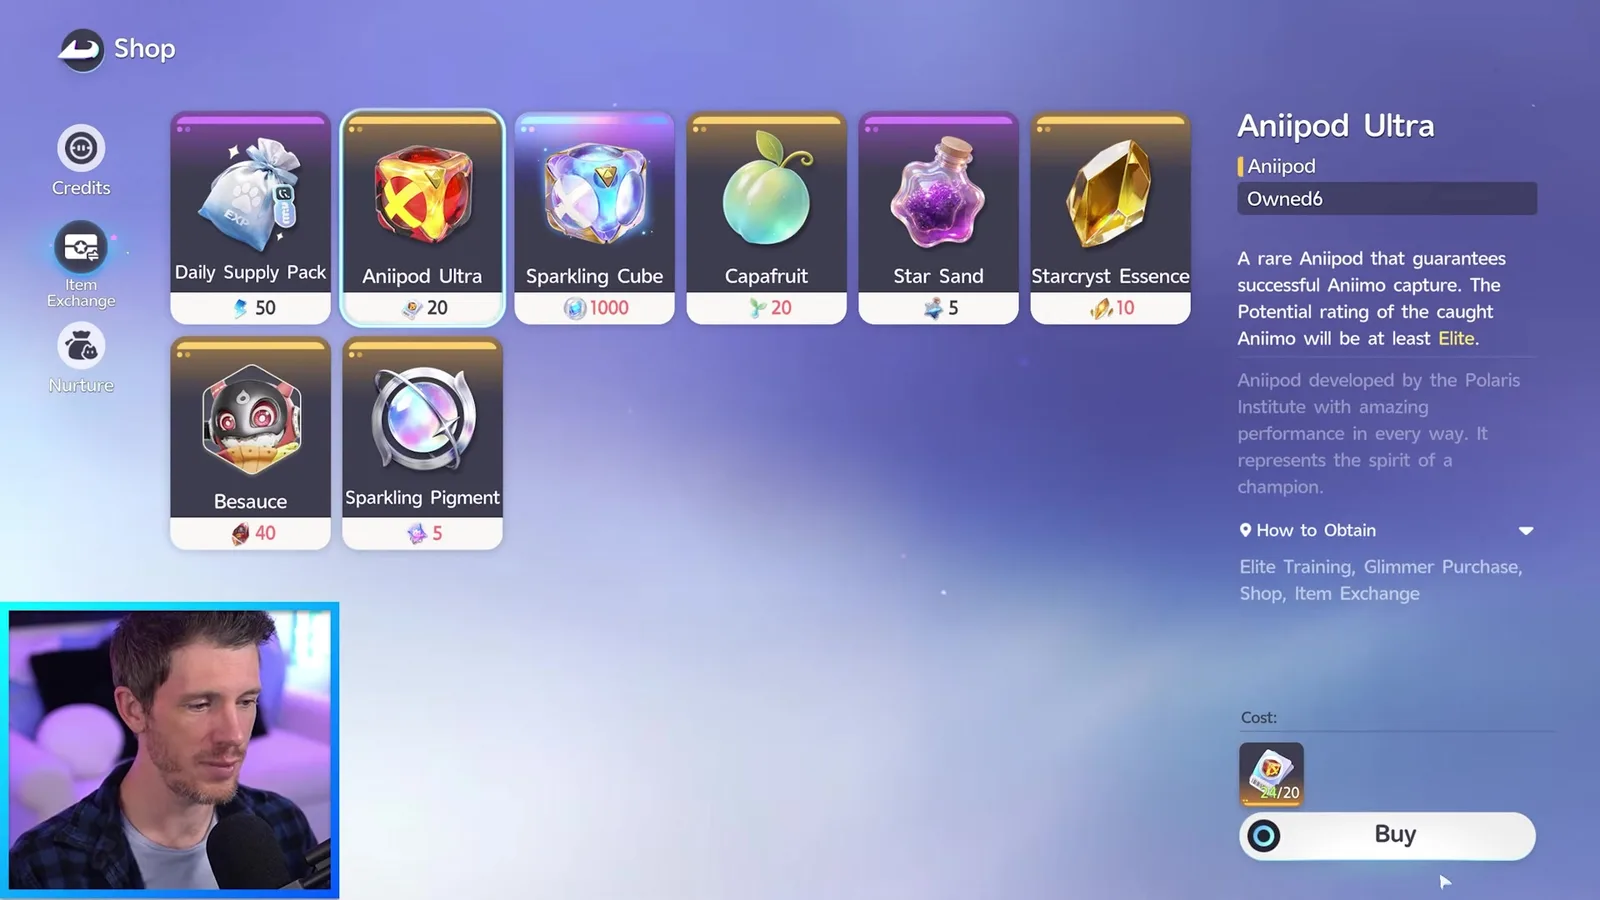
Click the voucher icon and the game lists where it comes from: Elite Training, Holo-Battle Sim, Sanctum Clear and Chest. None of those cost currency, which is the point. Our voucher row adds the one price the video does not show, 40 Training Points each in the shop, so 800 Training Points is one guaranteed catch.
The other three routes, in the order most players will hit them:
- Companion Handbook, free track. One Aniipod Ultra at level 5 and one at level 50, on the track everybody has. The level by level reward list has the rest.
- Glimmer, 200 a pod, weekly limit 10. Glimmer is the free-to-play currency, so this is ten guaranteed catches a week for nothing but time.
- Mysterious Vendor, 400,000 Credits, one a day. Below, because it needs its own section.
The Aniipod hub already sets out every listed Ultra route and what each is worth. If you want to know which creature to spend one on rather than where to get it, the Potential guide explains what Elite actually buys you, and the egg hatching guide explains why an Ultra on an Incredible Egg is wasted.
The Mysterious Vendor in Astra
The Mysterious Vendor is on the same Exchange list, and his stock rotates every day. His name is Weston, and the map card places him hidden in plain sight near Horizon Square.
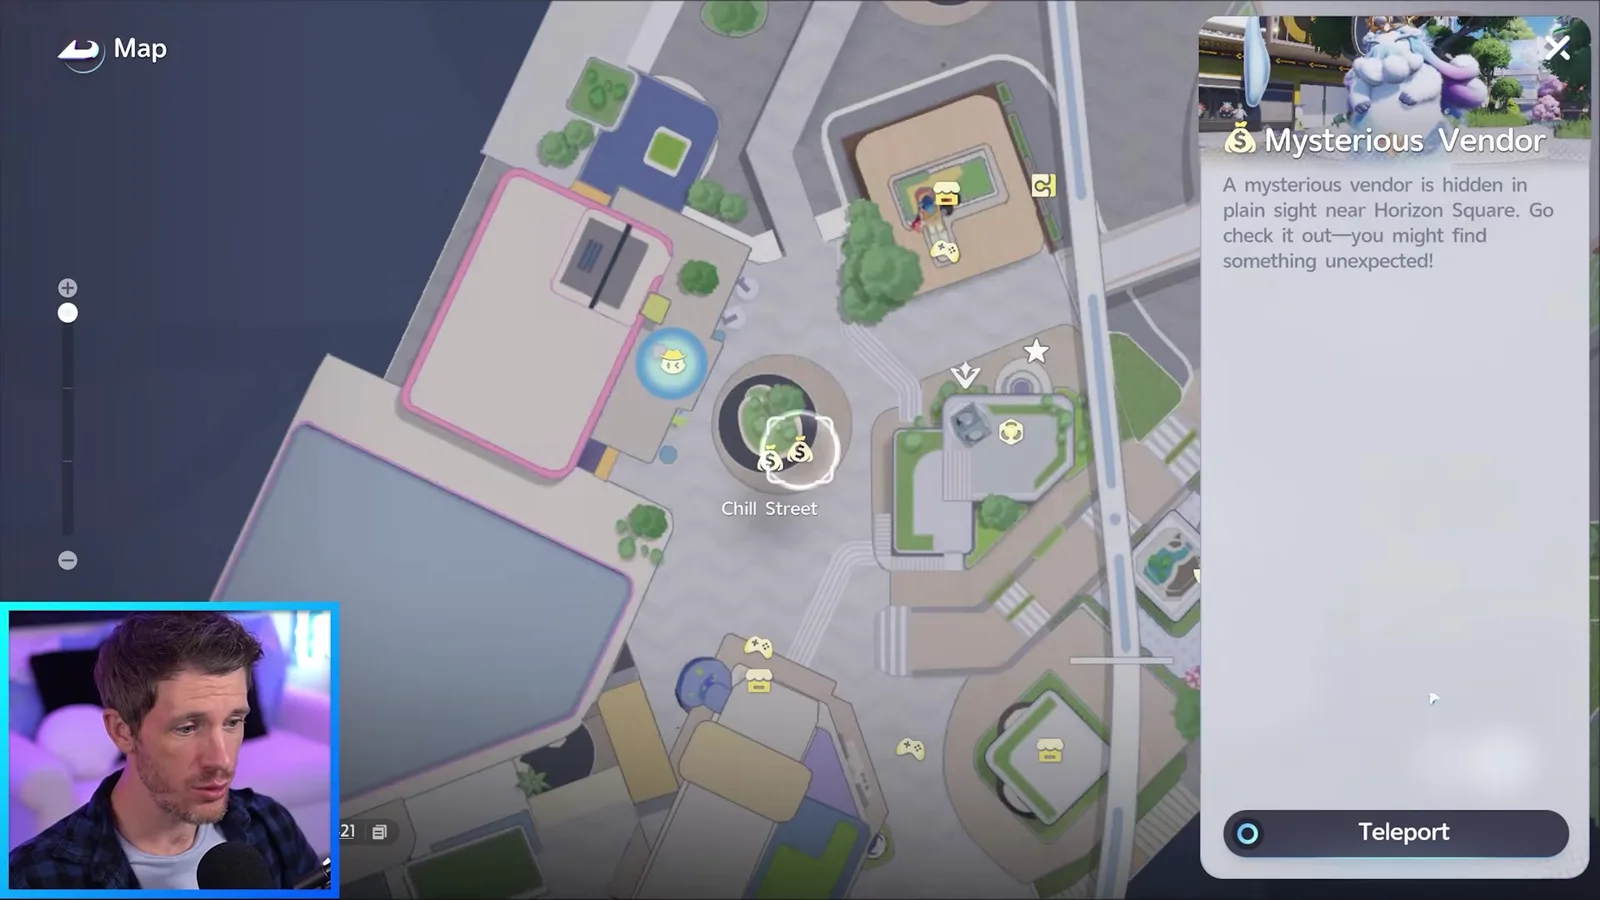
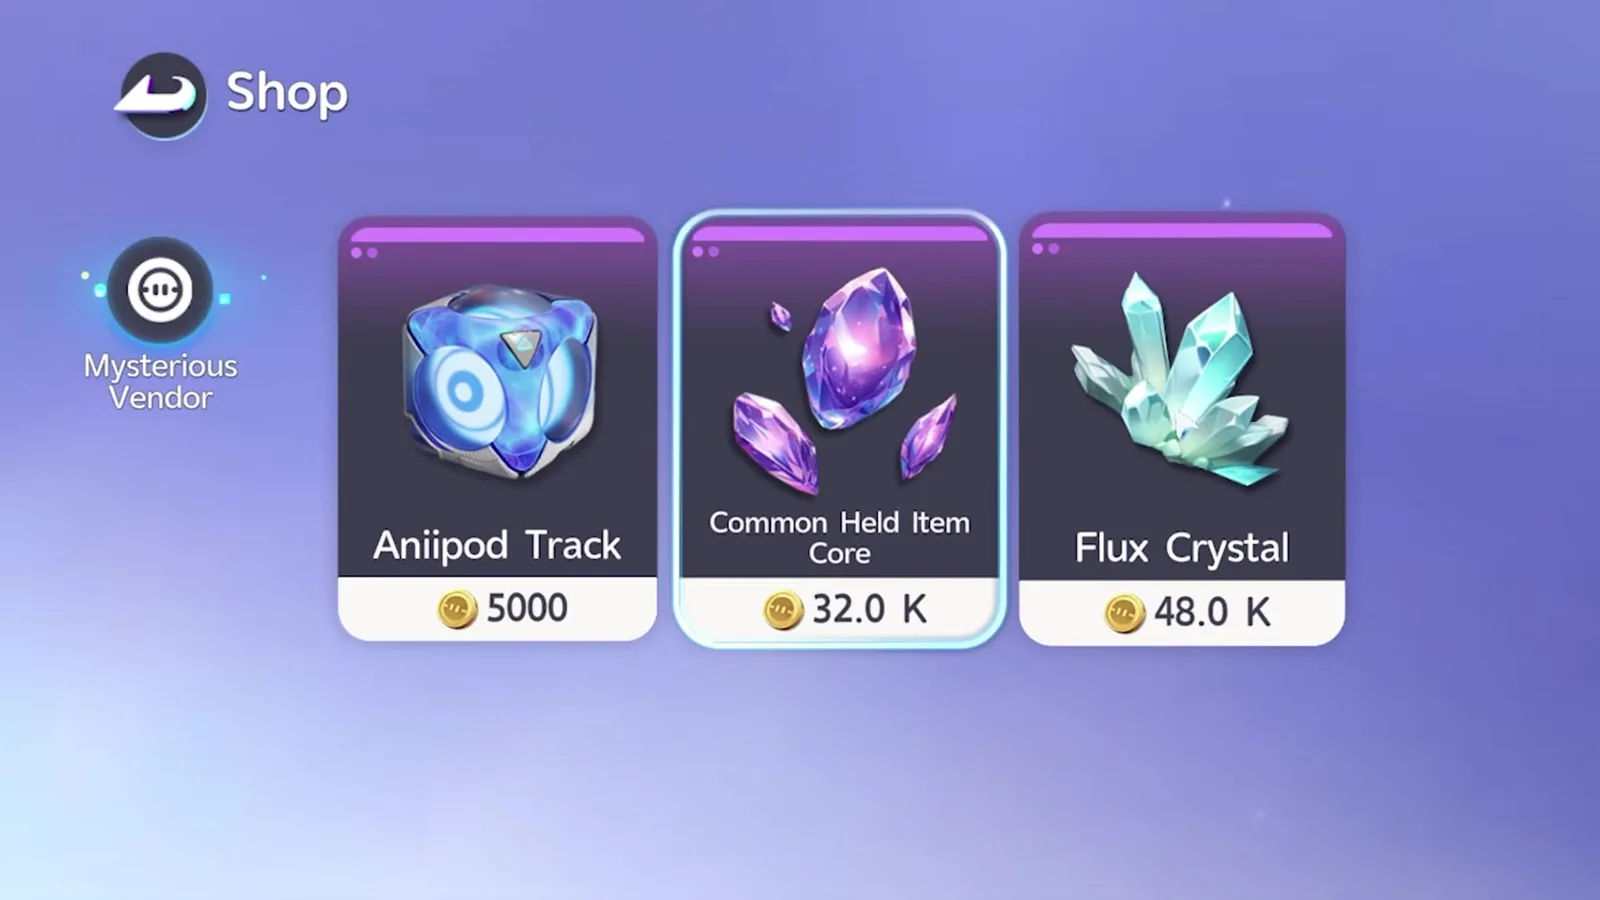
The reason to check him daily is the shelf he had on launch day.
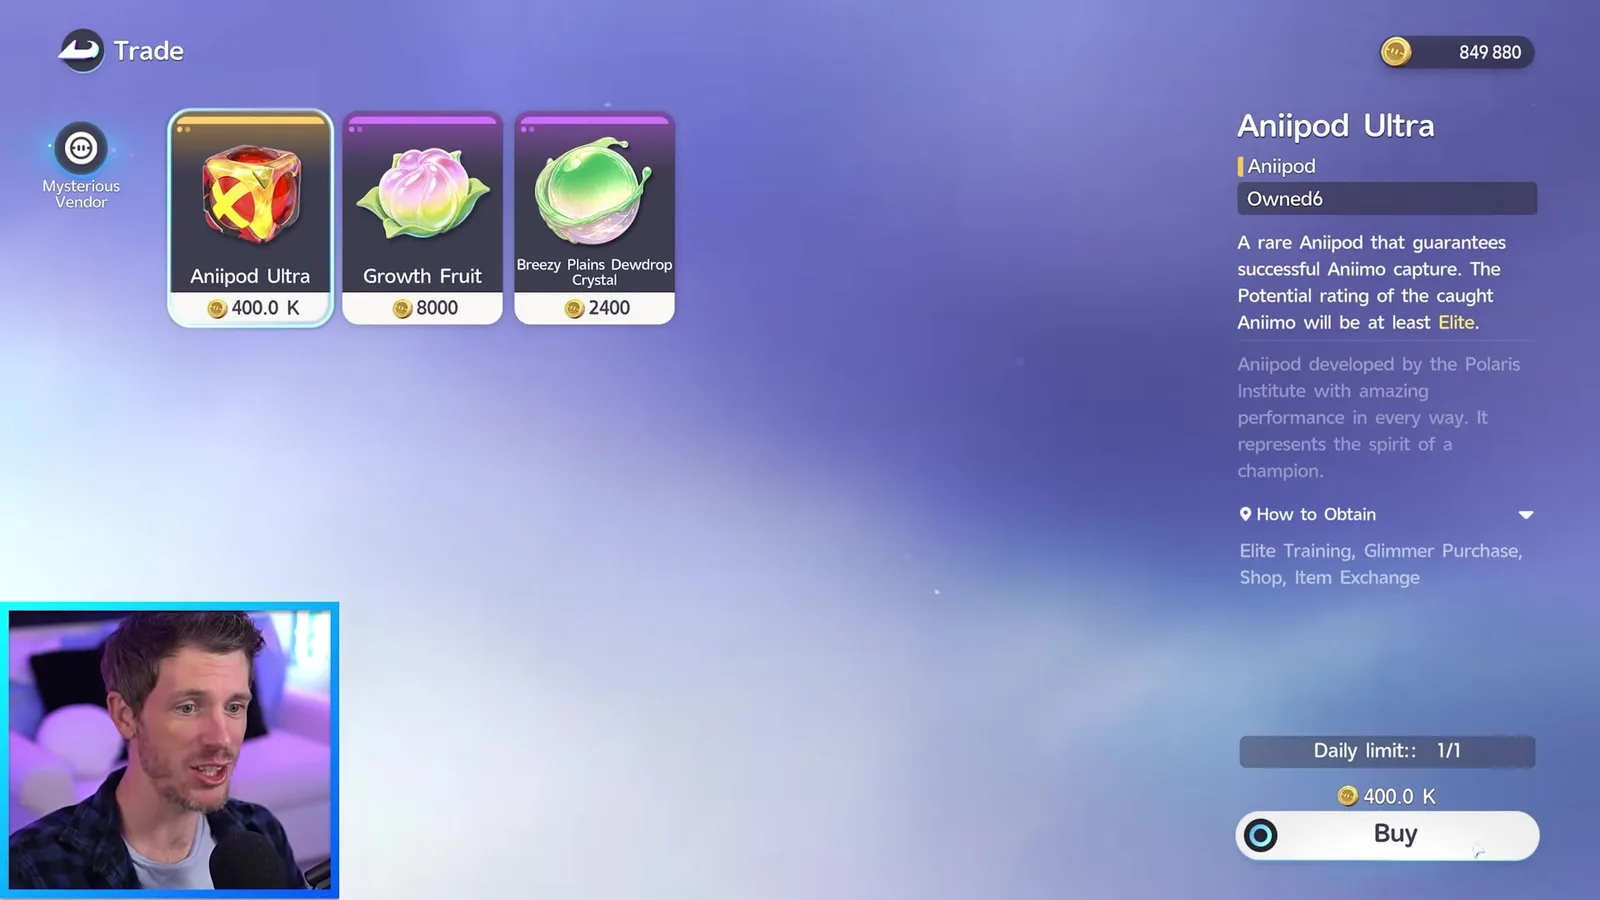
400,000 Credits is a serious price, roughly what two hundred discounted Aniipods cost, but it is the only place in the game that sells a guaranteed catch for a currency you earn by playing. The vendor restocks daily at 04:00 AM (UTC+8), which our dailies and caps guide covers along with every other reset in the client.
Sparkling Cube: 1,000 Sparkling Crystals
The Sparkling Cube is the top of the ladder: guaranteed catch, Perfect Potential, and the Aniimo always arrives Sparkling. The exchange rate is fixed and the game prints it on the currency card: collect 1,000 Sparkling Crystals to exchange for 1 Sparkling Cube at an outpost vendor.
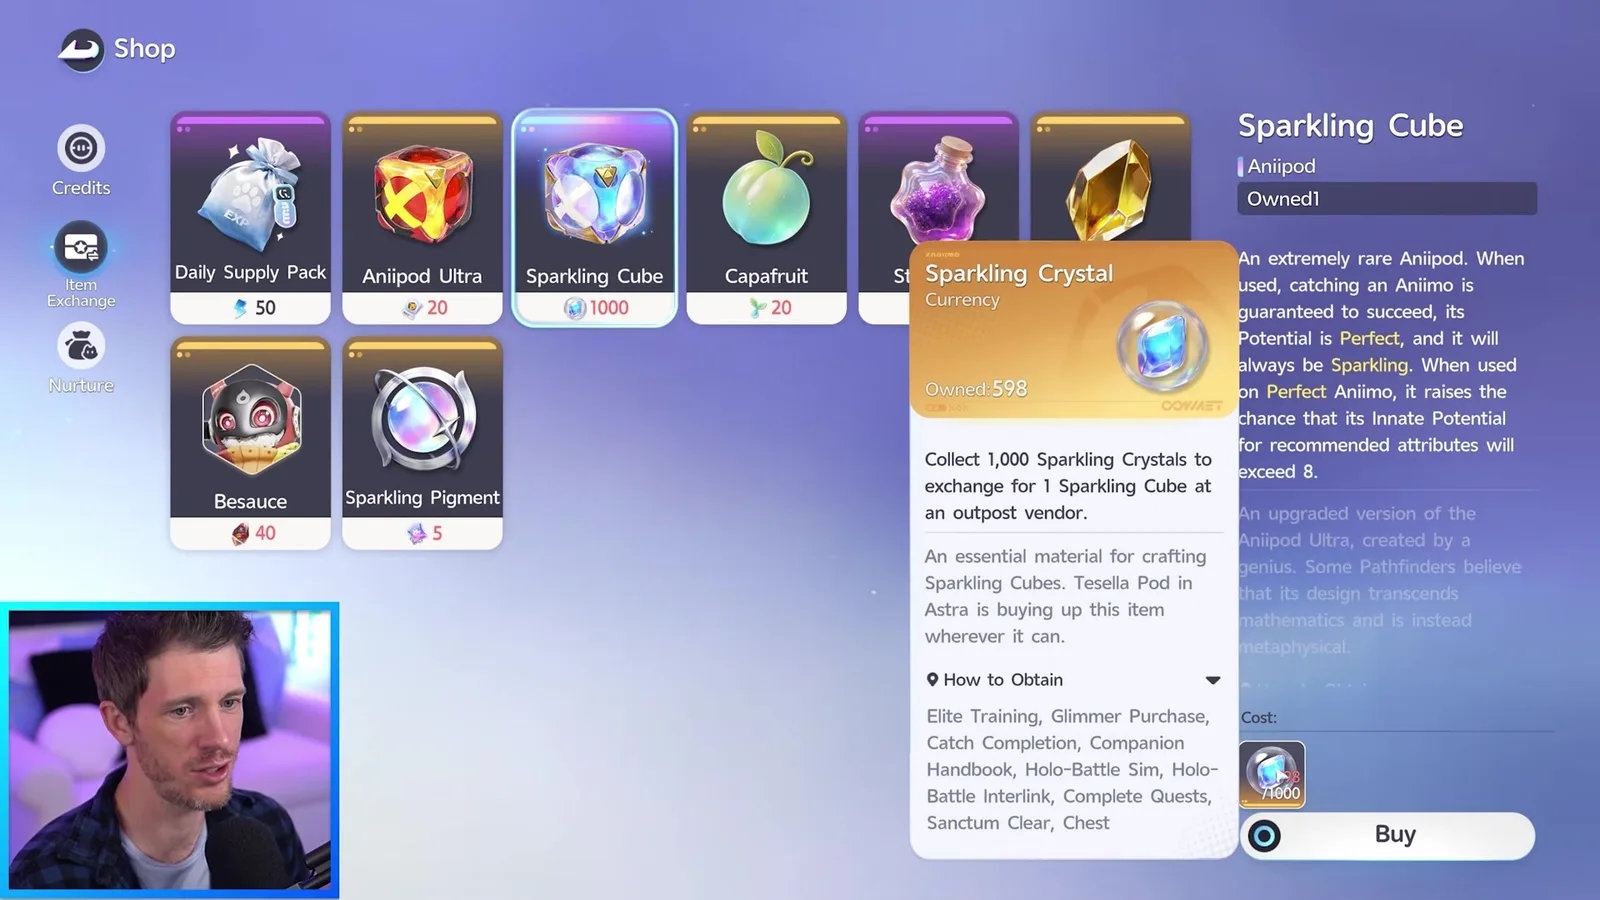
Open the How to Obtain list on the crystal and the game names nine sources: Elite Training, Glimmer Purchase, Catch Completion, Companion Handbook, Holo-Battle Sim, Holo-Battle Interlink, Complete Quests, Sanctum Clear and Chest. Two of those carry real weekly volume, the Companion Handbook and the Glimmer purchase, and one is a rotating event: the Vein Abundance event quests pay 30 crystals for using Nurture in the featured region and 30 more for catching ten Aniimo after it.
Our Nurture guide is the page for what to point a Cube at, since a Cube on a nurtured Prismana is the highest value throw in the game. This page stays on where the crystals come from.
Sparkling Cube from the Stamp Shop
Open the Companion Handbook and press Exchange at the bottom left. That is the Stamp Shop, it spends Windborn Stamps, and it has two tabs: Weekly and Season. The Sparkling Cube is on the Season tab for 500 stamps, and it is locked until you have spent 2,500 stamps in the shop.
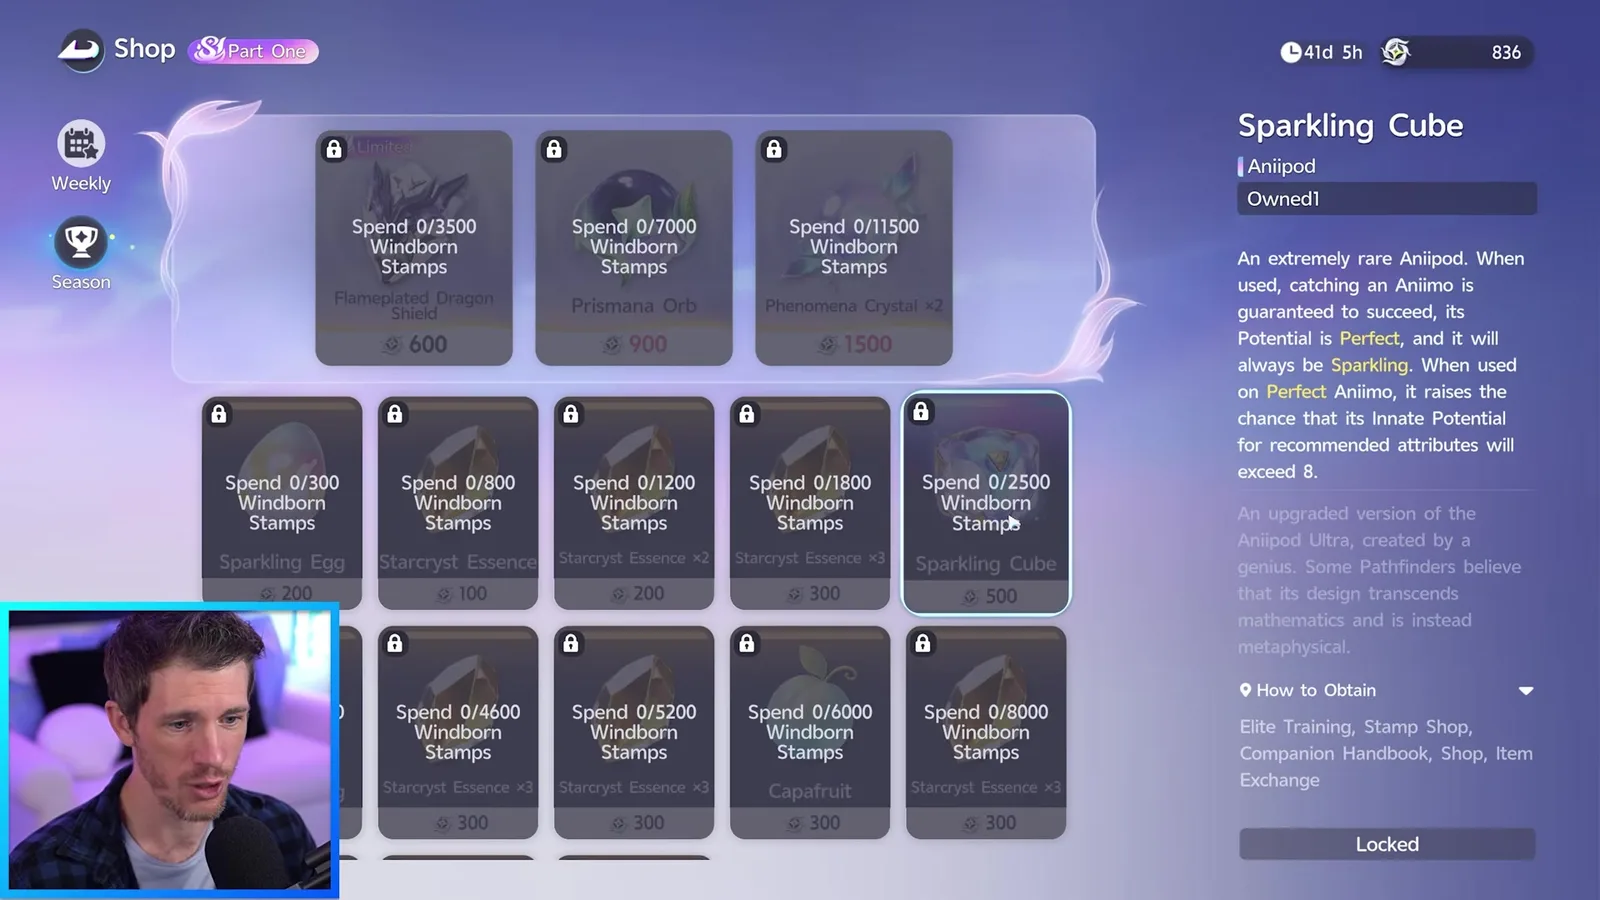
That gate is the part players miss. The tiles unlock on cumulative spending, not on what you hold, so the Weekly tab is not a distraction from the Cube, it is the way to it. The Weekly tab sells Vein Essence at 50, Breezy Plains Dewdrop Crystal ×20 at 30, Flux Crystal at 30, Star Dust ×5 at 20 and Credits ×2,000 at 1, each with a weekly limit of 10.
Stamps themselves come from four places, named on the currency card: Daily Activity Quests, Stamp Rush, Season Achievement and Companion Handbook. Stamp Rush is the weekly board of Wild Surge, Defeat Alphas, Holo-Battle Sim, Home Orders and Star-Crossed Tea Party, and it is capped at 1,000 stamps a week. The daily list is smaller and faster: log in, spend 60 Primegy, beat 5 Aniimo, earn 50 stamps, place one thing in your Homeland. Our Season 1 events guide is the full source table for both.
The Companion Handbook pays stamps too, and a lot of them: levels 71 to 100 hand out 25 Windborn Stamps each. Its paid Advanced track also pays two Sparkling Cubes outright, at levels 30 and 50, which is the only place in the game that gives Cubes rather than the currency for them.
One Sparkling Cube a week, for free
This is the method the video ends on, and it is the best one. Shop, Item tab, then switch the left rail from Item to Glimmer. Sparkling Crystals sell there at 15 Glimmer for 10, with a weekly limit of 100 buys. That is 1,000 crystals for 1,500 Glimmer, which is exactly one Sparkling Cube a week.
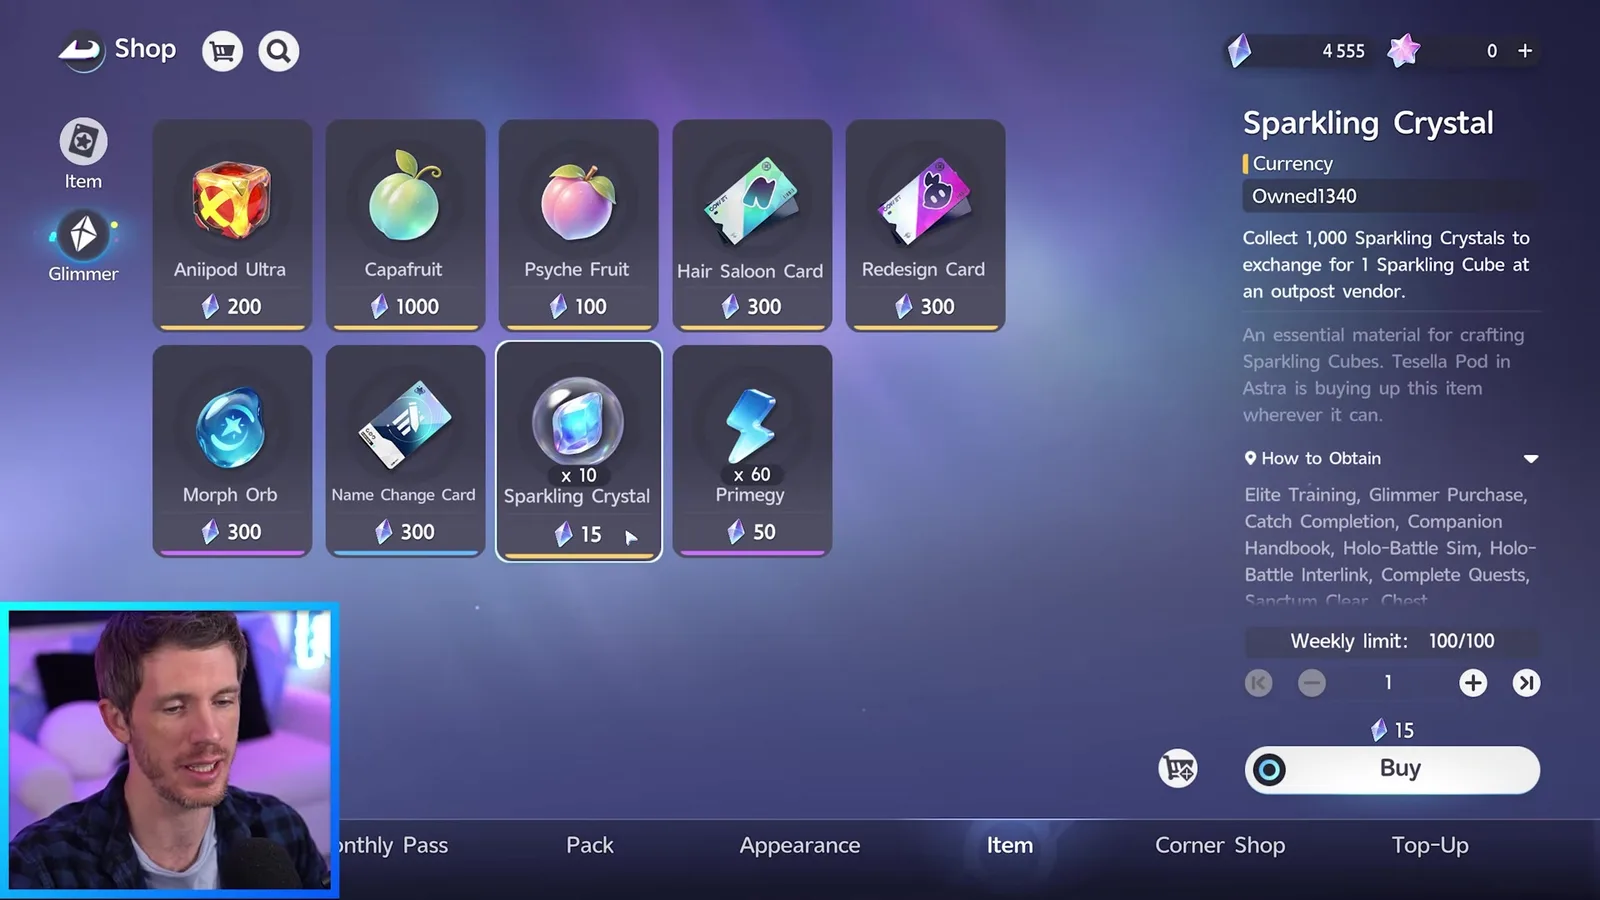
The currency conversion is deliberately confusing, and the video untangles it well. The same two items sit on the paid Lumin Crystal tab at 200 Lumin Crystals for an Aniipod Ultra and 1,500 for a Sparkling Cube. The Glimmer tab charges 200 Glimmer for the same Ultra and 1,500 Glimmer worth of crystals for the same Cube. The prices are identical, the currency is not, and Glimmer is the one you can earn.
So the free ceiling, in full: ten Aniipod Ultras and one Sparkling Cube per week, for 3,500 Glimmer. Glimmer arrives from the Companion Handbook, from Legendary Journey petal milestones at 50 to 200 a step, from Twitch drops and from the codes page, so it is worth keeping a running balance rather than spending it on cosmetics.
Kairos’ own recommendation, if you have to choose: take the Sparkling Crystals. The Cube is the more premium outcome, and ten Ultras a week is easier to replace from vouchers and the handbook than 1,000 crystals are.
What to buy first, and what to leave
The order below follows the prices on this page, not a feeling.
- Clear the discounted Aniipod Pro row every week. 4,000 Credits for a 1.5x pod is the best Credits-per-catch rate in either shop, and the row refills on a weekly counter.
- Buy the discounted Aniipod Mega when it is there. 6,000 for a 2x pod. It sells out, so check early in the week.
- Take the 1,500 Glimmer of Sparkling Crystals every week. A free Cube is worth more than anything else 1,500 Glimmer buys.
- Buy the Tumbler only at Super Claw. 100,000 rather than 200,000, and only if you are running Nurture.
- Check the Mysterious Vendor daily. It costs nothing to look, and the Aniipod Track at 5,000 is a real saving against 7,200.
What to leave: the 3,500 and 7,000 Credit rows at the outpost vendor, unless you have Credits you cannot spend. The discounted rows exist, the world is full of free pods, and the Homeland prints more while you sleep. Paying full price is the one avoidable mistake in this whole economy.
And do not throw the premium pods at anything. A Sparkling Cube on a creature you were going to catch anyway is 1,000 crystals wasted, and an Aniipod Ultra on an egg does nothing at all. The egg hatching guide covers which device belongs on which egg, and the Aniipod hub covers which multipliers stack with what.
Every cap and reset on one screen
| Shelf | Counter as printed | What it means |
|---|---|---|
| Outpost vendor, discounted Aniipod and Aniipod Pro | Weekly limit:: 1/100 | 100 a week at the cut price, 1 left when this was filmed |
| Outpost vendor, full price rows | No limit line | Buy as many as your Credits allow |
| Outpost vendor, Daily Supply Pack | Daily limit:: 3/3 | Three a day |
| Super Claw, discounted row | Sold Out on camera | Weekly, and it goes fast |
| Mysterious Vendor, Aniipod Track | Daily limit:: 40/40 | Forty a day, on the days it rotates in |
| Mysterious Vendor, Aniipod Ultra | Daily limit:: 1/1 | One a day, seen on launch day |
| Glimmer, Aniipod Ultra | Weekly limit: 10/10 | Ten a week for 2,000 Glimmer |
| Glimmer, Sparkling Crystal ×10 | Weekly limit: 100/100 | 1,000 crystals a week for 1,500 Glimmer |
| Stamp Shop, Weekly tab | Weekly limit:: 10/10 | Ten of each material a week |
| Stamp Shop, Season tab Sparkling Cube | Spend 0/2500 Windborn Stamps | Unlocks on cumulative spending, then costs 500 |
| Stamp Rush | Weekly earned 380/1000 | 1,000 stamps a week, resets Monday 04:00 |
One honest gap to close the page with. The video is one account, three days after launch, and one of its best shots is from launch day itself. Weekly counters were already partly spent when it was recorded, so the numbers above are the caps rather than a fresh week’s stock. Everything that could be checked against the game’s data files has been, and where it could not be, this page says which screen it came from and when.
Sources
- Kairos · “How to get Sparkling Cubes & ALL Aniipods!” (video, 19 September 2026)
- Kairos on YouTube
- The game’s data files: every Aniipod, its capture multiplier, its shop price and its listed sources
- The game’s map data: 599 Aniipod pickups, 773 chests and the Astra vendor pins
- Sparkling Crystals from Vein Abundance, and what to spend a Cube on
- Windborn Stamps, the Stamp Shop and the Stamp Rush source list