Gameplay · 15 min
Aniimo Best Talents and Report Card Costs
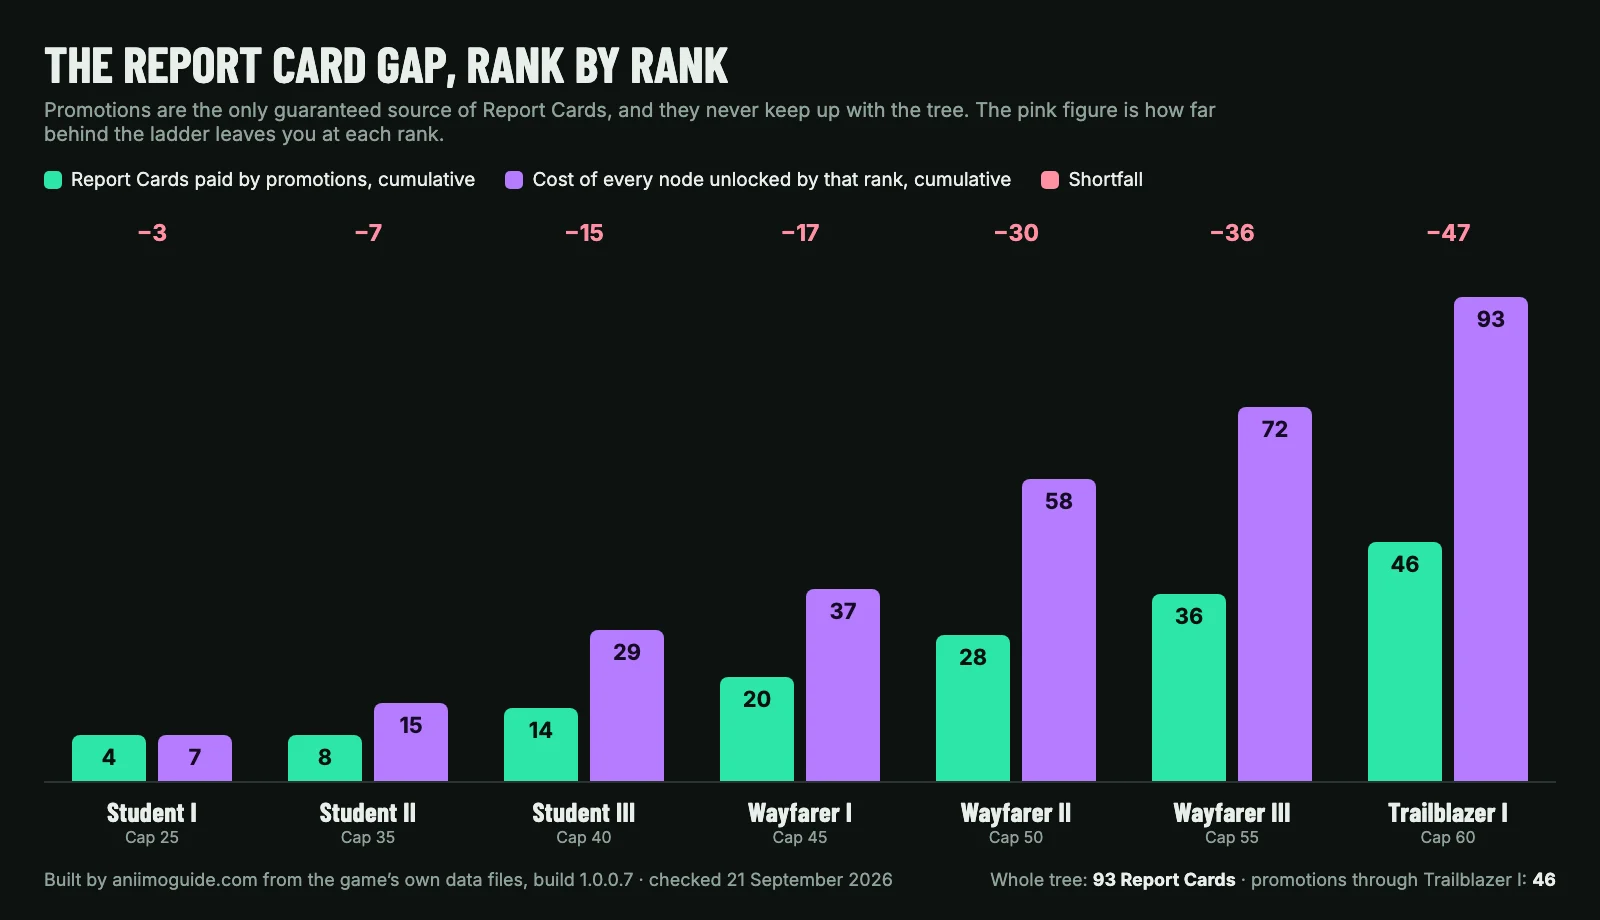
Maxing Aniimo’s Pathfinder talent tree costs 93 Report Cards and the promotion ladder pays 46 of them, so the tree is a budget before it is a build. Every node, its rank, its exact price and the order we would buy them in, read out of the game’s own data files and checked against the live client on 21 September 2026.

The best talents in Aniimo are Mode Switch, Master Trainer, Enhanced Twining and the Aeroboard: four nodes that cost 1 Report Card each, so your first four cards buy all four. Maxing the whole Pathfinder tree costs 93 Report Cards, the promotion ladder pays only 46 of them by Trailblazer I, and that gap is what turns a talent screen into a budget.
Every number on this page is read out of the game’s own data files, build 1.0.0.7, and checked on 21 September 2026: all 27 live nodes, the rank that opens each one, the Report Card price of every level, and the client’s own wording for what the talent does. Where a figure in circulation disagrees with the client, we follow the client and say which one moved.
The best talents in Aniimo, ranked
Ranked by what one Report Card buys, not by what reads best on a tooltip. The rank in brackets is the promotion that opens the node.
- Mode Switch, 1 card (Student I). The client is blunt: “Enables switching between Catch Mode, Attack Mode, and Defense Mode.” One card for a third of the combat interface.
- Master Trainer, 1 card for level 1 (Student I). 10% more Aniimo EXP from catches, kills and EXP items, rising to 30%. Nothing about it is retroactive, so every hour you delay it is taxed.
- Enhanced Twining, 1 card for level 1 (Student I). 7% more Aniimo damage after twining, and twining is how a fight starts. It ends at 25%, the largest multiplier in the tree.
- Aeroboard, 1 card (Student I). A board that costs no stamina and works in Astra, on a 20 second cooldown in the ability table.
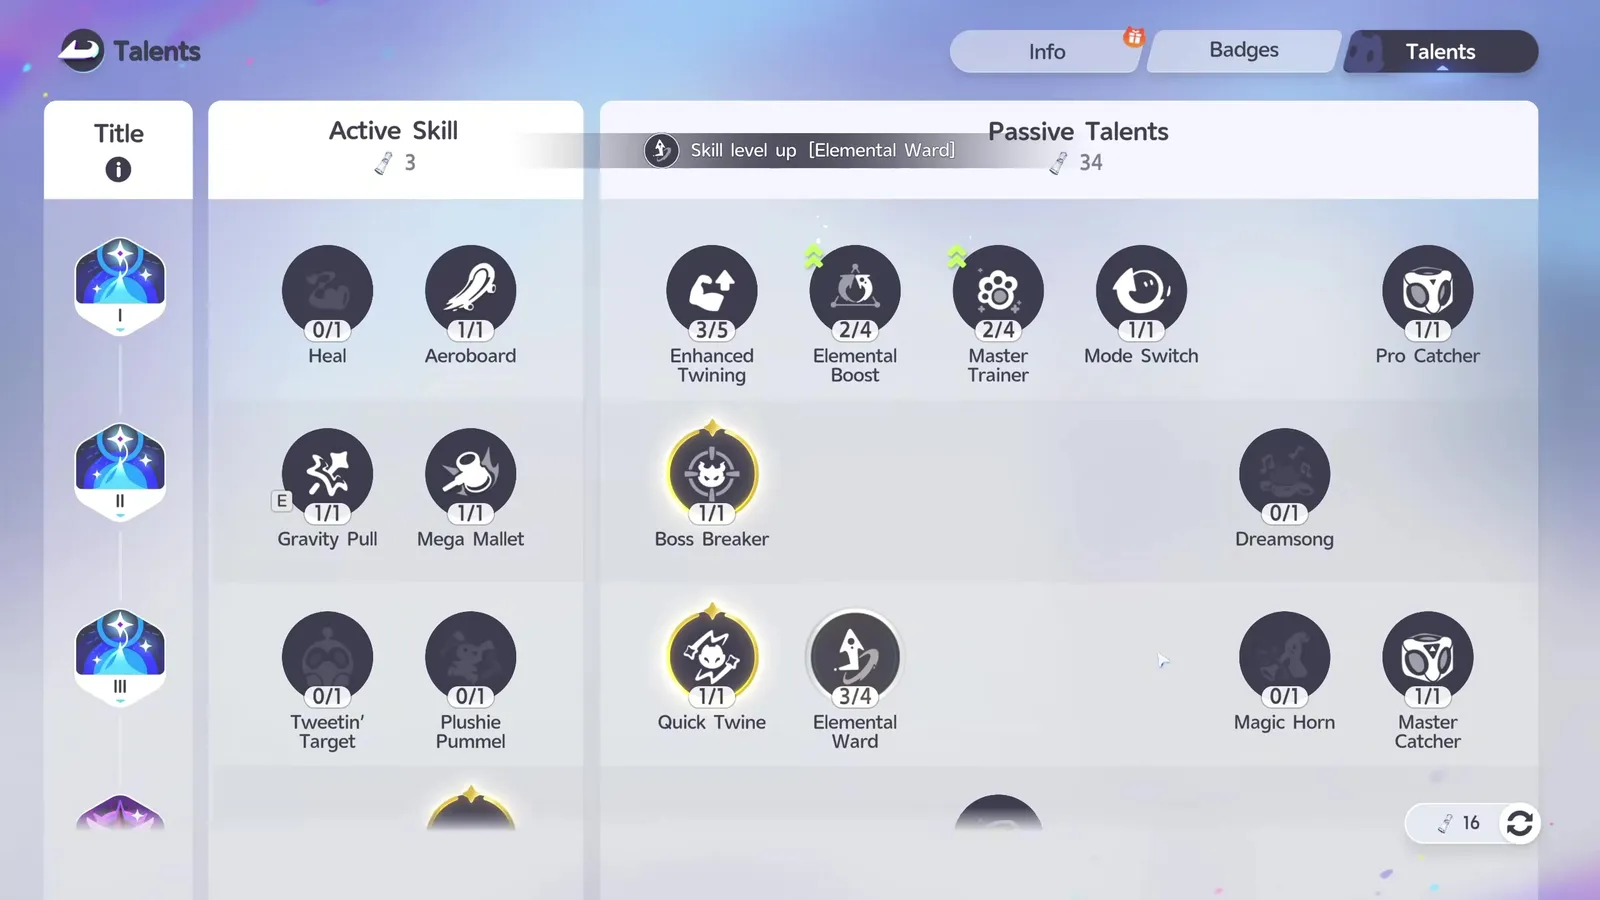
- Gravity Pull, 1 card (Student II). The client calls it “essential for solving puzzles in ancient ruins”, and it is not being modest.
- Master Catcher, 2 cards (Student III). Unlocks Aniipod Megas, Hypers, Traces and Tumblers for purchase. Until you own it, the only pod Super Claw sells you is the 3,500 Credit basic.
- Research Expert, 2 cards for level 1 (Wayfarer I). 10% more Credits from Reporting, rising to 30%. Reporting pays for the pods above.
- Quick Twine, 2 cards (Student III). Twining becomes instant. Not a damage number, a tax you stop paying every fight.
One word needs separating here, because two systems share it in chat. A talent is a Pathfinder node bought with Report Cards. The grade a wild Aniimo rolls, Common through Perfect, is its Potential, which plenty of players also call a talent. If that is the one you came for, our Potential guide has the odds, and the tier list has who deserves them.
How the Pathfinder talent tree works
Your rank opens rows, Report Cards pay for nodes, and a third rule quietly decides when you are allowed to buy the good half. The tree is a grid of eight columns and one row per rank. In the data files every node carries a row number and a required title, and for all 27 they are the same number. The row is the promotion that opened it.
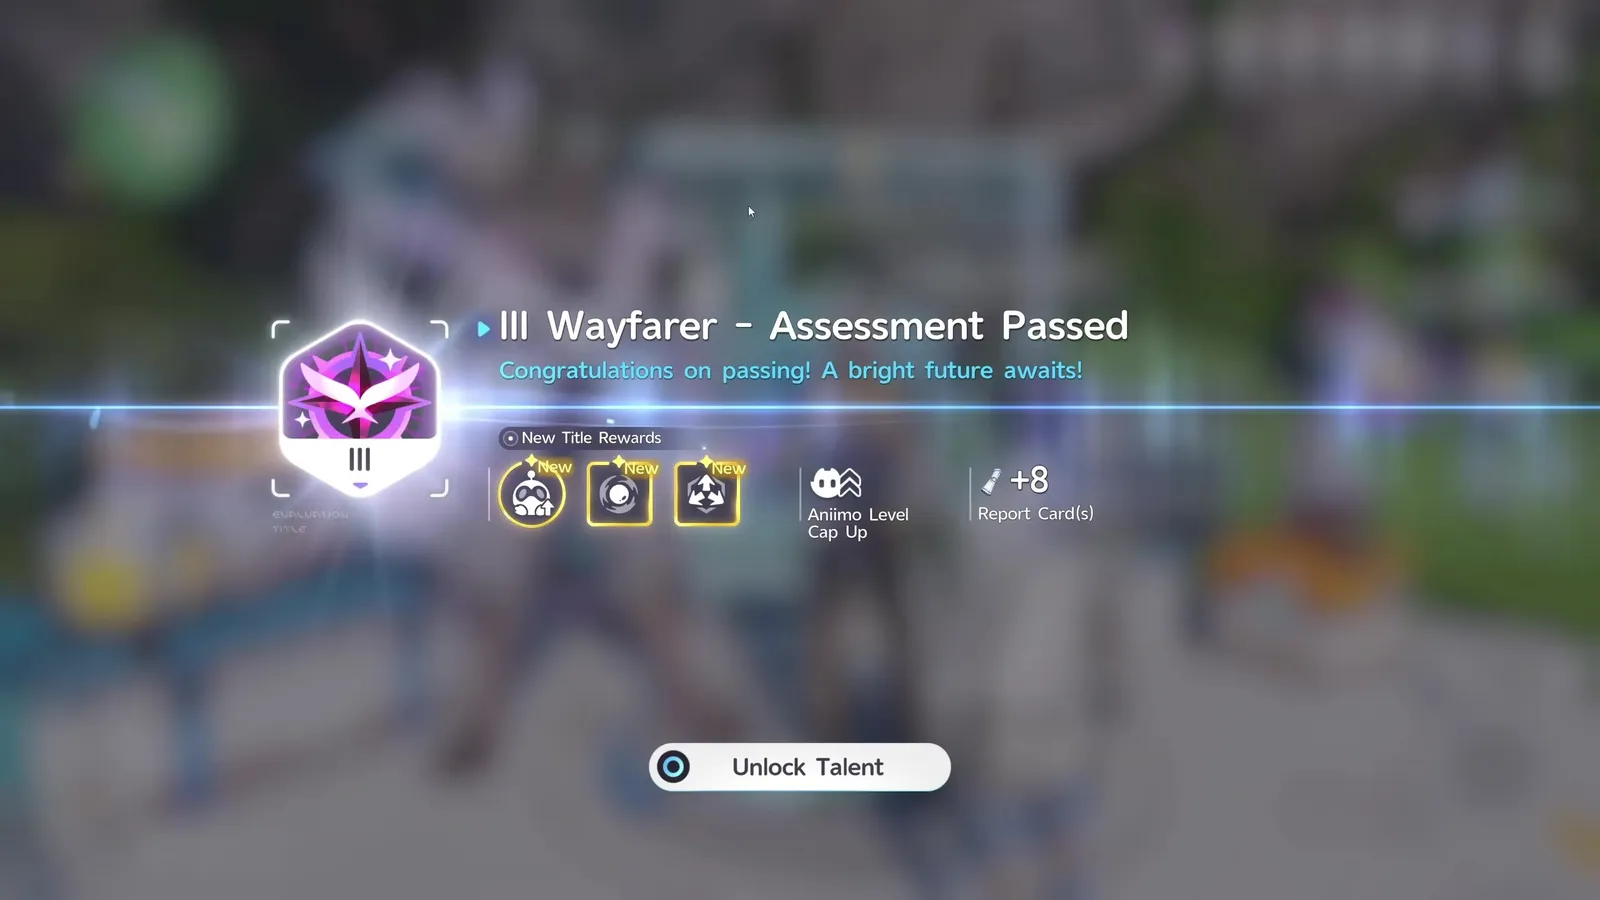
Ranks come from Elite Training. Finish four of a chapter’s five required Core Course quests, pass the assessment, and the screen that congratulates you carries a title, an Aniimo level cap rise and a fistful of Report Cards. It also carries an Unlock Talent button, which is the step most people walk past. Our levelling route covers the ladder itself and the menu guide covers where Elite Training hides.
Now the third rule, and we have not seen it written down anywhere. Almost every node past the first row carries a second condition on top of its price: a number of Report Cards you must already have spent. The thresholds are a short ladder, 8, 16, 24, 40 and 56, and they are counted per branch. Active Skills check what you have spent on Active Skills, Passive Talents check what you have spent on Passive Talents. That is why the screen keeps two counters in its column headers instead of one.
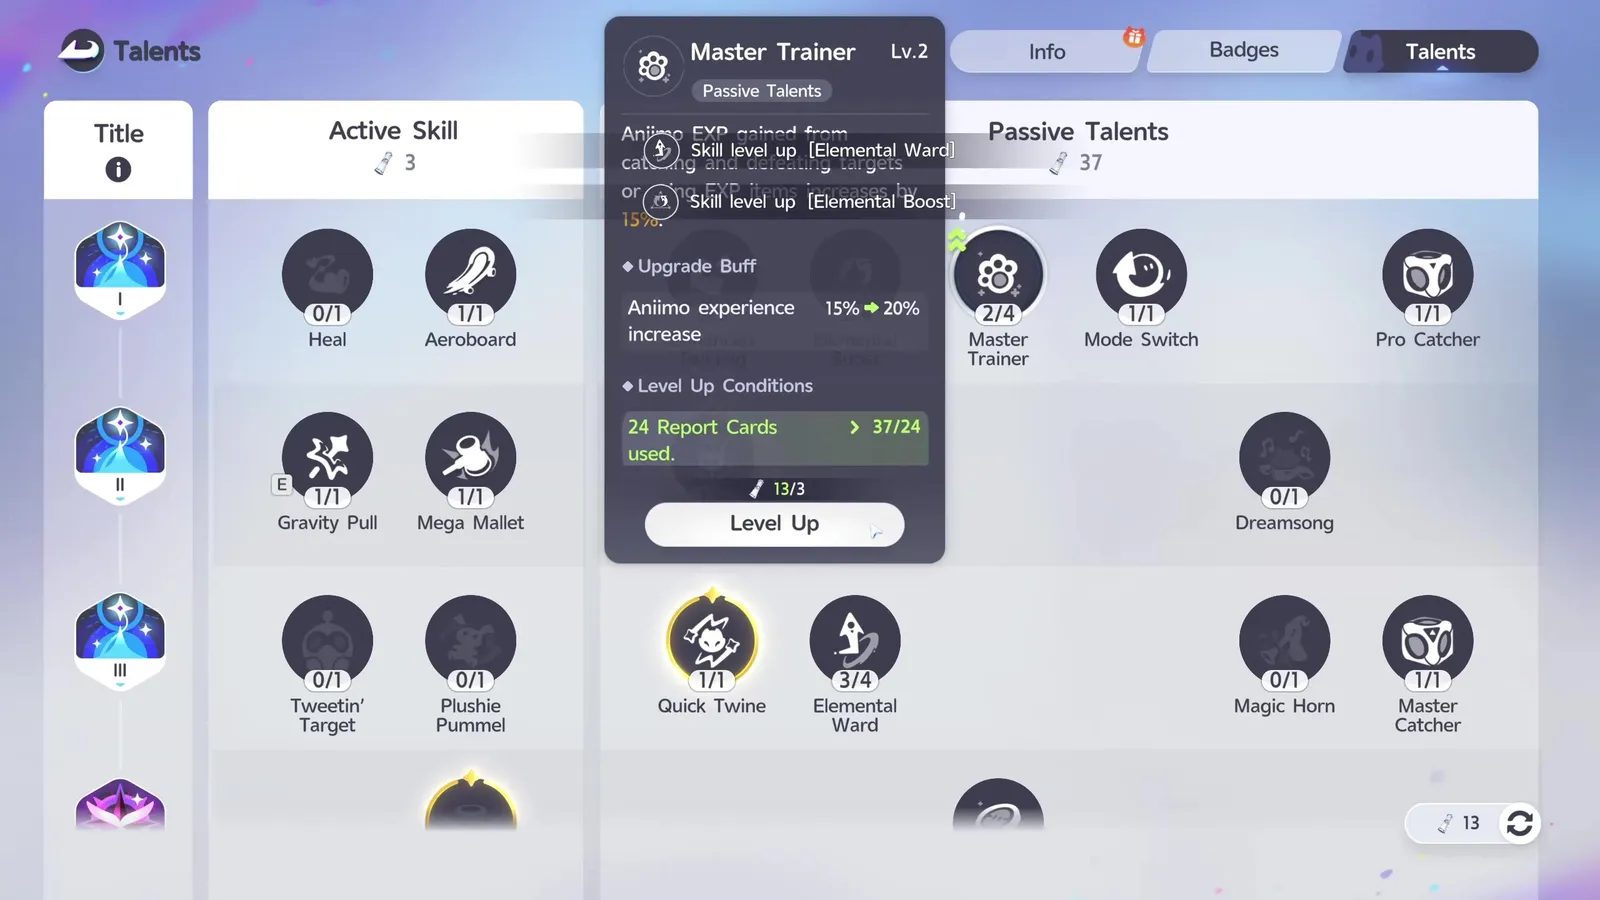
The practical effect is that a cheap talent is never wasted. Pro Catcher for 1 card is also one card of progress towards the 8 that open the Student III passives. The unpleasant version of the same rule: a player who pours everything into Active Skills will find the passive side shut, and the other way round.
What Report Cards are, and how to get them
A Report Card is the single currency the talent tree runs on, item 1000 in the client, and its own description tells you where it goes: “A certificate issued by Polaris Institute. Enhances passive talents. Use in the [Character] > [Talents] menu.” It is quality 5, it does not stack against a cap you will ever reach, and nothing in the game converts anything else into one.

That distinction is the one people get wrong. Account levels do not pay Report Cards. Promotions do. The level rungs and the title rewards are drawn on the same panel, so the cards look like a level prize; the reward tables keep them apart. Here is the whole ladder, with the level you have to reach to sit the assessment and the cap it leaves you with.
| Rank | Level to sit it | Cap after | Report Cards | Running total |
|---|---|---|---|---|
| Student I | Story | 25 | 4 | 4 |
| Student II | 25 | 35 | 4 | 8 |
| Student III | 35 | 40 | 6 | 14 |
| Wayfarer I | 40 | 45 | 6 | 20 |
| Wayfarer II | 45 | 50 | 8 | 28 |
| Wayfarer III | 50 | 55 | 8 | 36 |
| Trailblazer I | 55 | 60 | 10 | 46 |
| Trailblazer II | 60 | 65 | 10 | 56 |
Fifty-six cards at the current ceiling, against a tree that wants 93. The rest has to come from the other three taps the item’s own How to Obtain panel names: Aniilog Level, Journey Quests and the Elite Pathfinder Challenge, alongside the level rewards screen the panel calls Upgrade Level.
The Aniilog one is the big one and almost nobody treats it as a talent source. Idyll’s research track runs twelve levels, from 500 research points to 48,000, and it pays 22 Report Cards across them: 1 at level 1, 1 at level 2, then 2 at every level from 3 to 12. Catching and reporting species is therefore talent progress, which is the neatest argument for Master Trainer and Research Expert that the game never makes out loud.
Count every fixed reward in the launch build that pays this item and you get 158 Report Cards across 72 separate reward entries. That is comfortably more than 93, so the tree is finishable. It is also spread across a continent’s entire research track, seven promotions, a pile of journey quests and a challenge mode, which is why it feels rationed rather than generous.
Every talent in the tree, its rank and its cost
Sorted by the rank that opens it, then Active Skills before Passive Talents. The description column is the client’s own text, quoted rather than paraphrased, with the maxed line shown for anything that has more than one level.
| Talent | Type | Opens at | Cost per level | Total | What the client says it does |
|---|---|---|---|---|---|
| Heal | Active | Student I | 1 | 1 | You sprinkle healing dust on the engaged Aniimo to restore its HP. |
| Aeroboard | Active | Student I | 1 | 1 | A hover board that helps you travel faster and does not cost stamina. Can be used in Astra. |
| Enhanced Twining | Passive | Student I | 1 + 2 + 2 + 3 + 3 | 11 | Increases Aniimo damage by 7% after twining. Maxed: Increases Aniimo damage by 25% after twining. |
| Elemental Boost | Passive | Student I | 1 + 2 + 3 + 3 | 9 | Increases Elemental Counters effect by 2%. Maxed: Increases Elemental Counters effect by 10%. |
| Master Trainer | Passive | Student I | 1 + 2 + 3 + 3 | 9 | Aniimo EXP gained from catching and defeating targets or using EXP items increases by 10%. Maxed: Aniimo EXP gained from catching and defeating targets or using EXP items increases by 30%. |
| Mode Switch | Passive | Student I | 1 | 1 | Enables switching between Catch Mode, Attack Mode, and Defense Mode. |
| Pro Catcher | Passive | Student I | 1 | 1 | Unlocks Aniipod Pro in the shop. |
| Gravity Pull | Active | Student II | 1 | 1 | Activates the target’s energy field to create a gravity link, allowing you to move objects with ancient energy patterns from a distance. Essential for solving puzzles in ancient ruins. |
| Mega Mallet | Active | Student II | 1 | 1 | Smashes the targets within a circular area in front with a huge energy hammer, dealing a large amount of BREAK damage. It can also smash solid objects. |
| Boss Breaker | Passive | Student II | 2 | 2 | Increases damage to Alpha and Omega by 5%. |
| Dreamsong | Passive | Student II | 2 | 2 | Unlocks Dreaple’s exceptional evolution. |
| Tweetin’ Target | Active | Student III | 1 | 1 | Consumes 1 Rubber Duck and throws it at the target area to draw the attention of all Aniimo in a non-combat state within range for 10s. |
| Plushie Pummel | Active | Student III | 1 | 1 | You spin around and wave the doll like crazy, dealing BREAK damage to targets in your path and smashing hard objects. |
| Quick Twine | Passive | Student III | 2 | 2 | Amplifies your mind power and reduces the time needed to twine with an Aniimo to a mere instant. |
| Elemental Ward | Passive | Student III | 2 + 2 + 3 + 3 | 10 | Increases Element Resistance effect by 2%. Maxed: Increases Element Resistance effect by 10%. |
| Magic Horn | Passive | Student III | 2 | 2 | Unlocks Tromber’s exceptional evolution. |
| Master Catcher | Passive | Student III | 2 | 2 | Unlocks purchasing Aniipod Megas, Aniipod Hypers, Aniipod Traces, and Tumblers from shops. |
| Revive | Active | Wayfarer I | 2 | 2 | Allows you to revive Aniimo in your party. |
| Research Expert | Passive | Wayfarer I | 2 + 3 + 3 + 3 | 11 | Reporting grants 10% more Credits. Maxed: Reporting grants 30% more Credits. |
| Bubble Gun | Active | Wayfarer II | 3 | 3 | Prevents the target Aniimo from Fainting. While the effect is active, its HP cannot drop below 1, allowing the Aniimo to be caught multiple times in battle. |
| Nimble Dodge | Passive | Wayfarer II | 3 | 3 | Reduces stamina cost for dodging by 10%. |
| Peculiar Rock Ball | Passive | Wayfarer II | 3 | 3 | Unlocks Bouldus’s exceptional evolution. |
| Go, Rubber Duck! | Active | Wayfarer III | 2 | 2 | Consumes 1 Giant Rubber Duck and throws it at the target area, drawing the attention of all out-of-combat Aniimo within a large area for 20s. |
| Measured Strike | Passive | Wayfarer III | 3 | 3 | Aniimo deals 10% increased damage to targets in Break State. |
| Sure Shot | Passive | Wayfarer III | 3 | 3 | Greatly increases Aniipod’s targeting range. |
| Fast Charge | Passive | Trailblazer I | 3 | 3 | Increases the charging speed of Aniimo ultimates by 10%. |
| Unwavering Rampart | Passive | Trailblazer I | 3 | 3 | Unlocks Rookey’s exceptional evolution. |
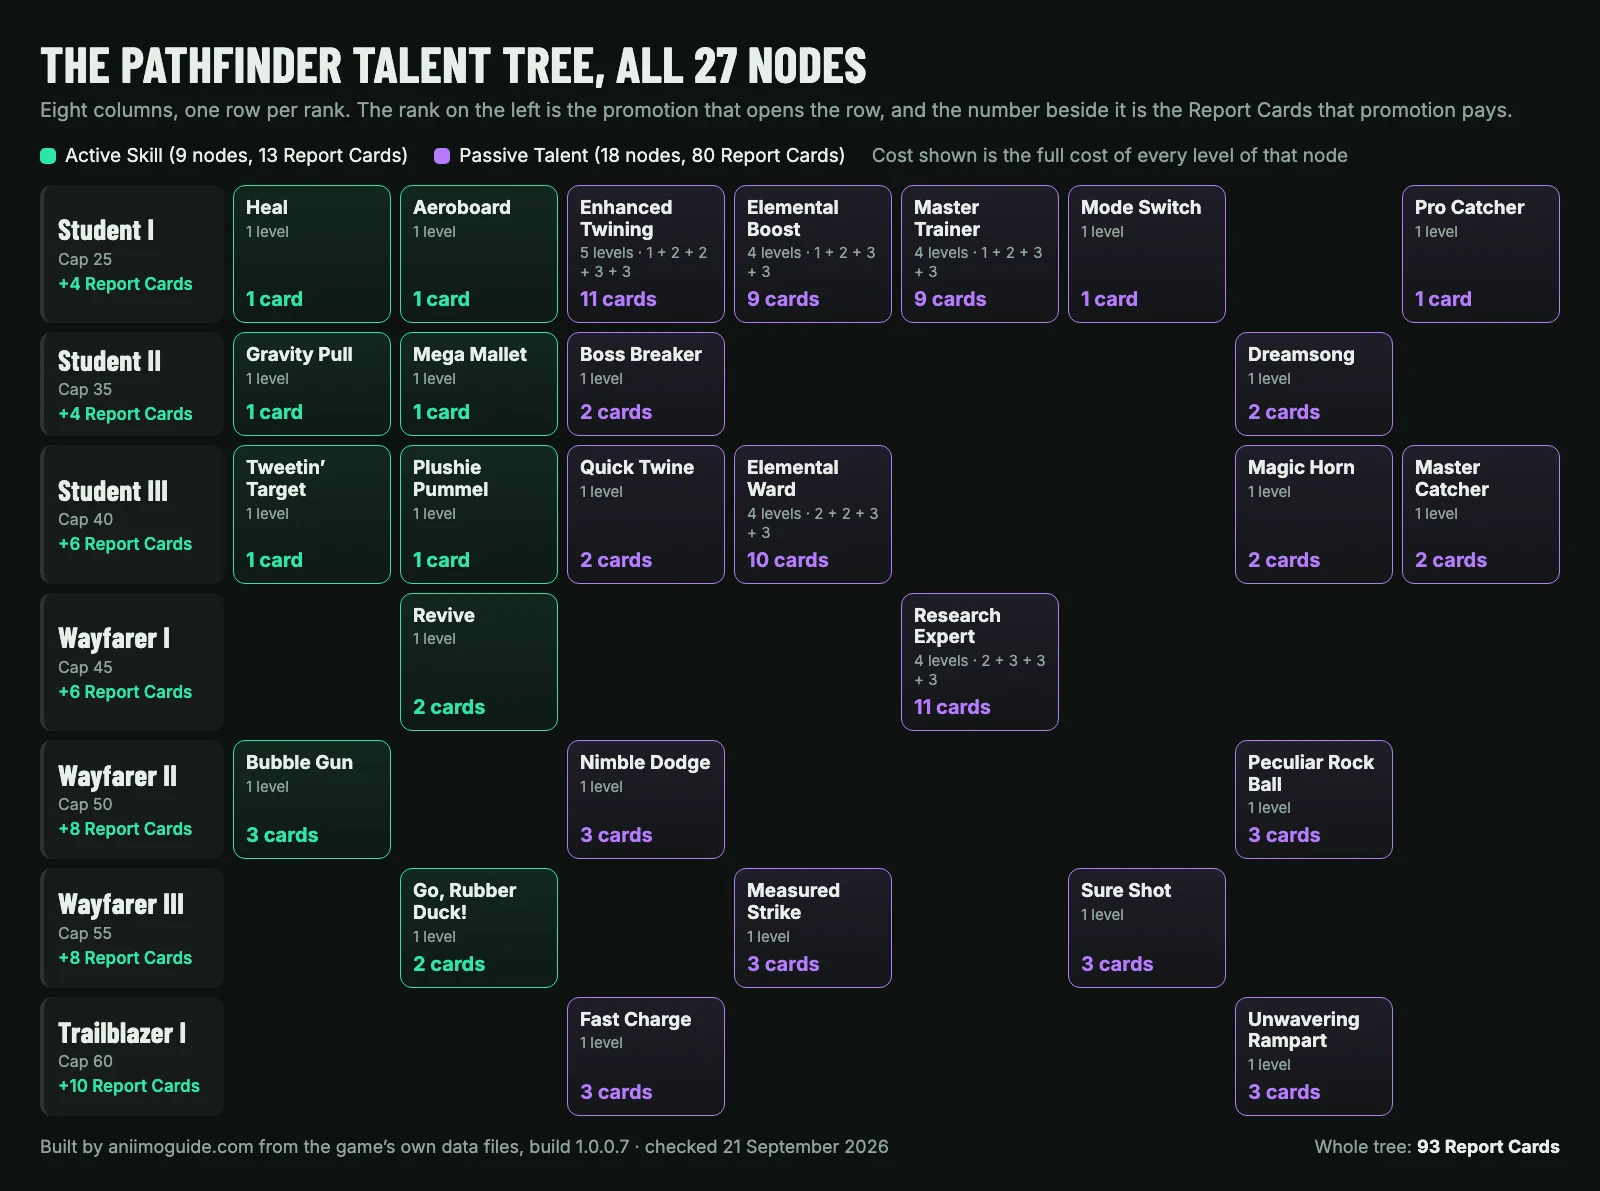
Two shapes fall out of that grid. The Active column is cheap and finite: nine skills, 13 cards, six of them a single card each. The passive side holds 80 of the 93, because five of those eighteen nodes have three or four upgrades stacked behind them.
The five talents that have more than one level
Enhanced Twining, Master Trainer, Research Expert, Elemental Boost and Elemental Ward are the only nodes you buy more than once, and between them they account for 50 of the tree’s 93 cards. They also scale unevenly, which changes where a late card should go.
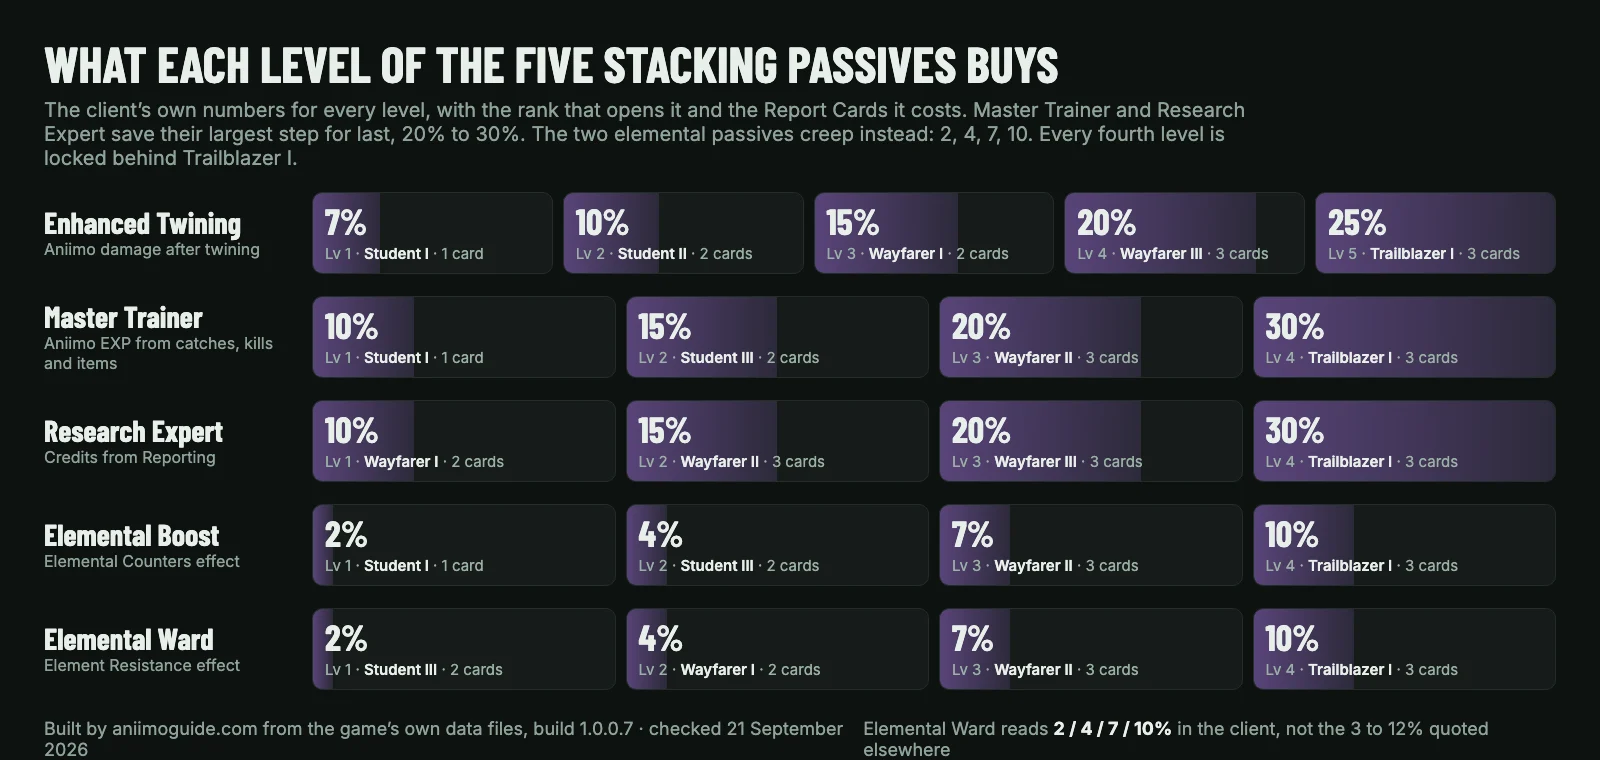
Elemental Ward is the figure to correct. It is quoted elsewhere as 3 to 12%. The client’s four levels read 2%, 4%, 7% and 10%, and Elemental Boost carries the same four numbers on the attacking side. We checked all eight values against the skill table and then against the tooltip on screen, and they agree. If you have budgeted around 12%, you have budgeted for two percentage points that are not in the game.
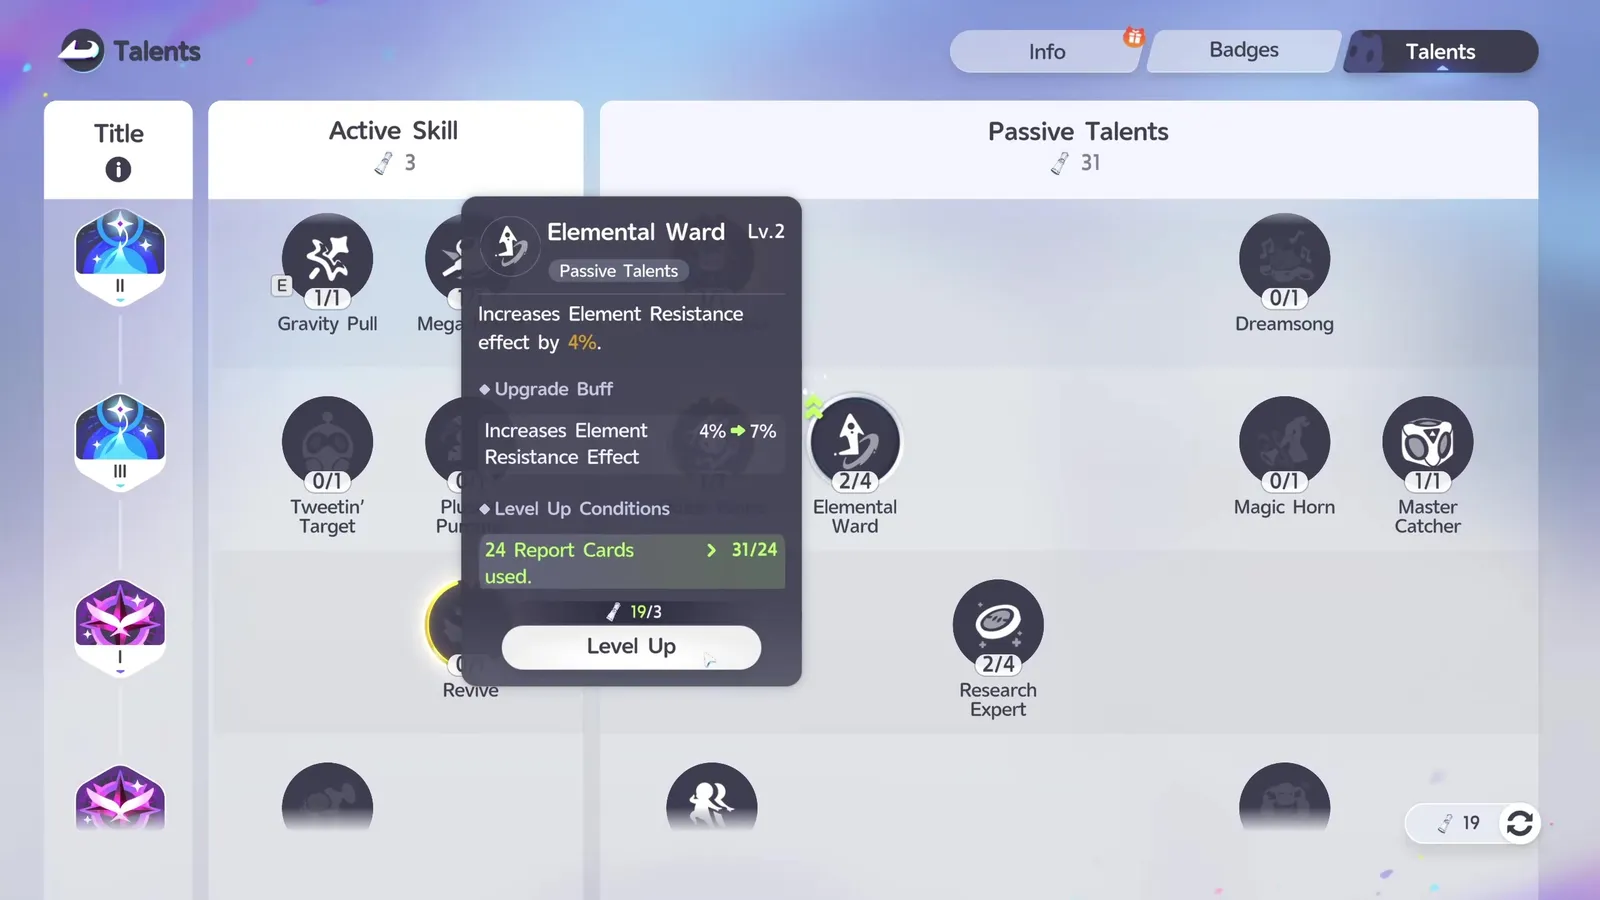
There is something about those two we cannot tell you, and we would rather say so than guess. The text is “Increases Elemental Counters effect by 10%”, and the client never defines what a 10% increase to an effect is a percentage of. Aniimo’s element chart multiplies damage by 1.6 when you are strong into a type and 0.625 when you are resisted, and nothing in the data says whether Elemental Boost lifts the 1.6, the damage that multiplier produces, or something else. Either way it is a small number with an expensive price: 9 cards for a full Elemental Boost and 10 for a full Elemental Ward, against 11 for Enhanced Twining’s 25%.
Master Trainer and Research Expert are the two we would finish first, for the same reason: they multiply something you do hundreds of times. Our Aniipod page has the shop ladder that makes the case, 3,500 Credits for the basic pod, 7,000 for the Pro, 7,200 for the Hyper and the Track, 10,500 for the Mega and 100,000 for the Tumbler. A 30% uplift on Reporting pays for itself in pods long before it looks impressive on a tooltip.
The order to buy Aniimo talents in
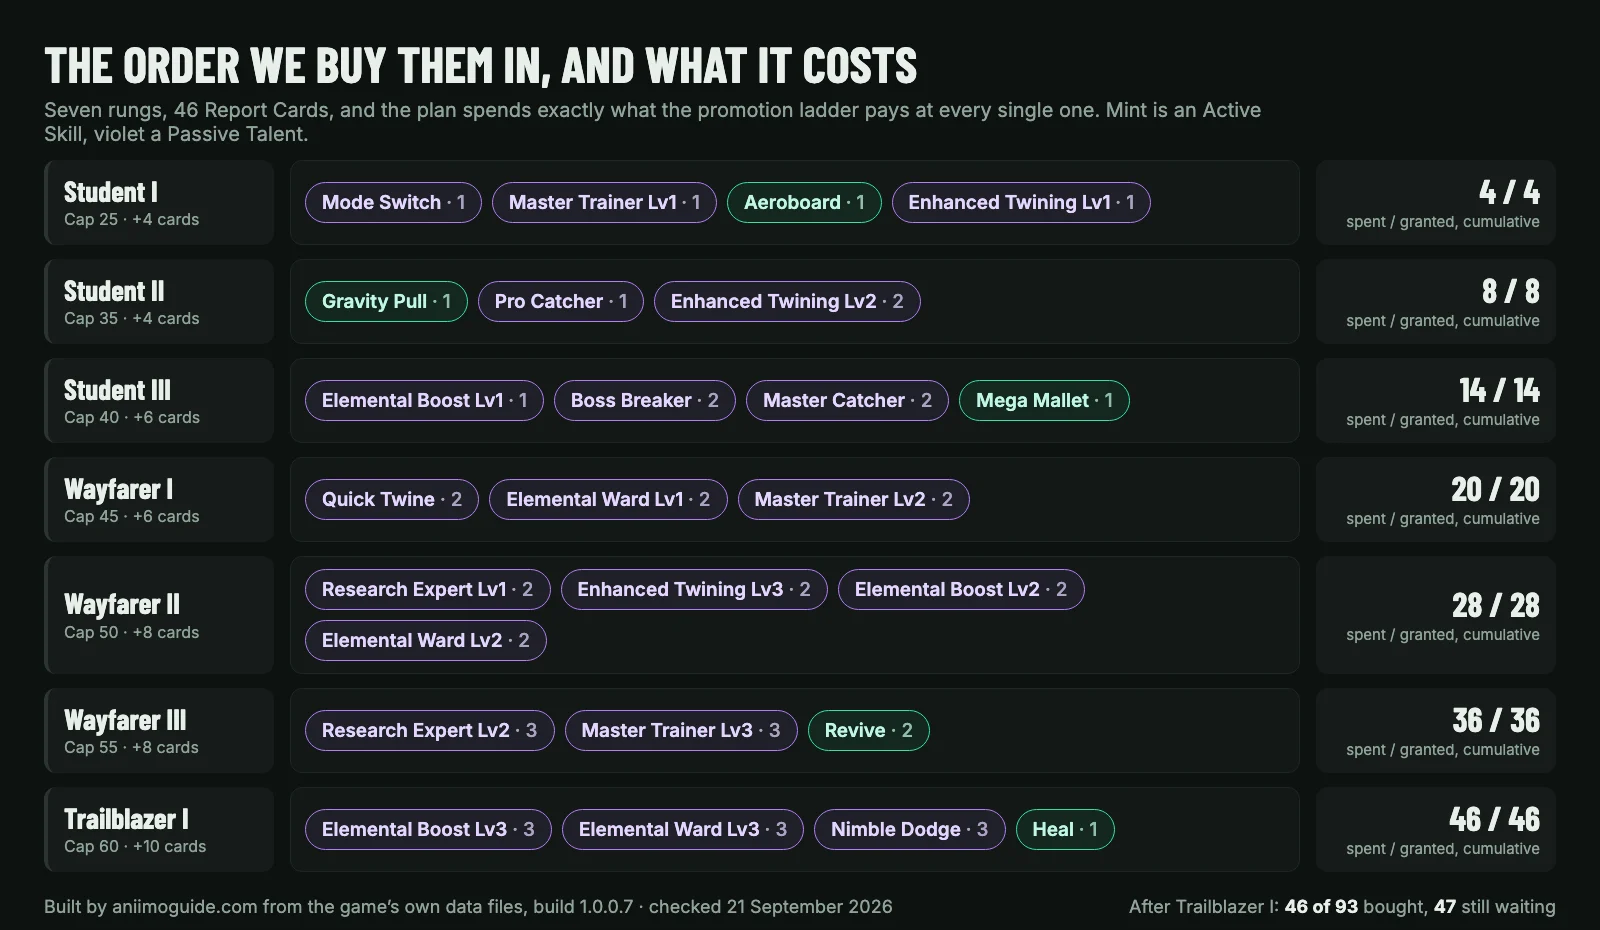
This is the plan we would run, and it spends exactly what the promotion ladder pays at every rung, with nothing borrowed and nothing left idle. It also respects the spend gates, which is why two nodes sit a rank later than their unlock.
| Rank | What to buy | Cost | Spent | Granted by then |
|---|---|---|---|---|
| Student I | Mode Switch, Master Trainer Lv1, Aeroboard, Enhanced Twining Lv1 | 4 | 4 | 4 |
| Student II | Gravity Pull, Pro Catcher, Enhanced Twining Lv2 | 4 | 8 | 8 |
| Student III | Elemental Boost Lv1, Boss Breaker, Master Catcher, Mega Mallet | 6 | 14 | 14 |
| Wayfarer I | Quick Twine, Elemental Ward Lv1, Master Trainer Lv2 | 6 | 20 | 20 |
| Wayfarer II | Research Expert Lv1, Enhanced Twining Lv3, Elemental Boost Lv2, Elemental Ward Lv2 | 8 | 28 | 28 |
| Wayfarer III | Research Expert Lv2, Master Trainer Lv3, Revive | 8 | 36 | 36 |
| Trailblazer I | Elemental Boost Lv3, Elemental Ward Lv3, Nimble Dodge, Heal | 10 | 46 | 46 |
Two rows are doing work you would not guess. Boss Breaker at Student III looks like a weak buy at 2 cards for 5% against Alphas and Omegas, and it is: we take it because Master Catcher needs 8 passive cards spent and the passive counter is one short without it. Elemental Boost Lv1 sits three ranks after it unlocks for the same reason in reverse, as the cheapest legal way to move that counter along.
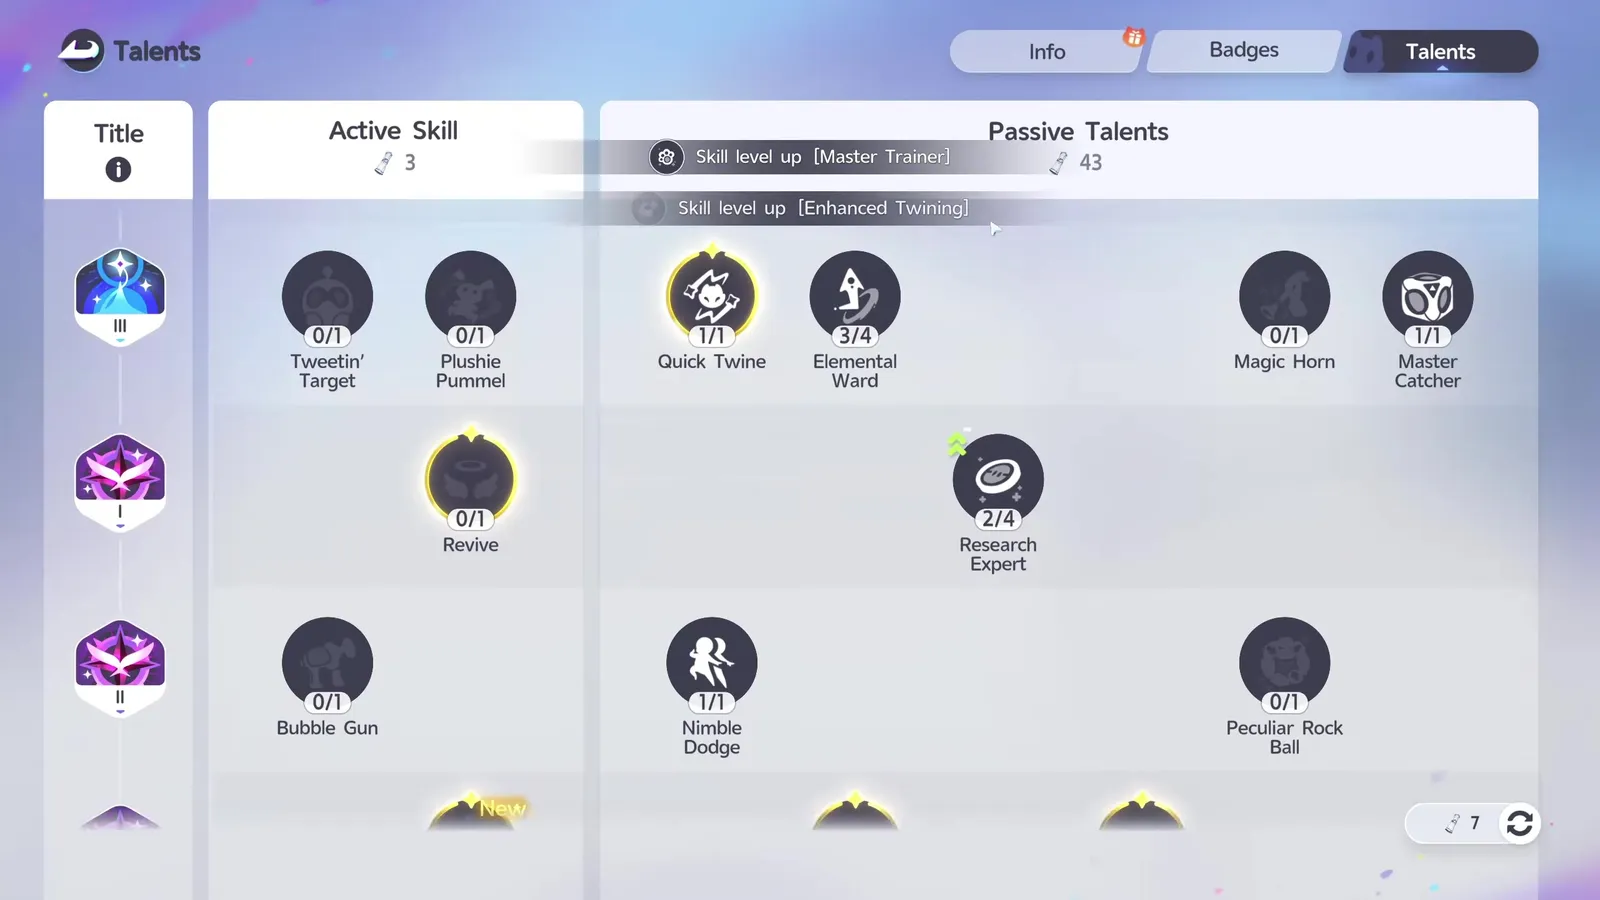
The honest end of the arithmetic is that the ladder runs out. After the Trailblazer I promotion you hold 46 cards, you have spent all of them, and 47 cards of tree are still locked: the four exceptional evolutions (10), the fourth level of every stacking passive (15), Enhanced Twining Lv4 and Lv5 (6), Measured Strike, Sure Shot and Fast Charge (9), Bubble Gun (3) and the four cheap Active Skills nobody is in a hurry for (4).
Three readers should deviate from that list. Collectors move Dreamsong and Magic Horn forward to Student II and Student III: 4 cards buys two exceptional evolutions and pushes everything else back about one rank. Boss farmers take Boss Breaker earlier than we do and add Measured Strike the moment Wayfarer III opens it, because Break State is where the damage window actually is. Anyone still under level 30 should ignore the whole plan and buy the four one-card nodes, since at that point the tree is cheaper than the decision.
What is not worth an early Report Card
Nimble Dodge, 3 cards for 10% less stamina on a dodge, is the weakest node in the tree by a distance, and we only buy it at Trailblazer I because the passive counter needs feeding. Stamina is not what kills you in Aniimo.
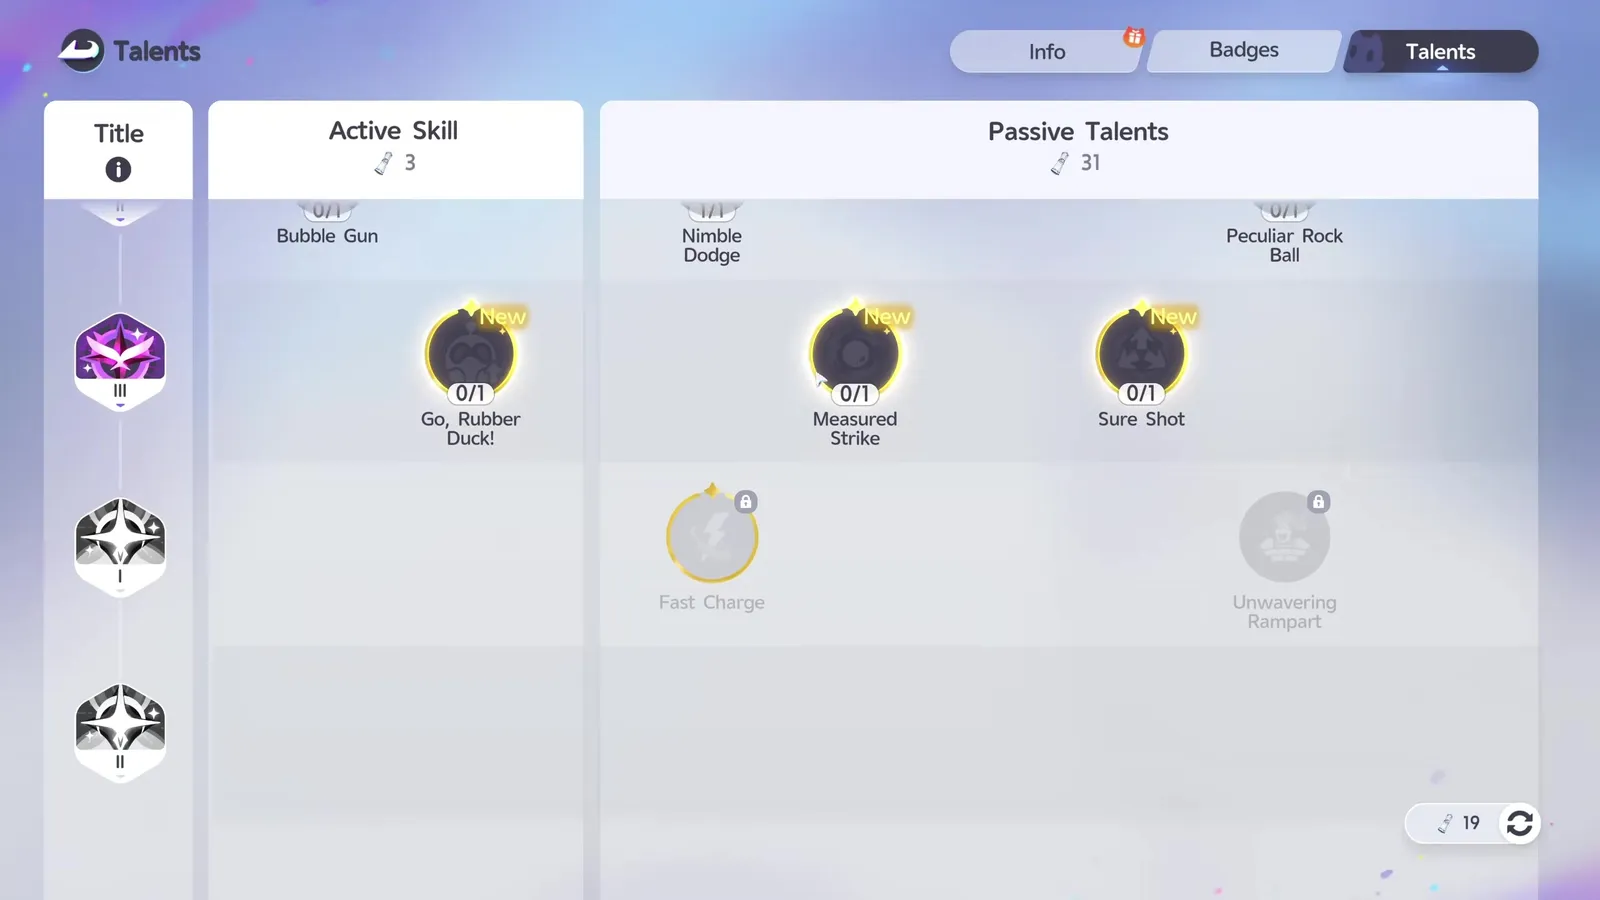
The two rubber ducks are the next skips. Tweetin’ Target, 1 card, throws a Little Rubber Duck to hold out-of-combat Aniimo in place for 10 seconds on a 20 second cooldown. Go, Rubber Duck!, 2 cards, does the same for 20 seconds over a larger area on a 60 second cooldown and eats a Giant Rubber Duck each throw. Both spend an item to make a catch tidier, and neither changes what you can catch.
Plushie Pummel, 1 card, is the one to leave alone on evidence rather than taste. It and Mega Mallet both deal BREAK damage and both smash hard objects, and in the ability table Mega Mallet carries power 25.94 against Plushie Pummel’s 5.83, on a shorter cooldown at 15 seconds against 20. Same price, four times the hit. Take the hammer.
Bubble Gun at 3 cards is the interesting skip, because it is genuinely strong and genuinely late. It stops a target Aniimo fainting, holding its HP above zero so it can be thrown at repeatedly, on a 2 second cooldown. Hunting one specific rare creature, it is the best active in the tree. Still filling an Aniilog, it is 3 cards that could have been most of a Research Expert level.
The talents you cannot skip
Five nodes are not upgrades, they are switches, and content stays shut until you buy them. None is expensive, and all of them are easy to walk past on a screen that looks optional.
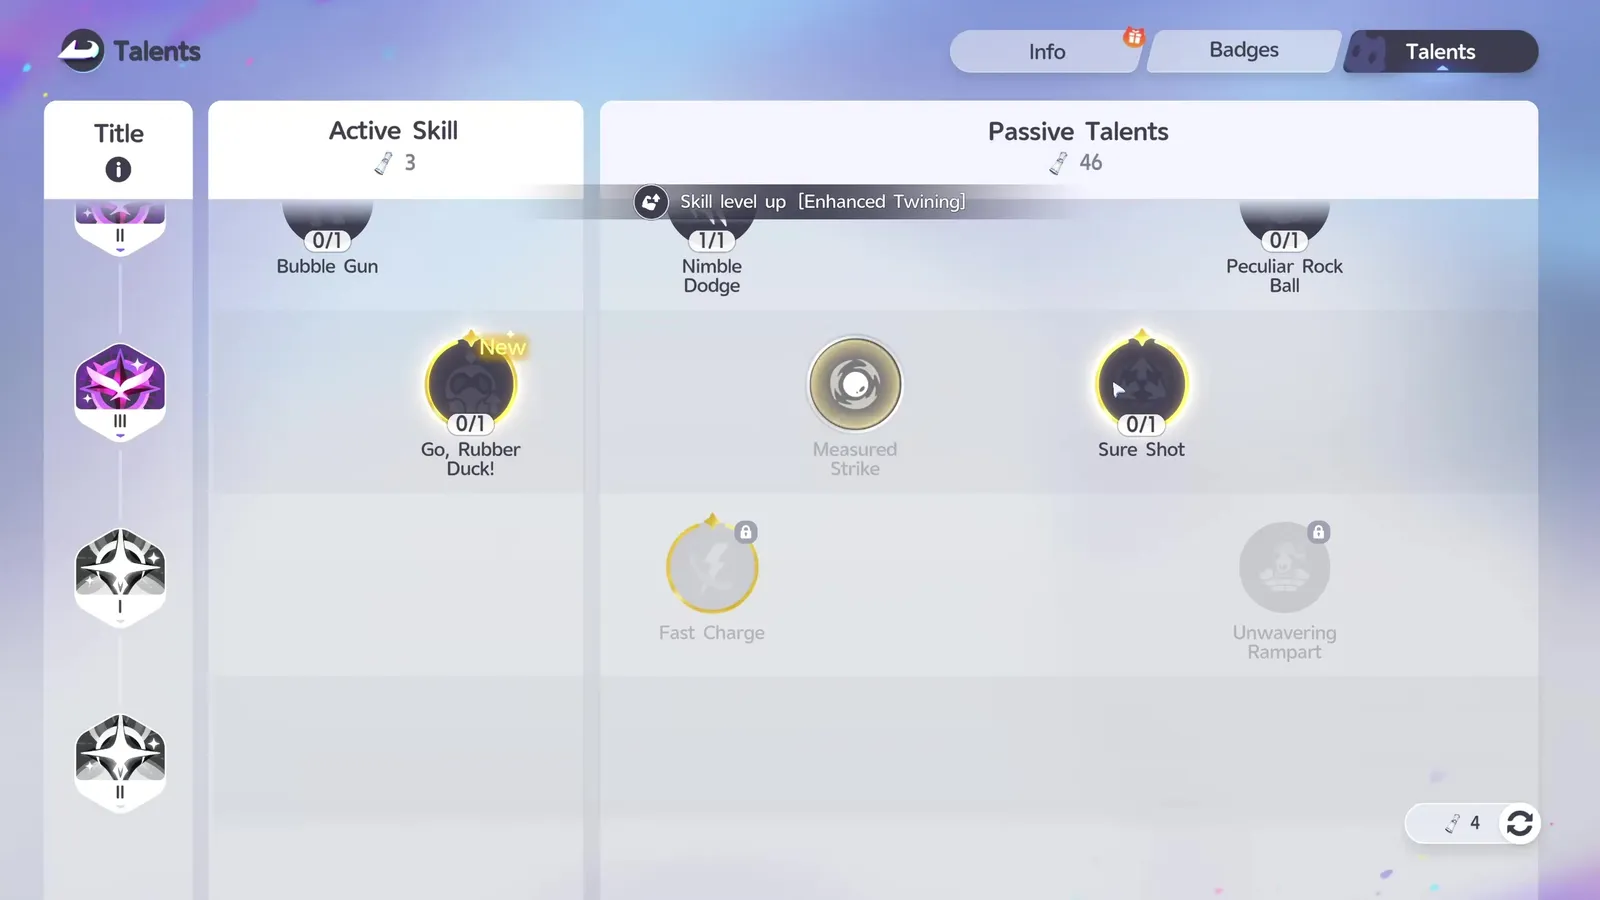
Gravity Pull, 1 card at Student II, moves objects with ancient energy patterns at a distance and is the tool ruin puzzles are built around. Mode Switch, 1 card at Student I, gives you the three stances. Aeroboard, 1 card at Student I, is the traversal answer, and it works alongside the Blooms and Transporters in our fast travel guide rather than replacing them; the interactive map is where you plan the route it shortens.
Then the two catchers. Pro Catcher, 1 card, unlocks the Aniipod Pro in the shop. Master Catcher, 2 cards, unlocks the Mega, the Hyper, the Trace and the Tumbler. Three cards is the whole price of a working shop, and a Pathfinder who has not spent them is throwing 3,500 Credit basics at creatures that deserve a 10,500 Credit Mega.
Last, the four exceptional evolutions, pure collector gates costing 10 cards between them: Dreamsong for Dreaple (2 cards, Student II), Magic Horn for Tromber (2 cards, Student III), Peculiar Rock Ball for Bouldus (3 cards, Wayfarer II) and Unwavering Rampart for Rookey (3 cards, Trailblazer I). Buy each when you actually own the Aniimo. The node does nothing on its own, and the evolved form is worth building a squad around afterwards, which is what our squad templates are for.
How we checked this
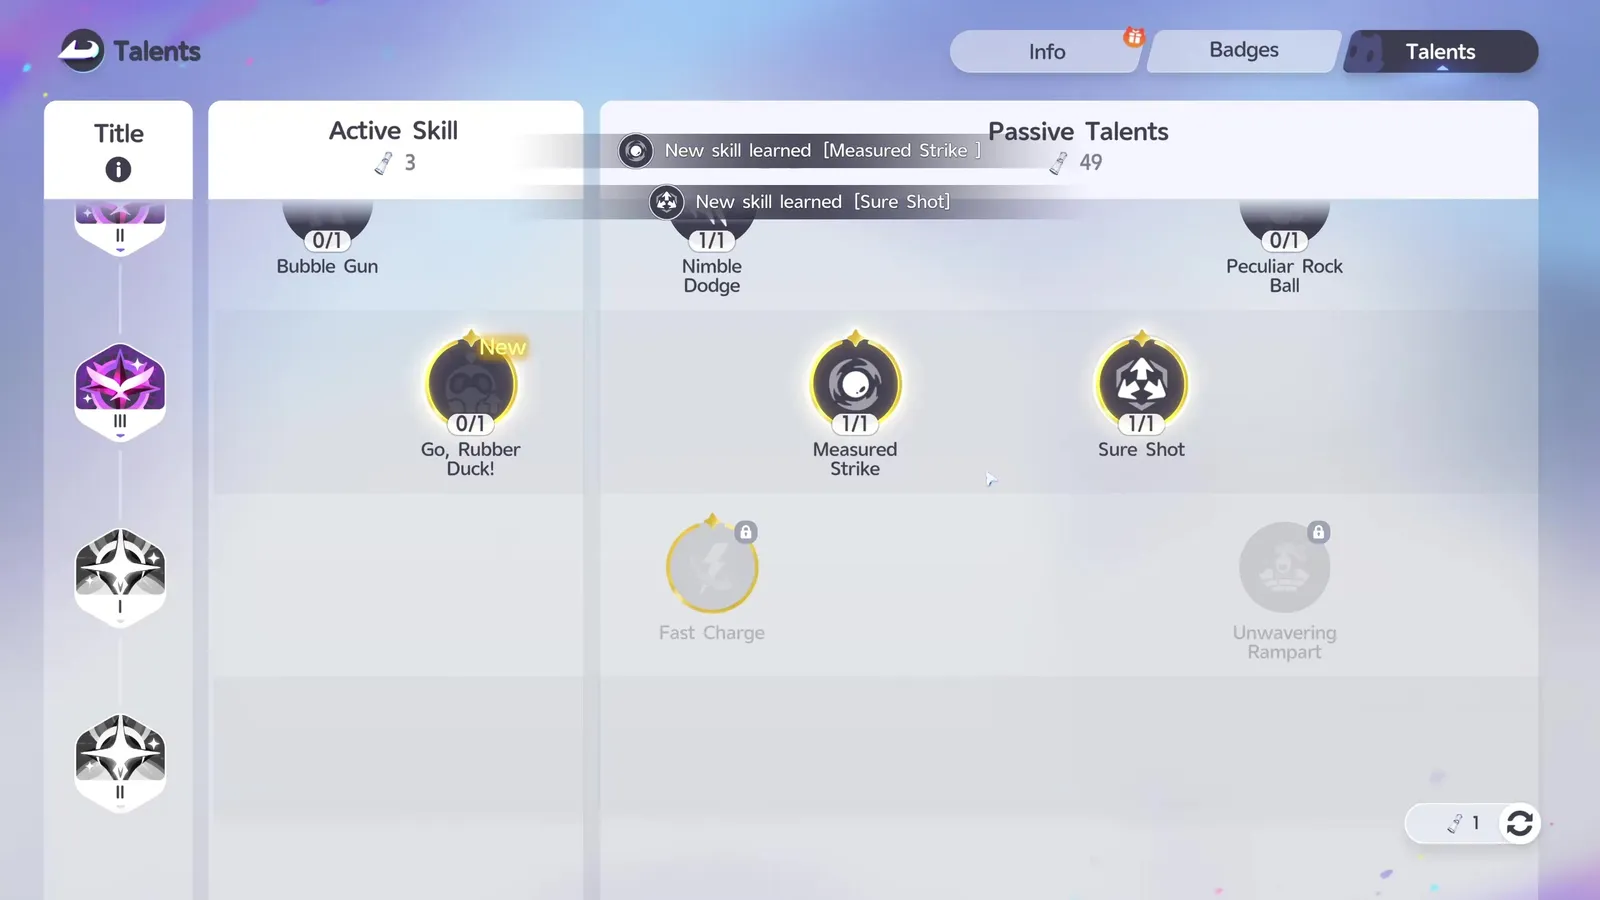
Every table above comes from the game’s own data files, build 1.0.0.7, read on 21 September 2026. Specifically: the player skill table for each node, its levels, its Report Card price and its English text; the skill tree table for the grid coordinates and maximum levels; the title table for the promotion ladder, the rank names and the cards each promotion pays; the custom trigger table for the “N Report Cards used” conditions; the item table for the Report Card and its four listed sources; the ability table for cooldowns and power values; and the regional research table for the Aniilog track. The screens are frames from Lex’s levelling video, filmed in the live game, and our write-up of that route is here.
What we could not verify. The client never says what “Elemental Counters effect” and “Element Resistance effect” are a percentage of, so the real damage value of Elemental Boost and Elemental Ward is unknown and we have not guessed at it. Gravity Pull’s ability row does not line up cleanly with the rest, so we quote no cooldown for it. And the 158 Report Cards counted across the build’s reward entries is a count of what the tables hold, not a promise that every entry is reachable today. Find one of these wrong in your own client and tell us through the contact page: corrections get dated on the page.
Sources
- The game’s own data files: the player skill and skill tree tables, the title ladder, the Report Card item row and its listed sources, the ability cooldowns and the Aniilog research track, build 1.0.0.7
- The FASTEST Way to Reach Level 50+ in Aniimo! (video)
- Lex on YouTube
- Aniimo levelling route: Elite Training, promotions and the level cap
- Aniipod prices, shop unlocks and catch rates
- Aniimo element multiplier chart